0806_GB_42 Instructions for installation, use e maintenance GAS PASTA COOKER ADN 640 04/2008
CHARACTERISTICS Supplied by: Date: Customer Service: FAX e-mail 0806_GB_42 - GAS PASTA COOKER 04/2008 2 · 12
INDEX 1 Diagram 4 2 Characteristics of the appliances 5 3 Technical data 5 4 Installation instructions 4.1 Safety rules 4.2 Structure, framework and safety devices of the appliances 4.3 Assembly 4.3.1 Installation premises 4.3.2 Statutory regulations and technical requirements 4.3.3 Installation 4.3.4 Gas connection 4.3.5 Water connection 4.3.6 Smoke extraction 6 6 6 6 6 6 6 6 6 6 5 Operation preparation 5.1 Preparation and Start-up 5.1.1 Start-up 5.1.2 Check of power 5.1.
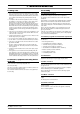
1 - DIAGRAM ADN 640 700 60 400 Water drainpipe 1"GC female 678 0 Water drainpipe 1"GC female Gas 1/2" 87 45 310 Water load pipe Ø12 545 45 150 305 305 408 117 128 55 700 Data plate Water load pipe Ø12 132 143 Gas 1/2" 32 45 Data plate 400 0806_GB_42 - GAS PASTA COOKER 04/2008 4 · 12
2 - CHARACTERISTICS OF THE APPLIANCES These appliances are used for professional purposes. Installation, repair and use must be carried out by expert personnel. These instructions for installation are for our gas pasta cooker set up for the category in the table 1 on pag. 5. The data plate is located on the appliance, see diagram. Beware of inexpert handling.
4 - INSTALLATION INSTRUCTIONS 4.1 Safety rules 4.3 Assembly • Only a local gas utility technician is authorized to carry out gas installations and connections. The statutory regulations (applied in Germany VDE, Austria ÖVE, Switzerland SEV, etc.) and connection conditions performed by the gas utility must be strictly observed.
5 - SET-UP FOR OPERATION 5.1 Preparation and Start-up Before starting up the appliance, remove the protective wrapping. Then carefully clean the working surface and the external parts with lukewarm water and detergent, using a damp rag to remove all traces of anti-rust material applied in the factory, then dry with a clean cloth. 5.1.1 Start-up Before using the appliance for the first time, thoroughly clean out the tank (see the chapter 6.3 “Cleaning and taking care of the machine”).
5 - SET-UP FOR OPERATION Fig. 2 32 30 31 28 33 A 39 29 5.1.5 Power check for operation with liquid gas 5.1.8 Checking the primary air Check if the type of injectors used meet the data of the table 1. Check that the pressure reducer installed in the system has an outlet pressure which is compliant with paragraph 5.1.2 "Check of power" (can be checked on the data plate of the appliance or on the table 1). The burner is equipped with primary air adjustment. Distance “A” (fig. 2) see table 1.
5 - SET-UP FOR OPERATION After the replacement check the seal using a leack detector spray. After any maintenance or repair work, replace the control panel and the lower panel. After replacing gas input components, check operation again and test for leakage. 5.1.13 Setting reduced capacity power The minimum setting screw (pos. 2 fig.
6 - INSTRUCTIONS FOR USE 6.1 Safety, cleaning and repair rules 6.2.2 Lighting the main burner and temperature adjustment • This appliance is used for the preparation of meals at industrial level. Usage and cleaning can be carried only by expert personnel. Maintenance and repair can be carried out only by skilled technical personnel. • These indications must be communicated to all those concerned during internal training.
6 - INSTRUCTIONS FOR USE 6.6 Recommendations for the treatment of stainless “steel industrial” kitchens formed rust spots can be removed with slightly abrasive liquid soaps or fine-grained sand paper. Larger rust spots can be removed with 2-3% of hot oxalic acid solution. If these cleaning products do not do the job, a nitric acid (10%) treatment is required. Attention! These treatments can be carried out only by expert personnel according to current regulations! 6.6.
WARNING THE MANUFACTURER CANNOT BE HELD RESPONSIBLE FOR ANY INACCURACIES IN THIS BOOKLET DUE TO COPYING OR PRINTING ERRORS. DUE TO ITS POLICY OF CONTINUAL PRODUCT IMPROVEMENT, THE MANUFACTURER RESERVES THE RIGHT TO MAKE ANY CHANGES DEEMED NECESSARY. THE MANUFACTURER CANNOT BE HELD RESPONSIBLE IF THE INSTRUCTIONS CONTAINED IN THIS MANUAL ARE NOT OBSERVED. WHIRLPOOL EUROPE srl V.