HOW TO MAKE A HOME !tl&- UseAndCare A Note to You . . . . . . . . . . . . . . . . 2 Important Safety hktructions .... I.. ............ 3 zK;d.. ...................... .5 Using Your Oven . .. . . . . .. . 7 Using the Self-Cleaning Cycle . . .. . . . . . . . . .. . . . . . . . . . . . . . . 28 Caring for Your Oven . . . .. . . . . . . . . . . . . . . 32 If You Need Assistance or Service . .. . . . . . .. . .. . . . . . . . . . . . . 37 . \ Warranty Li . . .. . . . . . . . . . . . . . .. . . .
A Note to You Thank you for buying a Whirlpool@ appliance. Because your life is getting busier and more complicated, Whirlpool ovens are easy to use, save time, and help you manage your home better. To ensure that you enjoy years of trouble-free operation, we developed this Use and Care Guide. It is full of valuable information about how to operate and maintain your appliance properly and safely. Please read it carefully.
Important Safety Instructions To reduce the risk of fire, electrical shock, injury to persons, or damage when using the oven, follow basic precautions, including the following: General @Read all instructions before using the oven. @Install or locate the oven only in accordance with the provided Installation Instructions. The oven must be installed by a qualified installer. The oven must be properly connected to electrical supply and grounded.
*Do not heat unopened containers. They could explode. The hot contents could cause burns and container particles could cause injury. @Do not store flammable materials on or near the oven. The fumes could create an explosion and/or fire hazard. When using off in the Self-Cleanino cycle from fiberglass insulation aid food decomposition. Significant exposure to these substances could cause cancer or reproductive harm.
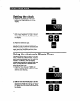
Parts and Features This section contains captioned illustrations of your appliance. Use them to become familiar with the location and appearance of all parts and features. Models RB770PXB, RB270PXB, (single oven models RB760PXB, and RBI 70PXB RB260PXB, and RBlGOPXB not shown) and top of oven door.
Double oven control Upper oven electronic oven control Lower oven temperature control Lower oven selector I Oven on indicator light Single panel oven control Manual oven I Manual oven light switch panel Electronic oven
Using Your Oven In This Section Page Page Positioning racks and pans . .. . ... .. . .. ... 7 For best air circulation Using aluminum The electronic Setting . .. . .. .. .. . ... .. . .. ... . 8 foil for baking oven control ... . .. .. . 8 .. .. . .. .. . ... .. 8 the clock . .. . .. .. .. . .. .. . .. ... . .. .. .. .. . 10 Using the electronic Minute Timer . .. . .. .. .. . .. .. . ...P.................. 10 Using the Off/Cancel pad .. .. . .. ... . .. .. ..
For best air circulation The hot air must circulate around the pans in the oven for even heat to reach all parts of the oven. This results in better baking. l Place the pans so that one is not directly over the other. l For best results, allow 1% to 2 inches (4-5 cm) of space around each pan and between pans and oven walls. There must be a minimum space of 1 inch (2.5 cm). l Use only one cookie sheet in the oven at one time.
The electronic (single/upper oven control oven) Electronic display Temperature Oveti selector pads pads Electronic MEALTIMEFP control pads Display/clock l l l l l l When you first plug in the oven, a time of day and “PF” will show on the temperature display. If after you set the clock (page 10) the display again shows “PF”, your electricity was off for a while. Reset the clock. When you are not using the oven, the control is an accurate clock.
Setting the clock 1. Push the Clock/Set pad. The colon flashes and TIME will light up on the display. 2. Use the Hour and Minute pads to set the time of day. Push the “up” (A) or “down” (V) pad(s) until the correct time shows on the display. 3. Push the Start/Enter pad. NOTE: If you do not want the clock time displayed, push and hold the Clock/Set pad for 4 seconds. To display the clock time again, push the Clock/Set pad once, then reset the clock time if necessary.
3. Push the Start/Enter pad. The Minute Timer will begin counting down immediately after the timer is started. When time is up, “End” will show in the large display and you will hear four 2-second tones. You will also hear four 1-second reminder tones every minute until you push one of the two Timer pads. NOTE: To disable the reminder tones, push and hold the Timer Set pad for 4 seconds. To reactivate the tones, follow the same procedure. To cancel l the Minute Timer: Push the Timer Off pad.
Baking/roasting in the single/upper 1. Position the rack(s) properly before turning on the oven. To change rack position, lift rack at front and pull out. For further information, see “Positioning racks and pans” on paw 7. 2. Push the Bake pad. “350”” will show on the small display to indicate the preset temperature and BAKE will light up. 3. To cook at a different temperature, use the Temp pad(s). Push A to raise the temperature or V to lower the temperature in 5°F increments.
Baking/roasting (for double in the lower oven ovens) 1. Position the rack(s) properly before turning on the oven. To change rack position, lift rack at front and pull out. For further information, see “Positioning racks and pans” on page 7. 2. Set the Oven Selector to BAKE. 3. Set the Oven Temperature Control Knob to the baking/roasting temperature you want. The OVEN ON Indicator Light will come on. NOTE: Do not preheat oven when roasting or cooking items such as casseroles. 4. Put food in the oven.
Adjusting the oven temperature control Although your new oven is properly adjusted to provide accurate temperatures, it may cook faster or slower than your old oven. If, after using the oven for a period of time, you are not satisfied with the baking/roasting results, you can change the temperature calibration by following these steps: Single/upper oven: 1. Push the Bake pad and hold for 4 seconds.
Broiling in the single/upper oven NOTE: Preheating is not necessary when broiling. 1. Position the rack before turning the oven on. See “Broiling rack position chart” on page 17. 2. Put the broiler pan and food on the rack. 3. Close the door to the Broil Stop position (open about 4 inches [ 10 cm]). The door will stay open by itself. 4. Push the Broil pad. The small display will show “500”” and BROIL will light up. 5. Push the Start/Enter pad. HEAT, BROIL, and “500”” show on the display.
- Broiling in the lower (for double oven ovens) 1. Position the rack properly before turning 2. 3. 4. 5. on the oven. Position the oven rack so that the surface of the food is at least 3 inches (7 cm) away from the broil element. See “Broiling rack position chart” on page 17. Put the broiler pan and food on the rack. Close the door to the Broil Stop position (open about 4 inches [lo cm]). The door will stay open by itself. Set the Oven Selector and Oven Temperature Control Knob to BROIL.
Broiling rack position RACK POSITION FROM BOTTOM chart TYPE OF FOOD/ DONENESS Hamburger patties and thin steaks, X” thick or less. Quickly searing food, rare and medium steaks, medium patties, ham slices, fish steaks, frankfurters. 2 Well-done steaks and patties, lamb chops, split chicken, pork steaks and chops, whole fish. 1 Not used for broiling. Broiling l l @ Q0 0 tips Use the broiler pan and grid for broiling.
Using the electronic (single/upper oven) The electronic MEALTIMER control will turn the oven on and off at times you set, even when you are not around. Delayed time baking/roasting is ideal for foods which do not require a preheated oven, such as meats and casseroles. Do not use delayed time cooking for cakes, cookies, etc. - undercooking will result.
4. Use the Hour and Minute pads to set the desired cooking time. Push the “up” (A) or “down” (V) pad(s) until the correct time shows on the display. This example shows a desired baking/ roasting time of 30 minutes. 5. Push the Start/Enter pad. “Lo”“, HEAT, BAKE, TIMED, and the set cook time will show on the display to indicate that the oven is heating. NOTE: The display will show “door” and a tone will sound once a minute for 5 minutes if the door is latched when you try to bake/roast.
2. Push the Bake pad to enter the Bake mode. Use the Temp pad(s) to set the desired temperature. Push A to raise the temperature or V to lower the temperature in 5°F increments. Use these pads until the desired temperature shows on the small display. After you have set the desired temperature, the display will show the set temperature and the time of day. BAKE will light up. 3. Push the Stop Time pad. The time of day with the colon flashing and STOP TIME will show on the display. 4.
To delay start automatically and stop Method 1 - Using and Start Time: Cook Time 1. Position the oven rack(s) properly and put food in the oven. 2. Push the Bake pad to enter the Bake mode. Use the Temp pad(s) to set the desired temperature. Push A to raise the temperature or V to lower the temperature in 5°F increments. Use these pads until the desired temperature shows on the small display. After you have set the desired temperature, the display will show the set temperature and the time of day.
6. Use the Hour and Minute pads to set the desired start time. Push the “up” (A) or “down” (V) pad(s) until the correct time shows on the display. This example shows a desired start time of 2 o’clock. The oven will automatically shut off at 2:30 (the set start time plus the set cook time). 7. Push the Start/Enter pad. DELAY and BAKE will light up on the display to indicate that the oven is programmed to start at a later time.
Method 2 - Using and Stop Time: Start Time 1. Position the oven rack(s) properly and put food in the oven. 2. Push the Bake pad to enter the Bake mode. Use the Temp pad(s) to set the desired temperature. Push A to raise the temperature or V to lower the temperature in 5°F increments. Use these pads until the desired temperature shows on the small display. After you have set the desired temperature, the display will show the set temperature and the time of day. BAKE will light up. 3.
6. Use the Hour and Minute pads to set the desired stop time. Push the “up” (A) or “down” (V) pad(s) until the correct time shows on the display. This example shows a desired stop time of 2:30. This provides a cook time of 30 minutes (the difference between the start and stop times). NOTE: If you do not set a stop time, the colon will flash on the display and STOP and COOK will flash alternately to remind you to program a stop time or a cook time.
Method 3 - Using and Stop Time: Cook Time 1. Position the oven rack(s) properly and put food in the oven. 2. Push the Bake pad to enter the Bake mode. Use the Temp pad(s) to set the desired temperature. Push A to raise the temperature or V to lower the temperature in 5°F increments. Use these pads until the desired temperature shows on the small display. After you have set the desired temperature, the display will show the set temperature and the time of day. BAKE will light up. 3.
This example shows a desired stop time of 230. The oven will automatically start cooking at 2: 00 (the set stop time minus the set cook time). 7. Push the Start/Enter pad. DELAY and BAKE will light up on the display to indicate that the oven is programmed to start at a later time. NOTE: The display will show “door” and a tone will sound once a minute for 5 minutes if the door is latched when you try to bake/roast.
To cancel the MEALTIMER” l control setting: Push the Off/Cancel pad to return the display to the time of day. To avoid sickness and food waste when using the MEALTIMERW control: l Do not let most UNFROZEN food stand for more than two hours before cooking starts. l Do not allow food to remain in oven for more than two hours after the end of cooking cycle. Failure to follow the above could result in sickness. NOTE: Do not use foods that will spoil while waiting for cooking to start.
Using the Self-Cleaning Cycle (single/upper In This oven) Section Page . .. . .. .. .. . .. .. . . .. .. . .. .. . 29 Page How the cycle works . .. . .. .. .. . ... .. . .. ... . . 28 Setting the controls Before you start . .. . . ... .. . .. .. . .. .. .. .. .. .. .. .. 28 Special tips ... . .. .. .. . .. .. . .. .. .. . .. .. . .. .. . . .. .. . . 31 The Self-Cleaning cycle saves you from the toil and mess that often come with handcleaning the oven interior.
l l l l Remove the broiler pan grid and any pots and pans being stored in the oven. NOTE: You can clean the broiler pan (without grid) in the oven if you have first removed most of the soil by hand-cleaning or in a dishwasher. If most of the soil is not removed, too much smoking will occur. The chrome broiler pan grid will discolor if cleaned in the Self-Cleaning cycle. Wipe out any loose soil or grease. This will help reduce smoke during the Self-Cleaning cycle.
If a cleaning cycle other than 3 hours is desired, use the Hour and Minute pads to set the desired cleaning time. Push the “up” (A) or Vown” (V) pad(s) until a time between 2-4 hours shows on the display. l Use 2 hours for light soil. l Use 34 hours for moderate to heavy soil. Push the Start/Enter pad. TIMED and HEAT will light up on the display to indicate that the oven is programmed for the Self-Cleaning cycle.
6. After the Self-Cleaning cycle is started, LOCKED lights up on the display when the oven temperature goes above normal baking/roasting temperatures. The Lock Lever must not be moved and the door cannot be opened when LOCKED is on. 7. After the Self-Cleaning cycle is completed, the time of day will show on the display. 8. When the oven reaches normal baking/ roasting temperatures, LOCKED goes off and “End” and CLEAN TIME come on. Move the Lock Lever back to the left. DO NOT FORCE IT.
Caring for Your Oven In This Section Cleaning Page chart .. .. . .. .. . .. .. .. . .. .. . ... .. . ... .. . 33 Removable oven door .. .. . .. ... . .. .. .. .. .. 35 Your oven is designed for easy care. Most cleaning can be done with items found around your home. Cleaning your oven whenever spills or soiling occur will help to keep it looking and operating like new. 32 Page The oven lights .. .. . .. .. .. .. . .. . .. .. . .. .. .. . . .
Cleaning chart Use the following table to help you clean all parts of your oven. PART Control knobs (some models) HOW TO CLEAN WHAT TO USE Sponge and warm, soapy water Turn knobs to OFF and pull straight away from control panel. Wash, rinse, and dry thoroughly. Do not soak. Do not use steel wool or abrasive cleansers. They may damage the finish of the knobs. Replace knobs. Make sure all knobs point to OFF.
WHAT TO USE PART Oven door glass Paper towel and spray glass cleaner HOW TO CLEAN l l OR Warm, soapy water and a nonabrasive, plastic scrubbing pad Oven cavity (single/upper oven) Self-Cleaning Oven cavity (lower oven) Sponge and warm, soapy water Soapy steel-wool pad for heavily soiled areas cycle l l l l l OR Commercial oven cleaner for heavily soiled areas l l l l l l l Heavy-duty aluminum foil or shallow pan used while cooking 34 Make sure oven is cool.
Removable (lower oven door oven) NOTE: Do not remove the single/upper oven door (Self-Cleaning oven). The lower oven door (Standard-Cleaning oven) can be removed for easier cleaning. See ‘Cleaning chart” on page 34. Personal Injury Hazard *Oven door is heavy. Use both hands to remove the oven door. l Grasp only the sides of the oven door. Do not use the handle for lifting. Failure to properly grasp the oven door could result in personal injury or product damage.
The oven lights In some double ovens, the oven lights both ovens come on when either oven is opened. To turn the light(s) on when oven door(s) is closed, press the Oven Switch on the control panel. Press the switch again to turn off the light(s). in door the Light Electrical Shock Hazard l Make sure oven and light bulb are cool and power to the oven has been turned OFF before replacing the light bulb. l The bulb cover must be in place when using the oven.
If You Need Assistance or Service This section is designed to help you save the cost of a service call. Part 1 of this section outlines possible problems, their causes, and actions you can take to solve each problem. Parts 2 and 3 tell you what to do if you still need assistance or service. When calling our Consumer Assistance Center for help or calling for service, please provide a detailed description of the problem, your appliance’s complete model and serial numbers, and the purchase date. (See page 2.
PROBLEM POSSIBLE Cooking results are not what you expected The oven is not level. The display shows “PF” “F, I, or “F3” shows on the display 38 CAUSE The oven temperature too low or too high. SOLUTION Level oven. (See Installation tions.) seems Instruc- Adjust the oven temperature control. (See “Adjusting the oven temperature control” on page 14.) The oven was not preheated before baking. Preheat oven when called for in recipe. The recipe has never been tested or is not from a reliable source.
2. If you need assistance ... Call Whirlpool Consumer Assistance Center telephone number. Dial toll-free from anywhere in the U.S.A.: l-800-253-1 301 and talk with one of our trained consultants. The consultant can instruct you in how to obtain satisfactory operation from your appliance or, if service is necessary, recommend a qualified service company in your area. If you prefer, write to: Mr.
WHIRLPOOL@ Electric Built-in Oven Warranty 1 LENGTH OF WARRANTY 1 WHIRLPOOL WILL PAY FOR FULL ONE-YEAR WARRANTY From Date of Purchase I FSPQ replacement parts and repair labor to correct defects in materials or workmanship. Service must be provided by an authorized Whirlpool service companv. . - 1 WHIRLPOOL WILL NOT PAY FOR A. Service calls to: B. C. D. E. 1. Correct the installation of your buitt-in oven. 2. Instruct you how to use your buift-in oven. 3. Replace house fuses or correct house wiring.