
Dishwasher User Manual


9
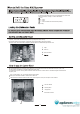
Connect the cold water supply hose to a threaded 3/4(inch) connector and make sure that it is
fastened tightly in place.
If the water
p
i
p
es are new or have not been used for an extended
p
eriod of time, let the water
run to make sure that the water is clear and free of impurities. If this precaution is not taken,
there is a risk that the water inlet can get blocked and damage the appliance.
The water su
pp
l
y
to the a
pp
liance can also be connected to the house hot water line
(
centralized s
y
stem, heatin
g
s
y
stem
)
,as lon
g
as it does not exceed a tem
p
erature of 60 C.
In this case, the wash cycle time will be shortened by about 15 minutes and the wash
efficiency slightly reduced.
The connection must be made to the hot water line following the same procedures as those
for the connection to the cold water line.
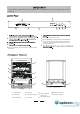
DIMENSIONS(mm)
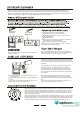
Position the appliance in the desired location. The back should rest against the wall behind it, and the sides, along the adjacent
cabinets or wall. The dishwasher is equipped with water supply and drain hoses that can be positioned to the right or the left to
facilitate proper installation.
If the sink is 1000 hi
g
her from the floor, the excess water in hoses cannot
be drained directly into the sink. It will be necessary to drain excess
water from hoses into a bowl or suitable container that is held outside and lower
than the sink.
Insert the drain hose into a drain
p
i
p
e with a minimum diameter of 40 mm, or let it run into the sink, makin
g
sure to avoid bendin
g
or crimping it. Use the special plastic support that comes with the appliance. The free end of the hose must be at a height
between 400 and 1000mm and must not be immersed in water.
Max 1000mm
Min 400mm