
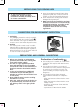
Instruction for Use


N C
M Y
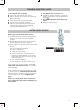
INSTALLATION
Connection to gas supply
The gas supply system must comply with
current local regulations (see chapter “National
Safety Regulations”).
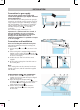
The connection of the cooking hob to the gas pipe
networkorgascylindermustbemadebymeansof
a rigid copper or steel pipe with fittings complying
with local standards, or by means of a continuous-
surface stainless steel hose complying with local
standards. Interpose gasket
in the e lbow
connection.
Themaximumlengthofthehoseis2m.
Important: if a stainless steel hose is used, it
must be installed so as not to touch any
movable part of the furniture. It must pass
through an area where there are no
obstructions and where it is possible to inspect
it on all its length.
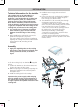
Connection and installation
Oven and cooking hob with universal joints
Afterhavinginstalledandfixedthecookinghob,
install the oven.
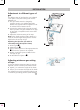
1.
Connect tongues to end ,asshowninthe
figure.
2.
If the cooking hob is equipped with an electric
hotplate, connect 3-plug assembly
to the first
3 bores of the 5-pole terminal board on block
,
asshowninthefigure.
3.
Position the oven and fix it with the screws
supplied.
4.
Fit the knobs, pressing them into their seats on
the control panel.
Note
If the cooking hob must be connected to the Box
instead of t he oven, read the instructions supplied
with the Box.
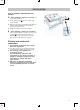
OVEN/COOKTOP DIRECT GAS CONNECTION
1.
Slacken off the screws and position the
cooktop in such a way that the taps are aligned
with the oven knobs.
2.
Adjust the height of the taps bracket
according to the position (2, 3, 4, 5) indicated on
the brackets
. Once adjusted to the correct
height, tighten the screws
.
3.
Use the screws provided to secure the
cooktop taps bracket
to the oven panel.
Fit the knobs.
18