31002018GB.fm Page 11 Tuesday, December 2, 2008 10:29 PM INSTRUCTIONS FOR USE SAFEGUARDING THE ENVIRONMENT IMPORTANT NOTES BEFORE USING THE OVEN OVEN ACCESSORIES CARE AND MAINTENANCE TROUBLESHOOTING GUIDE AFTER SALES SERVICE To make the most of your new oven, read the user’s instructions carefully and keep them on hand for consultation in the future.
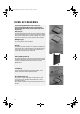
31002018GB.fm Page 12 Tuesday, December 2, 2008 10:29 PM SAFEGUARDING THE ENVIRONMENT Disposal of packaging materials • The packaging material is 100% recyclable and is marked with the recycle symbol . • Packing materials should therefore not be thrown away with household rubbish but disposed of as directed by local authorities. Disposal of old appliances • This appliance is marked according to the European directive 2002/96/EC on Waste Electrical and Electronic Equipment (WEEE).
1002018GB.fm Page 13 Tuesday, December 2, 2008 10:29 PM • Fruit juice drippings from the baking tray may leave permanent stains. We recommend the oven be cleaned before reusing it. • Never drag pots and pans across the bottom of the oven to prevent the coating from being scratched. • Residual condensation after cooking could damage the oven and surrounding kitchen units in time.
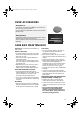
31002018GB.fm Page 14 Tuesday, December 2, 2008 10:29 PM OVEN ACCESSORIES Accessories supplied depend on the model. The accessories provided with the oven are listed in the Product Description Sheet provided separately (under Accessories). Drip tray (1) 1 The drip tray is designed to collect fat and food particles when it is positioned under the grid or as a plate, such as when cooking meat, chicken and fish with or without vegetables.
31002018GB.fm Page 15 Tuesday, December 2, 2008 10:29 PM OVEN ACCESSORIES Grease filter (7) To be used for cooking fatty food only. Hook it onto the rear wall of the cavity in front of the fan. It can be washed in the dishwasher and must not be used with the Fan function. 7 Sliding shelves(8) They facilitate manual access during cooking and allow the grids and drip trays to be pulled forward part way. They are suitable for all accessories and can be washed in the dishwasher.
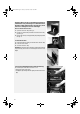
31002018GB.fm Page 16 Tuesday, December 2, 2008 10:29 PM Attention: When carrying out the following operations it is advisable to wear protective gloves. These instructions should be carefully followed both to prevent injury and in order not to damage the oven door and hinges. How to remove the oven door: 1. Open the oven door fully (see fig. 1). 2. Lift the two catches and push them forwards as far as they go (see fig. 2). 3. Remove the door by closing it partially and pulling it upwards (see fig. 3).
31002018GB.fm Page 17 Tuesday, December 2, 2008 10:29 PM Changing the rear oven lamp bulb (if provided): 1. Disconnect the oven from the electrical supply. 2. Let the oven cool before turning the lamp cover left to unscrew it (see fig. 1). 3. Change the bulb (see note). 4. Screw the lamp cover back on. 5. Reconnect the oven to the electrical supply. Note: use only 25 W/230 V, E-14 type, T300°C bulbs available from After Sales Service.
31002018GB.fm Page 18 Tuesday, December 2, 2008 10:29 PM TROUBLESHOOTING GUIDE Oven not working: • Check for the presence of mains electrical power and if the oven is connected to the electrical supply. • Turn off the oven and restart it to see if the fault persists. IMPORTANT: • Check that the oven control knob is not turned to “0” or to the “lamp” symbol .