
Instruction for Use


EN7
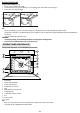
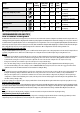
CONTROL PANEL DESCRIPTION
Your product can appear slightly different from the drawing.
1. Function selector knob
2. Analog clock
3. Thermostat knob
HOW TO OPERATE THE OVEN
SWITCHING ON THE OVEN
Turn the selector knob to the required function. The oven light switches on.
Turn the thermostat knob clockwise to the required temperature. The red thermostat indicator light switches on; when the required
cooking temperature is reached it will turn off. At the end of cooking, turn the knobs to “0”.
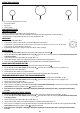
ANALOG CLOCK
This electromechanical programmer allows:
1. Viewing the time of the day. To adjust the time, press the button (B) and turn it anti-clockwise.
2. Programming the cooking start time max. 12 hours in advance (e.g. if you wish the cooking process to start at 7.00 a.m. do NOT set it at
8.00 p.m. because the oven would switch on at 8.00 a.m.).
3. Programming the duration of the cooking process from min. 5 minutes to max. 180 minutes.
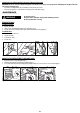
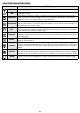
MANUAL COOKING
1. Turn the button (B) anti-clockwise (without pressing), until the symbol is displayed in the window .
2. Press the button (A) and turn it anti-clockwise until the triangle (D) points to the time shown on the clock (hour hand). The button clicks when turned
to the proper position.
3. Turn the selector knob to the required symbol. The oven light switches on.
4. Turn the thermostat knob clockwise to the required temperature. The red thermostat indicator light switches on.
5. At the end of cooking, turn the knobs to OFF (0- •) because in manual mode the oven will NOT switch off automatically.
MANUAL COOKING WITH COOKING START TIME
1. Turn the button (B) anti-clockwise (without pressing), until the symbol is displayed in the window .
2. Press the button (A) and turn it anti-clockwise until the triangle (D) points to the time at which cooking is to start (e.g. in figure: 11.30).
3. Turn the selector knob to the required symbol.
4. Turn the thermostat knob clockwise to the required temperature.
5. At the end of cooking, turn the knobs to OFF (0- •) because in manual mode the oven will NOT switch off automatically.
PROGRAMMED COOKING WITH COOKING START TIME AND COOKING DURATION
1. Turn the button (B) anti-clockwise (without pressing) until the required cooking duration is displayed in the window (C) (5 - 180 min.).
2. Press the button (A) and turn it anti-clockwise until the triangle (D) points to the time at which cooking is to start (e.g. in figure: 11.30).
3. Turn the selector knob to the required symbol.
4. Turn the thermostat knob clockwise to the required temperature.
5. At the end of the set cooking time an acoustic signal will sound and the oven will switch off automatically. To exclude the acoustic signal, turn the button (B)
anti-clockwise (without pressing) until the symbol is displayed in the window.
6. At the end of the set cooking time, cooking may be prolonged by following the instructions given above, or by using the manual cooking
procedure.
PROGRAMMED COOKING WITH COOKING DURATION
1. Turn the button (B) anti-clockwise (without pressing) until the required cooking duration is displayed in the window (C) (5 - 180 min.).
2. Press the button (A) and turn it anti-clockwise until the triangle (D) points to the time shown on the clock (hour hand). The button clicks when turned
to the proper position.
3. Turn the selector knob to the required symbol. The oven light switches on.
4. Turn the thermostat knob clockwise to the required temperature. The red thermostat indicator light switches on.
5. At the end of the set cooking time an acoustic signal will sound and the oven will switch off automatically. To exclude the acoustic signal, turn the button (B)
anti-clockwise (without pressing) until the symbol is displayed in the window.
6. At the end of the set cooking time, cooking may be prolonged by following the instructions given above, or by using the manual cooking
procedure.
23