(Apply the label from warranty here) EN User and maintenance manual Benutzer- und Wartungshandbuch Manuel d’utilisation et d’entretien Handleiding voor gebruik en onderhoud EL Εγχείριδιο χρήσης και συντήρησης
IMPORTANT SAFETY INSTRUCTIONS YOUR SAFETY AND THAT OF OTHERS IS VERY IMPORTANT This manual and the appliance itself provide important safety warnings, to be read and observed at all times. This is the danger symbol, pertaining to safety, which alerts users to potential risks to themselves and others. All safety warnings are preceded by the danger symbol and the following terms: DANGER Indicates a hazardous situation which, if not avoided, will cause serious injury.
INSTALLATION After unpacking the oven, be sure that it has not been damaged during transport and that the oven door closes properly. In the event of problems, contact the dealer or your nearest After-sales Service. To avoid any damage, only remove the oven from its polystyrene foam base at the time of installation. PREPARING THE HOUSING UNIT • • • • Kitchen units in contact with the oven must be heat resistant (min 90°C).
TROUBLESHOOTING GUIDE The oven does not work: • • Check for the presence of mains electrical power and if the oven is connected to the electrical supply. Turn off the oven and restart it to see if the fault persists. The door will not open: • • Turn off the oven and restart it to see if the fault persists. Important: during self-cleaning, the oven door will not open. Wait until it unlocks automatically (see paragraph “Cleaning cycle of ovens with pyrolysis function”).
MAINTENANCE - WARNING Use protective gloves. Ensure the oven is cold before carrying out the following operations. Disconnect power before servicing. REMOVING THE DOOR To remove the door: 1. Open the door fully. 2. Lift the catches and push them forwards as far as they will go (Fig. 1). 3. Close the door as far as it will go (A), lift it up (B) and turn it (C) until it is released (D) (Fig. 2). To refit the door: 1. 2. 3. 4. Insert the hinges in their seats. Open the door fully. Lower the two catches.
REPLACING THE OVEN LAMP To replace the rear lamp (if present): 1. Disconnect the oven from the power supply. 2. Unscrew the lamp cover (Fig. 6), replace the lamp (see note for lamp type) and screw the lamp cover back on (Fig. 7). 3. Reconnect the oven to the power supply. Fig. 6 Fig. 7 N.B.: - Only use 25-40W/230V type E-14, T300°C incandescent lamps or 20-40W/230 V type G9 T300°C halogen lamps (depending on model). - Lamps are available from our After-sales Service.
COMPATIBLE ACCESSORIES (for the accessories supplied with oven refer to the tech fiche) Fig. 1 Fig. 2 Fig. 3 Fig. 4 Fig. 7 Fig. 8 6a 6b Fig. 5 Fig. 6 Fig. 9 Drip-tray (Fig. 1) For collecting fat and bits of food when placed under the wire shelf, or as a plate for cooking meat, chicken and fish, etc., with or without vegetables. Pour a little water into the drip-tray to avoid spatters of fat and smoke. Baking tray (Fig. 2) For baking biscuits, cakes and pizzas. Wire shelf (Fig.
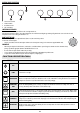
CONTROL PANEL DESCRIPTION 1. 2. 3. 4. Function selector knob Thermostat knob Red thermostat led Hob control knobs SWITCHING ON THE OVEN Turn the selector knob to the required function. The oven light switches on. Turn the thermostat knob clockwise to the required temperature. The red thermostat led lights up, switching off again when the oven reaches the selected temperature. At the end of cooking, turn the knobs to “0”.
COOKING TABLE Recipe Function Preheating Shelf Temperature (from bottom) (°C) Time (min) Accessories Leavened cakes Yes 2 160-180 35-55 Wire shelf + cake tin Biscuits/Tartlets Yes 3 170-180 15-40 Baking tray Choux buns Yes 3 180 30-40 Baking tray Vols-au-vent / Puff pastry crackers Yes 3 180-200 20-30 Baking tray Meringues Yes 3 90 Lamb / Veal / Beef / Pork Yes 2 190-200 90-110 Drip tray or wire shelf + pyrex dish Chicken / Rabbit / Duck Yes 2 190-200 65-85 Drip t
Recipe Function Preheating Shelf Temperature (from bottom) (°C) Time (min) Accessories Biscuits/Tartlets - 1 /3 170-180 20-40 Baking tray+drip tray, switch levels halfway through cooking Choux pastry - 1/ 3 180 35-45 Baking tray+drip tray, switch levels halfway through cooking Vols-au-vent / Puff pastry crackers - 1/ 3 180-200 20-40 Baking tray+drip tray, switch levels halfway through cooking Roast chicken - 2 200 55-65 Grill + drip tray with water on 1st level Roast potatoes -
RECOMMENDED USE AND TIPS How to read the cooking table The table indicates the best function to use for any given food, to be cooked on one or more shelves at the same time. Cooking times start from the moment food is placed in the oven, excluding pre-heating (where required). Cooking temperatures and times are purely for guidance and will depend on the amount of food and type of accessory used.
5019 610 01204 GB DE FR NL GR Whirlpool is a registered trademark of Whirlpool, USA 04/2011