(Apply the label from warranty here) EN User and maintenance manual EL Εγχείριδιο χρήσης και συντήρησης Manual del usuario y de mantenimiento IT Manuale d’uso e manutenzione Manual do utilizador e manutenção
IMPORTANT SAFETY INSTRUCTIONS YOUR SAFETY AND THAT OF OTHERS IS VERY IMPORTANT This manual and the appliance itself provide important safety warnings, to be read and observed at all times. This is the danger symbol, pertaining to safety, which alerts users to potential risks to themselves and others. All safety warnings are preceded by the danger symbol and the following terms: DANGER Indicates a hazardous situation which, if not avoided, will cause serious injury.
- This appliance can be used by children from 8 years and above and persons with reduced physical, sensory or mental capabilities or lack of experience and knowledge if they have been given supervision or instruction concerning use of the appliance in a safe way and understand hazards involved. Children shall not play with the appliance. Cleaning and user maintenance shall not be made by children without supervision. - The accessible parts of the appliance may become very hot during use.
- Only use the temperature probe recommended for this oven. - Do not use harsh abrasive cleaners or sharp metal scrapers to clean the oven door glass since they can scratch the surface, which may result in shattering of the glass. - Ensure that the appliance is switched off before replacing the lamp to avoid the possibility of electric shock. - Do not use aluminium foil to cover food in the cooking vessel (only for ovens with cooking vessel supplied).
Energy saving - Only pre-heat the oven if specified in the cooking table or your recipe. Use dark lacquered or enamelled baking moulds as they absorb heat far better. Switch the oven off 10/15 minutes before the set cooking time. Food requiring prolonged cooking will continue to cook even once the oven is switched off. DECLARATION OF CONFORMITY - This oven, which is intended to come into contact with foodstuffs, complies with European Regulation ( ) n.
Accessories: • • Soak the accessories in water with washing up detergent immediately after use, handling them with oven gloves if still hot. Food residues can be easily removed using a brush or sponge. Cleaning the rear wall and catalytic side panels of the oven (if present): IMPORTANT: do not use corrosive or abrasive detergents, coarse brushes, pot scourers or oven sprays which could damage the catalytic surface and ruin its self-cleaning properties.
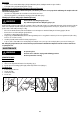
MOVING THE TOP HEATING ELEMENT (SOME MODELS ONLY) 1. Remove the side accessory holder grilles (Fig. 3). 2. Pull the heating element out a little (Fig. 4) and lower it (Fig. 5). 3. To reposition the heating element, lift it up, pulling it slightly towards you, be sure it comes to rest on the lateral supports. Fig. 3 Fig. 4 Fig. 5 REPLACING THE OVEN LAMP To replace the rear lamp (if present): 1. Disconnect the oven from the power supply. 2. Unscrew the lamp cover (Fig.
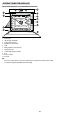
INSTRUCTIONS FOR OVEN USE FOR ELECTRICAL CONNECTION, SEE THE PARAGRAPH ON INSTALLATION 1. Control panel 2. Upper heating element/grill 3. Cooling system (if present) 4. Dataplate (not to be removed) 5. Light 6. Baking ventilation system (if present) 7. Turnspit (if present) 8. Lower heating element (not visible) 9. Door 10. Position of shelves 11. Rear wall N.B.: - At the end of cooking, after the oven has been switched off, the cooling fan may continue to run for a while.
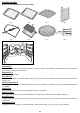
COMPATIBLE ACCESSORIES (for the accessories supplied with oven refer to the tech fiche) Fig. 1 Fig. 2 Fig. 3 Fig. 4 Fig. 7 Fig. 8 6a 6b Fig. 5 Fig. 6 Fig. 9 Drip-tray (Fig. 1) For collecting fat and bits of food when placed under the wire shelf, or as a plate for cooking meat, chicken and fish, etc., with or without vegetables. Pour a little water into the drip-tray to avoid spatters of fat and smoke. Baking tray (Fig. 2) For baking biscuits, cakes and pizzas. Wire shelf (Fig.
CONTROL PANEL DESCRIPTION 1 2 3 4 N.B.: - Your product may appear slightly different from the drawing. - If knobs on your oven are retractable, push them in the middle and they pop up, depending on model. 1. Function selector knob 2. Electronic programmer 3. Thermostat knob 4. Red thermostat led HOW TO OPERATE THE OVEN • Turn the selector knob to the required function. The oven light switches on. • Turn the thermostat knob clockwise to the required temperature.
Delaying cooking end time After selecting cooking time, press the middle button: the display shows , cooking end time and AUTO flashing in sequence. Press the button + to view the desired cooking end time (cooking can be delayed by a maximum of 23 hours and 59 minutes). After a few seconds the display shows the time of day, the symbol switches off and AUTO remains lit, confirming the setting. To view cooking end time and change it if necessary, press the middle button and then press it again twice.
COOKING TABLE Recipe Function Preheating Shelf Temperature Time Accessories (from bottom) (°C) (min) Yes 2 160-180 35-55 Cake tin on wire shelf Yes 1-3 150-170 30-90 Shelf 3: cake tin on wire shelf (switch levels halfway through cooking) Shelf 1: cake tin on wire shelf Yes 2 150-190 30-85 Drip tray / baking tray or cake tin on wire shelf Yes 1-3 150-190 35-90 Shelf 3: cake tin on wire shelf (switch levels halfway through cooking) Shelf 1: cake tin on wire shelf Yes 3 170-180 15-40
Recipe Function Preheating Yes Shelf Temperature Time Accessories (from bottom) (°C) (min) 3 180-200 20-30 Drip tray / baking tray Yes 1-3 180-190 20-40 Shelf 3: oven tray on wire shelf (switch levels halfway through cooking) Shelf 1: drip tray / baking tray Lasagna / Baked pasta / Cannelloni / Flans Yes 2 190-200 40-65 Drip tray or oven tray on wire shelf Lamb / Veal / Beef / Pork 1 kg Yes 2 190-200 90-110 Drip tray or oven tray on wire shelf Chicken / Rabbit / Duck 1 kg Yes 2 190
Recipe Function Preheating Shelf Temperature Time Accessories (from bottom) (°C) (min) Lasagna & Meat Yes 1-3 200 Meat & Potatoes Yes 1-3 200 Fish & Vegetables Yes 1-3 180 Shelf 3: oven tray on wire shelf (invertire i livelli a due terzi della 50-100* cottura se necessario) Shelf 1: drip tray or oven tray on wire shelf Shelf 3: oven tray on wire shelf (invertire i livelli a due terzi della 45-100* cottura se necessario) Shelf 1: drip tray or oven tray on wire shelf Shelf 3: oven tray on wire
4000 107 65116 GB GR ES IT PT Whirlpool® Registered trademark/TM Trademark of Whirlpool, USA 10/2011