TABLE OF CONTENTS GB INSTALLATION PAGE 100 ELECTRICAL CONNECTION PAGE 102 BEFORE USING THE APPLIANCES PAGE 103 PROTECTING THE ENVIRONMENT PAGE 103 PRECAUTIONS AND GENERAL RECOMMENDATIONS PAGE 103 ENERGY SAVING TIPS PAGE 104 OVEN ACCESSORIES PAGE 105 COOKTOP ACCESSORIES PAGE 105 COOKING CHARTS PAGE 106 CLEANING THE OVEN AND ACCESSORIES PAGE 107 CARE AND MAINTENANCE OF CONVENTIONAL ELECTRIC COOKTOPS PAGE 109 CARE AND MAINTENANCE OF GLASS-CERAMIC COOKTOPS PAGE 109 TROUBLES
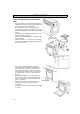
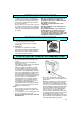
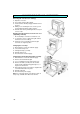
INSTALLATION Technical information for the installer OVEN • After removing the oven from its packaging, before making the connections place it on the polystyrene foam base to protect it from damage. • Do not attempt to lift the oven by the handle. Lift at the sides as shown in the figure (see arrow). • Check that the appliance has not been damaged in transit. • Oven dimensions and kitchen unit dimensions are shown in the opposite figure.
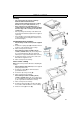
INSTALLATION Cooktop • • • • The cooktop must be set into a worktop between 20 mm and 50 mm thick. There must be nothing between the cooktop and the oven (cross rails, brackets, etc.). If the cooktop is to be installed next to a column unit, leave a distance of at least 100mm from the edge of the cooktop to the side of the column unit. Cut an opening in the worktop of the dimensions shown in the Product Description Sheet supplied separately.
ELECTRICAL CONNECTION • • Make sure the appliances are installed and connected to the electricity supply by a qualified technician in accordance with the manufacturer’s instructions and in compliance with local regulations. The installer is responsible for the correct electrical connection of the appliances and the observance of the relative safety regulations.
BEFORE USING THE APPLIANCES • • • To make the most of your new appliances, read the users instructions carefully and keep them on hand for consultation in the future. Remove the cardboard protections and the protective plastic film. Remove the accessories from the oven and heat it 200° C for about an hour to eliminate the smell of protective grease and insulating materials. Keep the window open during this procedure. N.
PRECAUTIONS AND GENERAL RECOMMENDATIONS Conventional electric/glass-ceramic cooktop Specific recommendations for glassceramic cooktops • • • • • • Do not switch on the hotplates/cooking zones when there is no pan in position. The cooktop features different size hotplates/ cooking zones. Use pans whose base diameter is the same as or slightly larger than the diameter of the hotplate/cooking zone. Use flat-bottomed pans. The use of pans with concave or convex bottoms may damage the cooktop.
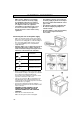
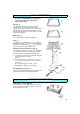
OVEN ACCESSORIES • Accessories supplied depend on the model (refer to the Product Description Sheet supplied separately). 1 Drip tray 1 The drip tray is designed to collect fat and food particles when it is positioned under the grid; it can also be used as a griddle to cook meat, chicken and fish, with or without vegetables. When using the drip tray under the grid, pour in a little water to avoid fat spatters and smoke. 2 Baking tray 2 For cooking biscuits, meringues and pizzas.
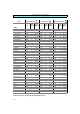
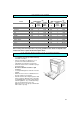
COOKING CHARTS . Food Static function Temp. °C Fan function Runner Cooking from Time bottom (Mins.) Temp. °C Static function + Fan Runner Cooking Temp. from Time bottom (Mins.) °C Runner Cooking from Time bottom (Mins.
COOKING CHARTS Grill function Food Temp. Sirloin steak Cutlets Sausages Pork chops Fish Chicken drumstick Kebabs Spare ribs Chicken halves Whole chicken Roast (pork, beef, veal) (~ 1kg) Duck Leg of lamb Roast Beef °C 200 200 200 200 200 200 200 200 200 - Runner from bottom 4 4 4 4 4 4 4 4 3 - Grill + Fan function Cooking Time (Mins.) 25-35 20-30 25-35 20-30 20-30 30-40 25-35 35-45 45-55 - Temp.
CLEANING THE OVEN AND ACCESSORIES Removing the oven door (for cleaning) 1. Open the oven door. 2. Press hinge catches (A) forwards. 3. Lift the catches until they engage and then remove the door. 4. While you are cleaning the oven, ensure you do not disengage the hinge retainer catches. 5. Refit the oven door by following the above steps in reverse order. Dropping the grill element to clean the oven roof (depending on model) • Do not attempt to clean the oven until it is cool. 1.
CARE AND MAINTENANCE OF CONVENTIONAL ELECTRIC COOKTOPS Before cleaning the cooktop, disconnect it from the electrical supply and wait until it has cooled. Care and Maintenance of conventional cooktop • Use a cloth and warm soapy water. • Do not use abrasives, corrosive cleaners, cleaners containing chlorine or pan scourers. • Do not leave acidic substances on the cooktop (vinegar, salt, lemon juice, etc.). Stainless steel cooktop • Use a proprietary cleaning product for stainless steel. N.
AFTER-SALES SERVICE Before contacting After-Sales Service: 1. Try to solve the problem (see “Troubleshooting Guide”). 2. Turn off the appliance and restart it to see if the fault is repeated. If after the above checks the fault still occurs, get in touch with the nearest After Sales Service.