
Instruction for Use


This operation must be performed by a qualied technician.
If the appliance is intended to operate with a different gas from the gas type stated on the rating plate and information label on the top of the hob, change the injectors.
Remove the information label and keep it with the instructions booklet.
Use pressure regulators suitable for the gas pressure indicated in the Instruction.
• The gas nozzles must be changed by After Sales Service or a qualied technician.
• Nozzles not supplied with the appliance must be ordered from After Sales Service.
• Adjust the minimum setting of the taps.
NOTE: when liquid petroleum gas is used (G30/G31), the minimum gas setting screw must be tightened as far as it will go.
IMPORTANT: should you experience difculty in turning the burners knobs, please contact the After Sales Service for the replacement of the burner tap
if found to be faulty.
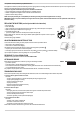
REPLACING THE INJECTORS (see the injector table in the Instruction)
• Remove grids (A).
• Extract burners (B).
• Using a socket spanner of the appropriate size unscrew the injector (C), unscrew the injector to be replaced.
• Replace it with the injector suitable for the new type of gas.
• Re-assemble the injector in (D).
• If you have a multiple crown burner use side spanner to replace the injector (E).
Before installing the hob, remember to afx the gas calibration plate supplied with the injectors in such a way that it
covers the existing
information relating to gas calibration.
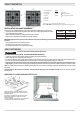
ADJUSTING MINIMUM GAS SETTING OF TAPS
To ensure that the minimum setting is correctly adjusted, remove the knob and proceed as follows:
• tighten screw to reduce the ame height (-);
• loosen screw to increase the ame height (+)
The adjustment must be performed with the tap in minimum gas setting position (small ame) .
• The primary air of the burners does not need to be adjusted.
• At this stage, light up the burners and turn the knobs from max position to minimum position to check ame stability.
Upon completion of adjustment, reseal using sealing wax or an equivalent material.
REFERENCE TO LOCAL REGULATIONS
Installation must be performed in accordance with standard NBN D 51-003.
AFTER-SALES SERVICE
Before calling the After-Sales Service, make sure you can give the following information:
- type of fault or problem;
- exact model (written on the label afxed to the instruction/warranty);
- service number that follows the word SERVICE on the rating plate under the hob and on the label afxed to instruction/warranty;
- your complete address and phone number.
If any repairs are required, please contact an authorised After-Sales Service, as indicated in the warranty.
TROUBLESHOOTING GUIDE
If the hob will not operate correctly, before calling the After-Sales Service, refer to the Troubleshooting Guide to determine the problem.
1. The burner fails to ignite or the ame is not even
Check that:
- The gas or electrical supplies are not shut off and especially that the gas supply tap is open.
- The gas cylinder (liquid gas) is not empty.
- The burner openings are not clogged.
- The plug end is not dirty.
- All the burner parts have been positioned correctly.
- There are no draughts near the hob.
2. The burner does not stay lit
Check that:
- When lighting the burner, the knob has been pressed for enough time to activate the protection device.
- The burner openings are not clogged near the thermocouple.
- The end of the safety device is not dirty.
- The minimum gas setting is correct (see relevant paragraph).
3. The containers are not stable
Check that:
- The bottom of the container is perfectly at
- The container is centered on the burner.
- The grids have not been exchanged or positioned incorrectly.
If after the above checks the fault still occurs, get in touch with the nearest After Sales Service.