
Instruction manual


6
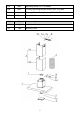
INSTALLATION & USE
Note 1 : On stainless steel hoods, carefully remove the plastic protective film from all
exterior surfaces of the hood and chimney prior to final installation.
Note 2: At least two people will be required to mount the hood.
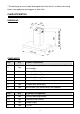
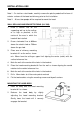
WALL DRILLING AND BRACKETS FIXING (X=Y-260)
1. Draw a vertical line on the
supporting wall up to the ceiling,
or as high as practical, at the
centre of the area in which the
hood will be installed.
2. Draw a horizontal line at 650mm
above the electric hob or 750mm
above the gas hob.
3. Place one of chimney mounting
brackets 6.1 on the wall as shown
min. 20mm from the ceiling or upper limit aligning the centre (notch) with the
vertical reference line.
4. Mark the wall at the centre of the holes in the bracket.
5. Place the hood mounting bracket 6.2 on the wall as shown aligning the central
notches to the vertical reference line.
6. Mark the wall at the centre of the holes in the bracket.
7. Drill 10mm holes at all the centre points marked.
8. Fix the two brackets using the mounting screws and drywall anchors.
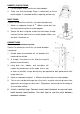
MOUNTING THE HOOD BODY
1. Hook the body onto the hood mounting
bracket 6.2 as shown.
2. Balance the hood body by slightly
adjusting the hood mounting bracket.
Gently lower the hood until it securely
engages the bracket.