
Instruction for Use


2
1
B
ELECTRICAL CONNECTION
IMPORTANT: the data relevant to the voltage and power absorption are indicated on the rating plate.
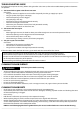
ASSEMBLY
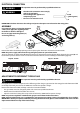
Use protective gloves to clean the perimeter
surface, then apply the supplied gaskets
to the hob as shown in the figure.
Be sure to apply both side gaskets (2)
and main gasket (1).
WARNING
This operation must be performed by a qualified technician.
WARNING
• The electrical connections must comply
with local regulations.
• The earthing of this appliance is
compulsory by law.
• Do not use an extension cord.
L
N
Earth
(yellow/green)
Position the hob in the worktop opening made respecting the dimensions indicated in the Instruction.
NOTE: the power supply cable must be long enough to permit its upward extraction.
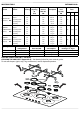
To secure the hob, use the brackets (A) provided with it. Fit the brackets into the relevant bores shown by the arrow (B) and
fasten them by means of their screws in accordance with the thickness of the worktop (see the following figures).
Top 20 - 30 mm Top 31 - 50 mm
ADJUSTMENT TO DIFFERENT TYPES OF GAS
If the appliance is intended to operate with a different gas from the gas type stated on the rating plate and information label
on the top of the hob, you need to call SERVICE and ask for the injectors change.
Remove the information label and keep it with the instructions booklet.
• The gas nozzles must be changed by After Sales Service or a qualified technician.
• Nozzles must be ordered from After Sales Service.
• Adjust the minimum setting of the taps needs to be done by SERVICE after injectors change.
NOTE: use pressure regulators suitable for the gas pressure indicated in the Instructions.
NOTE: when liquid petroleum gas is used (G30/G31), the minimum gas setting screw must be tightened as far as it will go.
IMPORTANT: should you experience difficulty in turning the burners knobs, please contact the After Sales Service for the
replacement of the burner tap if found to be faulty.
WARNING
This operation must be performed by a qualified technician.