
Instruction for Use
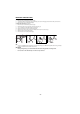


GB9
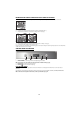
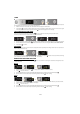
FAST PREHEATING
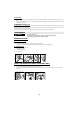
1. Turn the “Functions” knob to the symbol to select the fast preheating function.
2. Confirm by pressing : the settings are shown on the display.
3. If the proposed temperature is that desired, press button . To change the temperature, proceed as described in
previous paragraphs. The message PRE appears on the display. When the set temperature is reached, the corresponding
value (e.g. 200°C) appears on the display and the acoustic signal sounds. At the end of preheating, the oven automatically
selects the conventional function .
At this point food can be placed in the oven for cooking.
4. If you wish to set a different cooking function, turn the “Functions” knob and select the desired function.
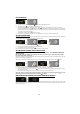
SETTING COOKING TIME
This function can be used to cook food for a set length of time, from a minimum of 1 minute to the maximum time allowed by
the selected function, after which the oven switches off automatically.
1. Once the temperature is confirmed, the symbol flashes.
2. Turn the adjustment knob to display the desired cooking time.
3. To confirm the cooking time, press button .
The oven automatically confirms your selection 10 seconds after the last operation.
SETTING END OF COOKING TIME /START DELAYED
IMPORTANT: the start delayed setting is not available for the following functions: FAST PREHEATING, BREAD/PIZZA,
CONVECTION BAKE.
N.B.: with this setting, the selected temperature is reached in a more gradual way, so cooking times will be slightly
longer than stated in the cooking table.
The end of cooking time can be set, delaying the start of cooking by up to a maximum of 23 hours and 59 minutes. This can only
be done once cooking time has been set.
After setting cooking time, the display shows the end of cooking time (for example 15:45) and the symbol flashes.
To delay the end of cooking time, and thus also the cooking start time, proceed as follows:
1. Turn the “Browse” knob to display the time you wish cooking to end (for example 16:00).
2. Confirm the selected value by pressing button : the two dots of end of cooking time flash, indicating that the setting
has been made correctly.
3. The oven will automatically delay the start of cooking so as to finish cooking at the set time.
At any time, however, set values (temperature, grill setting, cooking time) can be changed using button to go back,
followed by the “Browse” knob to change values and button to confirm.
INDICATION OF THE RESIDUAL HEAT INSIDE THE OVEN (IF PRESENT)
If at the end of cooking, or when the oven is switched off, the temperature inside the oven is high, the display on some models
shows the message HOT together with the current temperature. Once the oven chamber has cooled down, the display shows
the current time again.