
Instruction for Use


EN13
MEAT PROBE
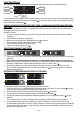
The meat probe supplied allows you to measure the exact core temperature of food during cooking,
between 0°and 100°C, in order to ensure that food is cooked to perfection.
Based on the food being cooked, the required core temperature can be set.
It is very important to position the probe accurately in order to obtain perfect cooking results. Insert the
probe fully into the fleshiest part of the meat, avoiding bones and fatty parts (Fig. 1). For poultry, the probe
should be inserted sideways, in the middle of the breast, taking care to ensure the tip does not end up in a
hollow part (Fig. 2).
In the case of meat with very irregular thickness, check it is cooked properly before removing it from the
oven. Connect the end of the probe in the hole located on the right wall of the oven chamber.
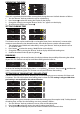
Meat probe recipes
1. Select “Meat probe recipes” by turning the functions knob to the corresponding symbol.
2. Select the dish to be cooked from the proposed list and confirm by pressing the button (OK).
N.B.:if you select “custom”, the function allows you to choose all parameters to be set. The other
recipes only allow you to insert some of these.
3. Connect the probe, place the dish in the oven and turn the “Browse” knob to position the cursor at
“Start”, then press .
N.B.:if the probe has not been connected, the display will show a message prompting you to insert it.
If it is not inserted, when you press , the oven will start a traditional cooking cycle without a set time.
If the probe has been connected properly, the display shows a confirmation message for three seconds
followed by a screen indicating all cooking parameters, including the core temperature of the meat as
measured by the probe.
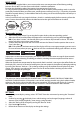
When the required core temperature for the particular food is reached, a message to that effect flashes on
the display for 3 seconds. At the end of cooking time, the oven proposes the option of prolonging cooking
by turning the “Browse” knob to +. This prolongs cooking using the traditional mode without any time
setting. If this option is not selected, the oven waits for 10 minutes before switching off, after which
cooking can no longer be prolonged.
The probe can also be used with the CONVENTIONAL, CONVECTION BAKE, FORCED AIR, TURBO GRILL
and MAXI COOKING functions. If the probe is not inserted, cooking proceeds using the traditional mode,
otherwise, the display advises that the probe is not connected. The message will display for 3 seconds,
after which the oven proceeds as if the “custom” function as indicated above has been selected.
SETTINGS
1. To change some display settings, select “SETTINGS” from the main menu by turning the “Functions”
knob.
2. Confirm by pressing : the display shows which settings can be changed (language, volume of
acoustic signal, display brightness, time, energy saving function).
3. Select the setting to be changed by turning the “Browse” knob.
4. Press button to confirm.
5. Follow the instructions of the display to change the settings.
Fig. 1 Fig. 2
Automatic roasting functions
Specials
Traditional
Meat Probe Recipes
Automatic roasting functions
Roast Beef
Roast Veal
Custom
Insert Meat Probe
or press OK
Meat Probe
has been connected
TEMPERATURE
150°C
MEAT PROBE
Cooking
100°C
CURRENT
79°C
TEMPERATURE
150°C
MEAT PROBE
Temperature reached
100°C
CURRENT
100°C
Insert Meat Probe
or press OK
PREHEAT
No
TEMPERATURE
180°C
COOK TIME
END TIME
Conventional
--:--
--:--
TEMPERATURE
150°C
MEAT PROBE
Conventional
100°C