IMPORTANT SAFETY INSTRUCTIONS YOUR SAFETY AND THAT OF OTHERS IS PARAMOUNT This manual and the appliance itself provide important safety warnings, to be read and observed at all times. This is the danger symbol, pertaining to safety, which alerts users to potential risks to themselves and others. All safety warnings are preceded by the danger symbol and the following terms: DANGER Indicates a hazardous situation which, if not avoided, will cause serious injury.
- This appliance is designed solely for use as a domestic appliance for cooking food. No other type of use is permitted (e.g.: heating rooms). The Manufacturer declines all responsibility for inappropriate use or incorrect setting of the controls.
- Never leave the appliance unattended during food drying. - If alcoholic beverages are used when cooking foods (e.g. rum, cognac, wine), remember that alcohol evaporates at high temperatures. As a result, there is a risk that vapours released by the alcohol may catch fire upon coming into contact with the electrical heating element. - Never use steam cleaning equipment. - Do not touch the oven during the pyrolysys cycle.
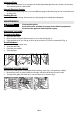
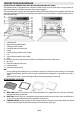
2. Lift the handle up as shown in Fig. 2 Fig. 1 Fig. 2 PREPARING THE HOUSING UNIT • • • • Kitchen units in contact with the oven must be heat resistant (min 90°C). Carry out all cabinet cutting work before fitting the oven in the housing and carefully remove all wood chips and sawdust. After installation, the bottom of the oven must no longer be accessible. For correct appliance operation, do not obstruct the minimum gap between the worktop and the upper edge of the oven.
ELECTRICAL CONNECTION (only in some models) Make sure the power voltage specified on the appliance dataplate is the same as the mains voltage. The dataplate is on the front edge of the oven (visible when the door is open). • Power cable replacement (type H05 RR-F 3 x 1.5 mm2) must be carried out by a qualified electrician. Contact an authorized service centre. • The oven is programmed to operate with power absorption above 2.
After Use: - Allow the induction plate to cool down before removal if cleaning is required. When the induction plate is removed from the oven, ensure the supplied socket cover is used to prevent dirt entering the electrical socket (Fig. 1). Fig. 1 SAFEGUARDING THE ENVIRONMENT Disposal of packing material The packing material is 100% recyclable and is marked with the recycle symbol ( ).
The induction plate does not work: • • The induction plate must be used on the third shelf position only; ensure it is correctly positioned and fully connected. Turn the oven off and then on again. Check if the fault persists. AFTER-SALES SERVICE Before calling the After-Sales Service: 1. See if you can solve the problem yourself with the help of the suggestions given in the “Troubleshooting guide“. 2. Switch the appliance off and back on again to see if the fault persists.
Induction Plate: • When cool to the touch, use a sponge and suitable liquid detergent for ovens or hobs. Do not clean the induction plate in a dishwasher. Internal Electrical Socket: • Remove the metallic plug cover; use a humidified sponge to clean the plug. Do not use metallic and/ or sharp tools. Cooking Vessel: • Suitable for dishwashing. Alternatively, use soft sponge and suitable liquid detergent. MAINTENANCE - WARNING Use protective gloves.
MOVING THE TOP HEATING ELEMENT (SOME MODELS ONLY) 1. 2. 3. Remove the side accessory holder grilles (Fig. 4). Pull the heating element out a little (Fig. 5) and lower it (Fig. 6). To reposition the heating element, lift it up, pulling it slightly towards you, making sure it comes to rest on the lateral supports. Fig. 4 Fig. 5 Fig. 6 REPLACING THE OVEN LAMP To replace the rear lamp (if present): 1. Disconnect the oven from the power supply. 2. Unscrew the lamp cover (Fig.
INSTRUCTIONS FOR OVEN USE FOR ELECTRICAL CONNECTION, SEE THE PARAGRAPH ON INSTALLATION The induction oven is equipped with an electrical socket on the rear wall of the oven to supply power to the heating element inside the induction plate when plugged in. The induction plate is designed to work together with the induction cooking vessel supplied with the oven. Improved cooking performances and energy consumption can be achieved by using the cooking vessel and induction plate. 1. Control panel 2.
D. INDUCTION PLATE (1): to be used in induction mode only by placing it on the third shelf position and ensuring the electrical plug is fully inserted (refer to "Inserting wire shelves and other accessories in the oven"). ACCESSORIES NOT SUPPLIED Other accessories can be purchased separately from the After-sales Service.
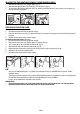
Fig. 4 1. 2. Fig. 5 Use both hands to place the cooking vessel on the induction plate (Fig. 4). Place the cooking vessel at the centre of the markings on the glass (Fig. 5). REMOVAL OF THE COOKING VESSEL AND INDUCTION PLATE REMOVING THE COOKING VESSEL: IMPORTANT: The induction cooking vessel can become extremely hot. Always use oven gloves to touch and move it. Fig. 1 Fig. 2 1. Using both hands, grasp the front handle and partially remove the cooking vessel (Fig. 1). 2.
to browse the functions/options and change pre-set values to select and confirm settings to start cooking LIST OF FUNCTIONS After switching on the oven, press the symbol and the display will show the following indication. Press any key to skip the message. NOTE: The induction first alert can be disabled/enabled through the Settings Menu. If the induction plate is already properly engaged, when oven is switched on, the induction first alert will not be shown.
SELECTING COOKING FUNCTIONS 1. 2. If the oven is off, press button ; the display will show the cooking functions. To browse the various possibilities, press buttons : the selectable function is highlighted in white in the centre of the screen. N.B.: for the list and description of functions, see the specific table at page 48 and at page 52.
FAST PREHEATING (Standard Functions Only) 180°C - 00:02 180°C - 00:02 180°C TEMPERATURE INSERT IN TEMPERATURE INSERT IN TEMPERATURE Fast Preheating Preheating - 00:02 INSERT IN Oven is Hot! If you wish to preheat the oven quickly before inserting food, change the oven’s default selection as follows: 1. Select the fast preheating function using buttons . 2. Confirm by pressing : the settings are displayed on the screen. 3.
At any time during cooking, set values (temperature, grill setting, cooking time) can be changed using buttons and button as described in previous paragraphs. INDICATION OF THE RESIDUAL HEAT INSIDE THE OVEN Standard Functions: 168° 19:42 Residual Heat If at the end of cooking, or when the oven is switched off, the temperature inside the oven is over 50°C, the display shows the current temperature and the bar indicating cooling in progress.
Shortly before cooking time finishes, the oven prompts you to check that the food is cooked to your satisfaction. If it is not, extra time can then be added manually using the buttons . INDUCTION FUNCTIONS Thanks to the Induction Heating technology, the oven offers several cooking functions (see Function Description table) which guarantee high cooking performances together with a very fast cooking process and low energy consumption.
FUNCTION DESCRIPTION TABLE MAIN MENU SETTINGS Setting the display (language, time, brightness, volume of acoustic signal, energy saving function). RECIPES Selecting 30 different pre-set recipes (see enclosed recipe booklet). The oven automatically sets the optimum cooking temperature, function and time. It is important to follow the instructions given in the recipe book regarding preparation, accessories and which oven shelf to use. TRADITIONAL SPECIALS INDUCTION FUNCTIONS See TRADITIONAL FUNCTIONS.
SPECIALS DEFROST KEEP WARM RISING CONVENIENCE MAXI COOKING To speed up defrosting of food. Place food on the middle shelf. Leave food in its packaging in order to prevent it from drying out on the outside. For keeping just-cooked food hot and crisp (e.g: meat, fried food or flans). Place food on the middle shelf. The function will not activate if the temperature in the oven is above 65°C. For optimal rising of sweet or savoury dough.
INDUCTION FUNCTIONS Roasted Meat Roast beef 4 steps: from 0.6 to 2 kg The function automatically selects the ideal cooking temperature and mode for different Roast meat weight categories (see oven display). It is 3 steps: from 1 to 4 kg possible to roast any type of meat (e.g. beef, veal, pork, ribs, lamb, etc.). fillet / piece Roasted poultry The function automatically selects the ideal Whole 5 steps: from 0.6 to 3 kg cooking temperature and mode for different weight categories (see oven display).
Low grill Top Finishing Medium grill High grill FINISHING Low power Base Finishing Medium power High power GB51 These functions are ideal for finishing any dish that requires a grill or gratin cooking mode. Using three different level of grill, it is possible to control the power or speed of this cooking mode. During top finishing the tray is not functional. These functions are ideal for finishing any kind of dish that requires only a base source of heat.
COOKING TABLE Recipe Function Pre- Shelf (from heating bottom) Temp.
Recipe Savoury pies (vegetable pie, quiche lorraine) Vols-au-vent / Puff pastry savouries Lasagna / Baked pasta / Cannelloni / Flans Lamb / Veal / Beef / Pork 1 Kg Chicken / Rabbit / Duck 1 Kg Turkey / Goose 3 Kg Baked fish / en papillote (fillet, whole) Stuffed vegetables (tomatoes, courgettes, aubergines) Toast Function Pre- Shelf (from heating bottom) Temp.
Recipe Function Pre- Shelf (from heating bottom) Temp.
INDUCTION OVEN COOKING TABLES Recipe Lasagna Pasta pasticciata/cannelloni Roast beef rare (0.6 - 0.8 Kg) Roast beef rare (0.9 - 1.2 Kg) Roast beef rare (1.3 - 1.5 Kg) Roast beef rare (1.6 - 2 Kg) Roast pork / veal (1 - 2 Kg) Roast pork / veal (2 - 3 Kg) Roast pork / veal (3 - 4 Kg) Pork ribs Roast chicken/turkey (0.6 - 0.8 Kg) Roast chicken/turkey (0.9 - 1.2 Kg) Roast chicken/turkey (1.3 - 1.5 Kg) Roast chicken/turkey (1.
* At the beginning of the cooking cycle, an indicative cooking time is displayed. The cooking time may be modified in order to suit personal preferences and for different kinds of meat/fish. For Roasted Meat - Roast beef the indicated cooking time refers to the time taken to cook the roast beef rare. TESTED RECIPES in compliance with IEC 50304/60350:2009-03 and DIN 3360-12:07:07 Recipe Function Pre- Shelf (from Temp. Time Accessories and notes heating bottom) (°C) (min) IEC 60350:2009-03 § 8.4.
RECOMMENDED USE AND TIPS How to read the cooking table The table indicates the best function to use for any given food, to be cooked on one or more shelves at the same time. Cooking times start from the moment food is placed in the oven, excluding pre-heating (where required). Cooking temperatures and times are purely for guidance and will depend on the amount of food and type of accessory used.
- - When using the roast Meat and whole roast Chicken functions, the meat does not need to be turned over. For fruit flans and other delicate dishes, it is advisable to prick the pastry case before filling it to avoid air bubbles forming and, after cooking, let the food cool down inside the cooking vessel. Pizza toppings should be added based on the height of the dough base and the quantity of sauce used.