AMW 234 www.whirlpool.
INSTALLATION PRIOR TO CONNECTING ENSURE THAT THE APPLIANCE IS NOT DAMAGED. Check that the oven door closes firmly against the door support. Empty the oven and clean the interior with a soft, damp cloth. CHECK THAT THE VOLTAGE on the rating plate corresponds to the voltage in your home. PLACE THE OVEN ON A STABLE, EVEN is strong enough to hold the oven and the food utensils you put in it. Use care when handling.
IMPORTANT SAFETY INSTRUCTIONS READ CAREFULLY AND KEEP FOR FUTURE REFERENCE DO NOT HEAT, OR USE FLAMMABLE MATERIALS in or near the oven. Fumes can create a fire hazard or explosion. ONLY ALLOW CHILDREN to use the oven without adult supervision after adequate instructions have been given so that the child is able to use the oven in a safe way and understands the hazards of improper use. The appliance is not intended for use by young children or infirm persons without supervision.
PRECAUTIONS GENERAL LIQUIDS E.G. BEVERAGES OR WATER. Overheating the liquid beyond boiling point can occur without evidence of bubbling. This could result in a sudden boil over of the hot liquid. To prevent this possibility the following steps should be taken: 1. Avoid using straight-sided containers with narrow necks. 2. Stir the liquid before placing the container in the oven and let the teaspoon remain in the container. 3.
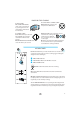
ACCESSORIES GENERAL TURNTABLE SUPPORT USE THE TURNTABLE SUPPORT under the Glass turntable. Never put any other utensils on the turntable support. Fit the turntable support in the oven. THERE ARE a number of accessories available on the market. Before you buy, ensure they are suitable for microwave use. ENSURE THAT THE UTENSILS YOU USE are oven proof and allow microwaves to pass through them before cooking.
PAUSE OR STOP COOKING TO PAUSE COOKING: THE COOKING CAN BE PAUSED to check, turn or stir the food by opening the door. The setting will be maintained for 10 minutes. IF YOU DON’T WANT TO CONTINUE COOKING: REMOVE THE FOOD, close the door and press the STOP button. TO CONTINUE COOKING: CLOSE THE DOOR and press the Start button ONCE. The cooking is resumed from where it was paused. PRESSING THE START BUTTON TWICE will increase the time by 30 seconds.
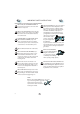
CLOCK WHEN THE APPLIANCE IS FIRST PLUGGED IN or after a power failure, the display is blank. If the clock is not set, the display will remain blank until the cooking time is set. qet q PRESS THE CLOCK BUTTON (3 seconds) until the left-hand digit (hours) flicker. TURN THE ADJUST KNOB to set the time to set the hours. wr w e r t PRESS THE CLOCK BUTTON AGAIN. (The two right hand digits (minutes) flicker). TURN THE ADJUST KNOB to set the minutes. PRESS THE CLOCK BUTTON AGAIN.
COOK & REHEAT WITH MICROWAVES USE THIS FUNCTION for normal cooking and reheating, such as vegetables, fish, potatoes and meat. q w e w PRESS THE POWER BUTTON to set the power. TURN THE ADJUST KNOB to set the cooking time. PRESS THE START BUTTON. ONCE THE COOKING PROCESS HAS BEEN STARTED: The time can easily be increased in 30-second steps by pressing the Start button. Each press increases the time with 30 seconds. You may also alter the time by turning the adjust knob to increase or decrease the time.
JET START THIS FUNCTION IS USED for quick reheating of food with a high water content such as clear soups, coffee or tea. q PRESS THE START BUTTON. THIS FUNCTION AUTOMATICALLY STARTS with maximum microwave power level and the cooking time set to 30 seconds. Each additional press increases the time with 30 seconds. You may also alter the time by turning the adjust knob to increase or decrease the time after the function has started.
AUTO DEFROST USE THIS FUNCTION for defrosting Meat, Poultry, Fish. AUTO Defrost should only be used if the net weight is between 100 g- 2 kg. ALWAYS PLACE THE FOOD on the glass turntable. q w e w PRESS THE AUTO DEFROST BUTTON repeatedly to select food class. TURN THE ADJUST KNOB to set the weight. PRESS THE START BUTTON. SOME FOOD CLASSES REQUIRE the food to be turned during defrosting. In these cases the oven will stop and prompt you to perform the needed action.
GRILL USE THIS FUNCTION TO quickly give a pleasant brown surface to the food. q w e PRESS THE GRILL BUTTON. TURN THE ADJUST KNOB to set the cooking time. PRESS THE START BUTTON. PRESSING THE GRILL BUTTON DURING COOKING switches the Grill element on and off. The timer will continue to count down when the Grill element is turned off. w q DO NOT LEAVE THE OVEN DOOR OPEN for long periods when the Grill is in operation, as this will cause a drop in temperature.
GRILL COMBI USE THIS FUNCTION TO cook such food as Gratin’s, Lasagne, Poultry and Baked potatoes. wr q w e r t PRESS THE POWER BUTTON to set the power. TURN THE ADJUST KNOB to set the microwave time. PRESS THE COMBI BUTTON. TURN THE ADJUST KNOB to set the Grill time. PRESS THE START BUTTON. DURING OPERATION you can switch the Grill element on/off by pressing the Grill button. q e IT IS POSSIBLE to switch the microwaves off by reducing the microwave power level to 0 W.
COOKING CHART THE MORE FOOD YOU WANT TO COOK the longer it takes. A rule of thumb is that double amount of food requires almost double the time. THE LOWER STARTING TEMPERATURE, the longer cooking time is required. Food at room temperature cooks faster than food taken directly from the refrigerator. IF YOU ARE COOKING SEVERAL ITEMS of the same food, such as jacket potatoes, place them in a ring pattern for uniform cooking.
REHEATING CHART AS IN TRADITIONAL COOKING METHODS, food reheated in a microwave oven must always be heated until piping hot. THE BEST RESULTS ARE ACHIEVED if the food is arranged with the thicker food to the outside of the plate and the thinner food in the centre. PLACE THIN SLICES OF MEAT on top of each other or interlace them. Thicker slices such as meat loaf and sausages have to be placed close to each other.
DEFROSTING CHART TURN LARGE JOINTS halfway through the defrosting process. BOILED FOOD, STEWS AND MEAT SAUCES defrost better if stirred during defrosting time. WHEN DEFROSTING it is better to underthaw the food slightly and allow the process to finish during standing time. STANDING TIME AFTER DEFROSTING always improves the result since the temperature will then be evenly distributed throughout the food.
GRILLING CHART THICKER FOODS such as gratins and chicken; Cook with microwaves first and then allow the grill to brown the top surface in order to put some colour to it. THE GRILL FUNCTION IS EXCELLENT for browning the food after cooking with microwaves. THE WIRE RACK may be used to move foods closer to the grill element for quicker browning. YOU MAY PLACE vessels or gratins directly on the Glass turntable. PLACE THIN FOODS such as toasts and sausages on the wire rack and cook with grill only.
MAINTENANCE & CLEANING CLEANING IS THE ONLY MAINTENANCE normally required. FAILURE TO MAINTAIN THE OVEN in a clean condition could lead to deterioration of the surface that could adversely affect the life of the appliance and possibly result in a hazardous situation. DO NOT USE METAL SCOURING PADS, ABRASIVE CLEANSERS , steel-wool pads, gritty washcloths, etc. which can damage the control panel, and the interior and exterior oven surfaces.
TROUBLE SHOOTING GUIDE IF THE OVEN DOES NOT WORK, do not make a service call until you have made the following checks: The Turntable and turntable support is in place. The Plug is properly inserted in the wall socket. The Door is properly closed. Check your Fuses and ensure that there is power available. Check that the oven has ample ventilation. Wait for 10 minutes, then try to operate the oven once more. Open and then close the door before you try again.
GB
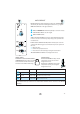
IN ACCORDANCE WITH IEC 60705. THE INTERNATIONAL ELECTROTECHNICAL COMMISSION has developed a standard for comparative testing of heating performance of different microwave ovens. We recommend the following for this oven: TEST AMOUNT APPROX. TIME POWER LEVEL CONTAINER 12.3.1 750 G 10 MIN. 750 W PYREX 3.220 12.3.2 475 G 5 MIN. 750 W PYREX 3.827 12.3.3 900 G 14 MIN. 750 W PYREX 3.838 12.3.4 1100 G 20 - 22 MIN. GRILL + 600 W PYREX 3.827 13.