MICROWAVE OVEN EN User and maintenance manual
I
ENGLISH LANGUAGES EN PAGE 1 FR PAGE DE PAGE NL PAGE TABLE OF CONTENTS IMPORTANT SAFETY INSTRUCTIONS ............. 2 DECLARATION OF CONFORMITY .............................. 5 SAFEGUARDING THE ENVIRONMENT ...................... 5 INSTALLATION ................................................... 6 INSTALLING THE APPLIANCE ...................................... 6 PRIOR TO CONNECTING ................................................ 6 AFTER CONNECTING ......................................................
SAFETY RECOMMENDATIONS EN 2 IMPORTANT SAFETY INSTRUCTIONS These instructions are also available on website: www.whirlpool.eu YOUR SAFETY AND THAT OF OTHERS IS VERY IMPORTANT This manual and the appliance itself provide important safety warnings, to be read and observed at all times. This is the danger symbol, pertaining to safety, which alerts users to potential risks to themselves and others.
SAFETY RECOMMENDATIONS EN 3 - Do not touch the appliance with any wet part of the body and do not operate it when barefoot. - This appliance is designed solely for use as a domestic appliance for cooking food. No other type of use is permitted (e.g.: heating rooms or outdoor use). The Manufacturer declines all responsibility for inappropriate use or incorrect setting of the controls. - This appliance is intended to be used built-in. Do not use it freestanding.
EN 4 SAFETY RECOMMENDATIONS - Overheating the liquid beyond boiling point can occur without evidence of bubbling. This could result in a sudden boil over of the hot liquid. - Do not use microwave oven for deep-frying, because the oil temperature cannot be controlled. - After heating baby food or liquids in a baby bottle or in a baby food jar, always stir and check the temperature before serving. Ensure the lid and the teat is removed before heating. - If alcoholic beverages are used when cooking foods (e.
SAFETY RECOMMENDATIONS EN 5 DECLARATION OF CONFORMITY This oven, which is intended to come into contact with foodstuffs, complies with European Regulation ) n. 1935/2004 and has been designed, manufactured and sold in conformity with the safety ( requirements of the “Low Voltage” directive 2006/95/CE (which replaces 73/23/CEE and subsequent amendments), the protection requirements of “EMC” 2004/108/CE.
BEFORE THE USE EN 6 INSTALLATION After unpacking the appliance, make sure that it has not been damaged during transport and that the appliance door closes properly. In the event of problems, contact the dealer or the nearest After-sales Service. To prevent any damage, only remove the appliance from its polystyrene foam base at the time of installation. MOUNTING THE APPLIANCE Read all the safety recommendations at pages 2, 3, 4, 5 before installing the appliance.
USING THE APPLIANCE EN 7 THE APPLIANCE 1. Control panel 2. Cavity 3. Door 4. Upper heating element 5. Light 6. Data plate (not to be removed) 7. Glass plate turntable ACCESSORIES A. Turntable support. Use only with the glass plate turntable. Fig. A Fig. B B. Glass plate turntable. Use with all cooking cycles. To be placed on the turntable support. C. Wire rack. To cook and bake. Fig. C Fig. D D. Baking plate (only in some models). Never use in combination with microwaves. E.
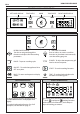
USING THE APPLIANCE EN 8 CONTROL PANEL DESCRIPTION LEFT-HAND DISPLAY TOUCH KEYS KNOB TOUCH KEYS RIGHT-HAND DISPLAY °C / W KNOB AND TOUCH KEYS °C / W 6TH SENSE BUTTON KNOB Press to select, set, access or confirm functions or parameters and eventually start the cooking program. ROTARY SWITCH KNOB Turn this to navigate through the functions and adjust all of the cooking parameters. PAUSE – To pause a cooking cycle. °C / W POWER – To adjust the temperature, grill level or microwave power.
USING THE APPLIANCE 1.1 SETTING THE CLOCK When the appliance is switched ON for the first time, the clock must be set. EN 9 2 JET START To skip the mode-setting wizard and launch a cooking cycle immediately using full microwave power (900 W) and a default duration that is set to 30 seconds. Put the food in the microwave oven cavity and close the door. Turn to set the hours. Press to confirm. Press to start. NOTE: this function is only available when the appliance is switched OFF.
USING THE APPLIANCE EN 10 4 COOLING DOWN When a function is finished, the appliance may carry out a cooling procedure. The right-hand display shows "Cool On". 6 SETTING FOOD CLASSES and 6th Sense When using Jet Defrost the appliance needs to know which functions food class it is to use to reach proper results. Access the desired function: after selecting the required function, the food class symbol is displayed and the class flashes in the right-hand display.
USING THE APPLIANCE 6.1 EN 11 SETTING THE WEIGHT and Jet To aid the cooking, 6th Sense functions need to know the weight of food. Defrost The appliance automatically calculates the ideal power and duration for each food class. The display shows the default value and "g" flashes. 7.1 SETTING THE GRILL LEVEL , To set the grill power level for Grill , Turbo Grill and Turbo Grill Grill Combi Combi cooking functions. There are three defined power levels for grilling: 1 (low), 2 (mid), 3 (high).
USING THE APPLIANCE EN 12 7.3 SETTING THE MICROWAVE POWER To set the power level for all cooking cycles, where possible (Microwave , Grill Combi , Turbo Grill Combi , Forced Air Combi ). 9 QUICK PREHEAT To preheat the microwave oven cavity quickly. See the full description on page 15. Select the icon in the right-hand display. The default value is displayed and "W" flashes. Press to confirm. Turn Turn to set the target temperature. Press or to set the desired power. to start quick preheat.
FUNCTION DESCRIPTIONS EN 13 Traditional function FUNCTION DESCRIPTIONS TABLE MICROWAVE The microwave function allows to quickly cook or reheat food and beverages. FORCED AIR This function allows to use oven-proof dishes. The cooking cycle is just like that of a traditional oven. It is useful for cooking meringues, pastry, sponge cakes, soufflés, poultry and roast meats. Put food on the wire rack to allow the air to circulate properly around the food.
FUNCTION DESCRIPTIONS 6th Sense functions EN 14 Thanks to 6th Sense technology, this function allows you to automatically* achieve a perfect golden brown results both on the top and bottom of the food. Place food onto the crisp plate.
COOKING TABLE EN 15 Baked apples Beverage (100-500 g) Bread (Loaf, buns or rolls) 100 g-1 kg 5 160-350 2 REHEAT Uncover Standing time improves the result 5 DEFROST BAKE 4 TIPS ACCESSORIES (if available) GRILL POWER TIME PREHEAT TEMP.
COOK Cover Cover. Stir when requested Fruit crumble COOK 160-350 2 Grill spit GRILL 2 Hamburgers GRILL 1 Ice creams SOFT Lasagne COOK Meat (Minced meat, cutlets, steaks or roasts) COOK Potatoes (french fries) (200-500 g) Potatoes (200-800 g) BAKE Roast beef, medium (1.3-1.5 kg) Roast pork (1.3-1.
Rolls COOK Sausages GRILL Soup (200-800 g) 4 210-220 y 10-12 2 REHEAT Uncover Cake dish on wire rack BAKE Stews SIMMER 350 COOK 750 170-180 n 30-40 Vegetables Vegetables (fresh) Vegetables (stuffed) * TIPS Baking plate Sponge cake Vegetables (canned) (200-600 g) ACCESSORIES (if available) GRILL POWER TIME PREHEAT TEMP. ACTION CATEGORY EN 17 FUNCTION FOOD COOKING TABLE 4 DEFROST Standing time improves the result 4 COOK Pour away most of the liquid.
COOKING TABLE EN 18 TESTED RECIPES 1000 g 12-13 650 12.3.2 Sponge cake 475 g 5.30 650 12.3.3 Meat loaf 900 g 13-14 750 12.3.4 Potato gratin 1100 g 190 28-30 350 12.3.5 Cake 700 g 175 28-30 90 12.3.6 Chicken 1000 g 210 30-32 350 Meat defrosting 500 g 10 160 TEST ACCESSORIES (if available) POWER Egg custard TEMP. 12.3.
USING THE APPLIANCE EN 19 RECOMMENDED USE AND TIPS How to read the cooking table The table indicates the best functions to use for any given food. Cooking times, where indicated, start from the moment when food is placed in the microwave oven cavity, excluding pre-heating (where required). Cooking settings and times are purely for guidance and will depend on the amount of food and type of accessory used. Always cook food for the minimum cooking time given and check that is it cooked through.
AFTER USE EN 20 CLEANING AND MAINTENANCE Cleaning is the only maintenance work that is normally required. Failure to maintain the appliance in a clean condition could lead to deterioration of the surface, which could adversely affect the service life of the appliance and may result in a hazardous situation. Tips Do not use metal scouring pads, abrasive cleansers, steel wool pads, gritty wash-cloths, etc. which can damage the control panel, and the interior and exterior appliance surfaces.
AFTER USE EN 21 TROUBLESHOOTING GUIDE • • • • • • The appliance does not work The turntable support is in place. The door is properly closed. Check the fuses and ensure that there is power available. Check that the appliance has ample ventilation. Wait for 10 minutes, then try to operate the appliance once more. Open and then close the door before you try again. Disconnect the appliance from the power supply. Wait for 10 minutes before reconnecting and trying again.
400010757348 Printed in Italy Whirlpool is a registered trademark of Whirlpool, USA.