Instruction booklet TUMBLE DRYER CZ GB English Česky, 19 Contents PT Português, 37 FR Français, 55 Installation, 2 Where to put your dryer Ventilation Electrical connection Levelling the tumble dryer Before you start using your dryer Warnings, 4 General safety Save energy and respect the environment Care and maintenance, 6 AQUALTIS AQC9 6F7 Disconnecting the power supply Cleaning the filter after each cycle Checking the drum after each cycle Empty the water container after each cycle Cleaning the
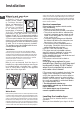
Installation Where to put your dryer 10 mm • Place your dryer at a distance from gas ranges, stoves, heaters, or cooktops because flames can damage the appliance. The dryer 15 mm 15 mm should be installed in an ambient room temperature of between 20 to 23°C for optimum performance. But will function if the room is between 14 and 30°C.
location check that it is level first side-to-side, then front to back. If the dryer is not level, adjust the two legs up or down until your dryer is level. Maximum load: 9 kg GB Product Fiche - Regulation 392/2012. Brand Hotpoint/Ariston Model Preliminary information AQC9 6F7 TM1 (EU) Once the tumble dryer is installed, clean the inside of the drum before operating it and remove any dirt accumulated during transportation.
Warnings GB ! This appliance has been designed and built according to international safety standards. These warnings are given for safety reasons and must be followed carefully. General safety • This appliance can be used by children aged from 8 years and above and persons with reduced physical, sensory or mental capabilities or lack of experience and knowledge if they have been given supervision or instruction concerning use of the appliance in a safe way and understand the hazards involved.
• • • • • • waxes and wax removers. Ensure these items have been washed in hot water with an extra amount of detergent before being dried in the tumble dryer. Do not tumble dry items containing foam rubber (also known as latex foam), or similarly textured rubber like materials. Foam rubber materials can, when heated, produce fire by spontaneous combustion.
Care and maintenance GB Disconnecting the power supply ! Disconnect the dryer when not in use or during cleaning and maintenance operations. Cleaning the filter after each cycle The filter is a fundamental component of the dryer: its function is to collect lint and fluff that form during drying. Clean the filter once drying is completed, by rinsing it under running water or cleaning it with a vacuum cleaner.
4.Whenever you clean the Heat pump filter unit always clean any build up of fluff from the surface of the metal plates. Carefully clean this fluff off with a damp cloth,sponge or vacuum cleaner. Never use your Fingers. 5. Assemble the two parts of the filter clean the surface of the seals and replace with the 4 clips into the horizontal position, sure that the catches have been secured.
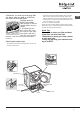
Dryer Description The Features To open door GB Rating Plate Pull on handle Model & Serial Numbers Water container Filter Heat Pump Filter Unit (cover open) Air Intake Grille Heat Pump Filter Unit cover handle (Pull here to open) Ajustable feet (to level dryer) Control Panel On/Off Button & Light Option Buttons and Lights Start/Pause Programme ECO Light Button & Light Progress Light Display Panel Programme Knob Sensor Dry Timed Dry The On/Off button/light , if the dryer is running and this butt
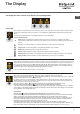
The Display The Display has three sections each with its corresponding button. GB Sensor Dry After selecting a programme that has a Sensor Dry Option, press and release the button until the required dryness sensing level is displayed. If the sensing option is not available the display will flash and the buzzer beeps three times. ! Some drying programmes are not compatible with all 7 sensor drying levels.
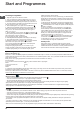
Start and Programmes GB Choosing a Programme 1. Plug the dryer into the electrical socket. 2. Sort your laundry according to fabric type (see Laundry). 3. Open the door and make sure the filter is clean and in place and the water container is empty and in place (see Maintenance). 4. Load the machine and make sure that the items are not in the way of the door seal. Close the door. 5. If the ON/Off light is not lit; press the On/Off Button . 6.
Special Programmes Shirts High Heat option • This is a programme for Shirts made from Cotton. • It can be used for load sizes up to 3 kg (approximately 10 shirts). • Loads dried using this programme are usually ready to wear; the edges or seams may be slightly damp. If this is found try turning the shirts inside out and running the programme again for a short period. • The duration of this programme will depend on the size of the load, the dryness setting selected and the spin speed used inyour washer.
GB Refresh Thanks to a cool air flow, oxygen penetrates the fibers and transports unpleasant odors such as cigarette smoke, frying, smog out of the clothes. With this short program, you can easily refresh your garments in just 20 minutes. ! Airing is not a drying programme and should not be used for wet articles of clothing. • If can be used on any load size up to 9 kg, but is more effective on smaller loads. 20-minute programme that airs your clothes with cool air. Use also to cool warm clothes.
Programmes Table ! If the On/Off light is not lit; Press the On/Off Button Programme Easy Iron Refresh Standard Cotton** GB and then select programme. What it does How to set it Brief programme (approximately 10 minutes) that softens fibres of clothing that is ready for ironing. 1. Position the PROGRAMME knob on 2. Select Alarm Option if required. 3. Press the Start Button . . ! This is not a drying programme (see previous page). Options available Sound .
GB Programme What it does How to set it Dries your dark clothes. 1. Position the PROGRAMME knob on 2. Select any Options if required. 3. Press the Start Button . . Sound . Delay Start . Sensor Dry option, automatic drying: Damp dry , Iron dry , Hanger Plus , Hanger dry , Light dry , Cupboard dry . (We suggest to use only Cupboard dry) Dries your cotton or synthetic clothes in less time. 1. Position the PROGRAMME knob on 2. Select any Options if required. 3. Press the Start Button . .
The Controls • Programme knob ! Warning, if after pressing the start button the programme knob position is changed, the new position will NOT change the programme selected. To change programme press Start/Pause Button to pause the programme, the light flashes Amber, select new programme and any option, the light will then flash green. Press the Start/ Pause Button and the new programme will start. • Option Buttons/ Lights These buttons are used to customise the selected programme to your requirements.
Laundry GB Sorting laundry Drying times • Check the symbols on the care labels of the various garments to verify whether the garments can be safely tumble dried. • Sort laundry according to the type of fabric. • Empty all pockets and check for loose buttons. • Close zips and hooks and fasten belts and strings without tightening them. • Wring out garments to remove the maximum amount of water possible.
Troubleshooting One day your dryer seems not to be working. Before you call your Service Centre (see Service), go through the following troubleshooting suggestions. Problem: Possible causes / Solutions: The dryer won’t start. • The plug is not plugged into the socket, or not making contact. • There has been a power failure. • The fuse has blown. Try to plug another appliance into the socket. • You are using an extension cord. Try to plug the dryer’s power cord directly into the socket.
Service GB Heat Pump System This dryer is fitted with a sealed heat pump system to dry your clothes. To operate, the heat pump contains fluorinated greenhouse gases ( F gases) which are covered by the Kyoto Protocol. These F gases are contained in a hermetically sealed unit. This sealed unit contains 0.29 kg of the F gas R134a which acts as a refrigerant. GWP = 1430 (0.4 t C02) If the sealed unit fails then it must be replaced by a new sealed unit. Contact your nearest service centre for advise.
Návod k použití SUŠIČKA Obsah Instalace, 20 CZ Česky Kam nainstalovat sušičku Ventilace Připojení k elektrické síti Vyrovnání sušičky do vodorovné polohy Výchozí informace Upozornění, 22 Základní bezpečnostní pokyny Úspora energie a ohled na životní prostředí Péče a údržba, 24 AQUALTIS AQC9 6F7 Přerušení elektrického napájení Vyčištění filtru po každém cyklu Kontrola bubnu po každém cyklu Vyprázdnění nádoby na zachytávání vody po každém cyklu Čištění filtru Kondenzátoru Čištění sušičky Popis sušičky
Instalace • Plameny mohou sušičku poškodit, a proto musí být nainstalována v dostatečné vzdálenosti od plynových sporáků, kamen, radiátorů nebo 15 mm 15 mm varných desek. Kvůli dosažení optimální výkonnosti musí být sušička nainstalována v místnosti s teplotou prostředí od 20 do 23 °C. Je však funkční v teplotním rozmezí od 14 do 30 °C.
! Napájecí kabel elektrického napájení je třeba pravidelně kontrolovat. Pokud je napájecí kabel poškozen, musí být vyměněn výrobcem, jeho servisní službou nebo jiným kvalifikovaným personálem, aby se zabránilo nebezpečí. (viz Servisní služba). Nové nebo delší elektrické kabely lze zakoupit u autorizovaných prodejců. Maximální nápl: 9 kg CZ ! Výrobce neponese žádnou odpovědnost za nedodržení uvedených pokynů. ! V případě pochybností o výše uvedeném se obraťte na kvalifikovaného elektrikáře.
Upozornění CZ ! Tento elektrospotřebič byl navržen a vyroben v souladu s platnými mezinárodními bezpečnostními předpisy. Tato upozornění jsou uváděna z bezpečnostních důvodů a je třeba si je pozorně přečíst.
• • • • • • v domácnostech patří kuchyňský olej, aceton, denaturovaný alkohol, petrolej, prostředky na čištění skvrn, terpentýn, vosky a prostředky na odstraňování vosku. Než vložíte takovéto prádlo do sušičky, ujistěte se, že bylo vyprané v horké vodě s větším množstvím pracího prostředku. V sušičce nesušte prádlo obsahující molitan (známý také pod označením pěnový latex) nebo podobně strukturované pryžovité materiály. Molitanové materiály se mohou při ohřátí spontánně vznítit a způsobit požár.
Péče a údržba CZ Přerušení elektrického napájení ! Odpojte sušičku, když není v činnosti, a také během čištění a provádění údržby. Vyčištění filtru po každém cyklu Filtr představuje základní součást sušičky: Jeho úkolem je zachytávat chuchvalce vlny a chmýří, které se vytvářejí během sušení. Po ukončení sušení proto vyčistěte filtr jeho opláchnutím pod tekoucí vodou nebo jeho vyčištěním vysavačem.
houby nebo vysavačem. Nedělejte to prsty. 5. Proveďte zpětnou montáž obou částí filtru, vyčistěte povrch těsnění a vložte filtr do jeho uložení pootočením 4 klips do vodorovné polohy; ujištěte se o jejich správném uchycení. Čištění sušičky • Vnější kovové a plastové součásti a součásti z gumy se mohou čistit vlhkým hadrem.
Popis sušičky Otevírání dvířek Vlastnosti Model a Výrobní číslo Štítek s provozními údaji CZ Potáhněte za rukojeť Nádoba na zachytávání vody Filtr Kondenzátoru (otevřené v íko) Mřížka otvoru pro nasávání vzduchu Rukojeť víka kondenzátoru (potáhněte ji za účelem otevření) Nastavitelné nožky Ovládací panel Tlačítka a kontrolky Volitelné funkce Tlačítko s kontrolkou On/Off Kontrolka Tlačítko s EKO kontrolkou Start/Pause Kontrolky Průběhu programu Displej Otočný ovladač Volba programů Automatické
Displej Displej je tvořen třemi částmi, každá má odpovídající tlačítko. CZ Automatické sušení Po provedení volby programu vybaveného volitelnou funkcí Automatické sušení víckrát po sobě stiskněte tlačítko, dokud nebude zobrazena požadovaná úroveň automatického sušení. Když volitelná funkce automatického sušení není k dispozici, displej bude blikat a budou vydány tři akustické signály. ! Některé programy sušení nejsou kompatibilní se všemi úrovněmi automatického sušení.
Uvedení do činnosti a volba programů Volba programu CZ 1. Zasuňte zástrčku sušičky do zásuvky elektrického napájení. 2. Zvolte sušení podle druhu prádla (viz Prádlo). 3. Otevřete dvířka a ujistěte se, že je filtr čistý, že se nachází v předepsané poloze a že je nádoba na zachytávání vody prázdná a správně umístěná (viz Údržba). 4. Naplňte zařízení a dbejte přitom, aby se žádný kus prádla nedostal mezi dvířka a příslušné těsnění. Zavřete dvířka. 5.
Speciální programy Košile - Intenzivní sušení • Tento program je určen specificky pro košile vyrobené z bavlny. • Lze jej použít pro náplně až do 3 kg (přibližně 10 košil). • Doba trvání tohoto programu závisí na množství vloženého prádla, na zvoleném nastavení sušení a na rychlosti odstřeďování použité ve vaší pračce • Náplně prádla vysušené s použitím tohoto programu jsou obvykle připravené k oblečení; okraje a švy mohou být mírně vlhké.
CZ Osvěžit Díky proudu čerstvého vzduchu kyslík pronikne do vláken a odstraní z oblečení nepříjemné zápachy, jako je zápach cigaretového kouře, smažení nebo smogu. S tímto krátkým programem lze osvěžit oblečení v průběhu pouhých 20 minut ! Program pro provzdušnění prádla, který nebyl navržen pro jeho sušení: a proto jej nepoužívejte na mokrém prádle. • I když jej lze použít s náplněmi všech rozměrů (až do 9 kg), je mimořádně účinný s náplněmi malých rozměrů.
Tabulka programů ! Když kontrolka On/Off není rozsvícená, stiskněte příslušné tlačítko Program Snadné žehlení Osvěžit Bavlna Standard** Funkce Nastavení Krátký program (přibližně 10 minut), který zjemní vlákna prádla kvůli usnadnění jeho žehlení. 1. Nastavte otočný ovladač PROGRAMY do polohy 2. Dle potřeby zvolte volitelnou funkci Alarm. 3. Stiskněte tlačítko Start/Pause . . Program trvající 20 min, který provzdušní prádlo čerstvým vzduchem. 1. Nastavte otočný ovladač PROGRAMY do polohy 2.
CZ Program Funkce Nastavení Poznámky / Dostupné volitelné funkce Suší tmavé odvy. 1. Posute knoflík programu na . 2. Zvolte jakoukoliv poadovanou volbu. 3. Stisknte tlaítko . Vlhké , K žehlení , Věšák plus , Ramíko , Lehké vysušení , Prádelník . (Doporučuje se používat výhradně úroveň Sušení „Prádelník “). Slouží k rychlejšímu vysušení oblečení z bavlny nebo syntetických tkanin. 1. Nastavte otočný ovladač PROGRAMY do polohy . 2. Zvolte případné požadované volitelné funkce. 3.
Ovládací prvky • Otočný ovladač programů ! Upozornění: Když po stisknutí tlačítka pro uvedení do činnosti dojde ke změně polohy otočného ovladače volby programů, jeho nová poloha NEZMĚNÍ zvolený program. Pro provedení změny programu je třeba znovu stisknout tlačítko Start/Pause za účelem přerušení programu (kontrolka bude blikat žlutým světlem) a zvolit nový program a příslušné volitelné funkce; kontrolka začne blikat zeleným světlem. Zahajte nový program stisknutím tlačítka Start/Pause .
Prádlo CZ Rozdělení prádla Doby sušení • Zkontrolujte symboly na visačkách jednotlivých kusů prádla, abyste se přesvědčili, zda jsou vhodné pro bubnové sušení. • Rozdělte prádlo podle druhu tkaniny. • Vyprázdněte kapsy a zkontrolujte knoflíky. • Zavřete zipsy, zahákněte háčky a zavažte tkaničky, aniž byste je příliš utahovali. • Vyždímejte prádlo, abyste odstranili co největší množství vody.
Poruchy a jejich odstraňování V případě, že máte pocit, že sušička nefunguje správně, si dříve, než se obrátíte na Středisko servisní služby (viz Servisní služba), pozorně přečtěte následující rady pro řešení problémů. CZ Porucha: Možné příčiny / Řešení: Nedochází k uvedení sušičky do činnosti. • Zástrčka není zastrčena do elektrické zásuvky ve stěně zcela na doraz, a proto není zabezpečen řádný kontakt. • Došlo k přerušení dodávky elektrického proudu. • Došlo k vypálení pojistky.
Servisní služba CZ Kondenzační systém Tato sušička je vybavena Kondenzačním systémem pro sušení vašeho prádla. Pro umožnění jeho činnosti Kondenzátor používá plyn způsobující skleníkový efekt (fluorované plyny), které jsou předmětem Protokolu z Kyoto. Plyny F se nacházejí v hermeticky utěsněné jednotce. Tato utěsněná jednotka obsahuje 0,29 kg plynu R134a F, který působí v úloze chladiva. GWP = 1430 (0.4 t C02). V případě poškození uvedené jednotky je třeba provést její výměnu.
Instruções para a utilização MÁQUINA DE SECAR ROUPA Índice Instalação, 38 PT Português Onde instalar a máquina de secar roupa? Ventilação Ligação eléctrica Nivelamento da máquina de secar roupa Informações preliminares Advertências, 40 Segurança geral Economia energética e respeito pelo meio ambiente Cuidados e manutenção, 42 AQUALTIS AQC9 6F7 Interrupção da alimentação eléctrica Limpeza do filtro no fim de cada ciclo Controlo do tambor no fim de cada ciclo Esvaziamento do recipiente de recolha da á
Instalação • As chamas podem danificar a máquina de secar roupa, que deve pois ser instalada num local afastado de fogões 15 mm 15 mm a gás, aquecedores, radiadores ou placas de cozinha. Para um desempenho ideal, a máquina deve ser instalado à temperatura ambiente entre 20 e 23 °C. Mas irá funcionar a uma temperatura entre 14 e 30 °C.
! O cabo eléctrico não deve ser dobrado nem esmagado. Dimensões máximas de carga: 9 kg PT ! Se a ficha a substituir é do tipo incorporado, é necessário eliminá-la de forma segura. NÃO a deixe onde possa ser inserida numa tomada, podendo provocar choques eléctricos. ! O cabo eléctrico deve ser verificado periodicamente. Se o cabo de alimentação estiver danificado, deve ser substituído pelo fabricante, pelo seu serviço de assistência ou por pessoal qualificado, para evitar perigos. (consulte Assistência).
Advertências PT ! Este electrodoméstico foi concebido e fabricado em conformidade com as normas internacionais em matéria de segurança. Estas advertências são fornecidas por razões de segurança e devem ser observadas com atenção.
• • • • ou azeite, uma vez que isto representa um perigo de incêndio. As peças de roupa contaminadas com óleo podem inflamar espontaneamente, sobretudo quando são expostas a fontes de calor, como uma máquina de secar roupa. As peças de roupa podem ficar quentes, provocando uma reacção de oxidação com o óleo. A oxidação gera calor. Se não for o possível evacuar o calor, as peças de roupa podem ficar quentes o suficiente para se incendiarem.
Cuidados e manutenção PT Interrupção da alimentação eléctrica ! Desligue a máquina de secar roupa quando não estiver a funcionar, bem como durante as operações de limpeza e de manutenção. Limpeza do filtro no fim de cada ciclo O filtro é um componente fundamental para a secagem: a sua função consiste em recolher os resíduos de lã e o cotão que se formam durante a secagem. No fim da secagem, limpe o filtro enxaguando-o com água corrente ou limpando-o com o aspirador.
superfície interna da rede do filtro. ! ATENÇÃO: a parte dianteira da bomba de calor é realizada com finas chapas metálicas. Quando for limpá-lo, remova ou reposicione a unidade filtrante para a limpeza, preste atenção para não danificá-lo e para não se cortar. 4. Juntamente com a bomba de calor, é preciso limpar também com atenção o cotão que se forma nas placas metálicas passando um pano húmido, uma esponja ou o aspirador de pó. Não limpe com os dedos. 5.
Descrição da máquina de secar roupa Abertura da porta PT Características Modelo e Número de série Placa de características Puxe a pega Recipiente de recolha da água Filtro Grelha da admissão de ar Bomba de Calor (tampa aberta) Pés reguláveis Painel de comandos Indicador luminoso ECO Botões e indicadores luminosos Opção Botão e indicador luminoso On/Off Pega tampa da Bomba de Calor (puxe para abrir) Botão e indicador luminoso Start/Pause Indicador luminoso Avanço do programa Visor Selector de
Visor O visor possui três secções, cada uma com o respectivo botão. PT Secagem automática Depois de ter seleccionado um programa com a opção Secagem automática, prima várias vezes o botão até visualizar o nível de secagem automática pretendido. Se a opção de secagem automática não estiver disponível, o visor fica intermitente e são emitidos três sinais acústicos. ! Determinados programas de secagem não são compatíveis com todos os níveis de secagem automática.
Início e programas Selecção do programa PT 1. Introduza a ficha da máquina de secar roupa na tomada de alimentação eléctrica. 2. Seleccione a roupa em função do tipo de roupa (consulte Roupa). 3. Abra a porta e certifique-se de que o filtro está limpo e em posição, e que o recipiente de recolha da água está vazio e posicionado correctamente (consulte Manutenção). 4. Carregue a máquina tendo o cuidado de não deixar nenhuma peça de roupa entre a porta e o respectivo vedante. Feche a porta. 5.
Programa especial Programas para Camisas Camisas - Secagem intensiva • Este programa destina-se às camisas de algodão. • Pode ser utilizado para cargas de até 3 kg (cerca de 10 camisas). • A duração deste programa depende da carga, configuração de secagem seleccionada e velocidade de rotação utilizada na sua máquina de lavar. • As cargas secas com este programa ficam normalmente prontas a serem usadas. Os rebordos e as costuras podem ficar ligeiramente húmidos.
PT Arejar Graças a um fluxo de ar fresco, o oxigénio penetra nas fibras e remove odores desagradáveis da roupa, como o fumo de cigarro, odores a fritos e a poluição atmosférica. Com este breve programa poderá refrescar as suas roupas em apenas 20 minutos. ! O programa para refrescar as roupas não foi pensado para secá-las: portanto, não o utilize com roupas molhadas. • Embora possa ser utilizado com cargas de qualquer dimensão (até 9 kg), é particularmente eficaz com as cargas de pequenas dimensões.
Tabela dos programas ! Se o indicador luminoso On/Off não estiver aceso, prima o respectivo botão Programa Engomar Fácil Arejar tecidos Algodão Normal** Funções Definição Notas / Opções disponíveis Programa breve (cerca de 10 minutos) que amacia as fibras das peças para facilitar a passagem a ferro. . 1. Posicione o botão PROGRAMAS em 2. Seleccione a opção Alarme, se necessária. 3.Prima o botão de início/pausa . Não se trata de um programa de secagem (consulte a página anterior).
PT Programa Funções Definição Notas / Opções disponíveis Seca peças de vestuário escuras. 1. Posicione o botão PROGRAMAS em . 2. Seleccione as eventuais opções necessárias. 3.Prima o botão de início/pausa . Alarme Seca a roupas de algodão ou fibras sintéticas mais rapidamente. 1. Posicione o botão PROGRAMAS em . 2. Seleccione as eventuais opções necessárias. 3.Prima o botão de início/pausa . Alarme ou Antiarrugas Temperatura Alta . . Início retardado . Seca a roupa desportiva. 1.
Comandos • Selector dos programas ! Atenção: se, depois de ter premido o botão de início, alterar a posição do selector dos programas, a nova posição NÃO altera o programa seleccionado. Para alterar o programa, prima o botão Start/Pause para colocar o programa em pausa (o indicador luminoso fica amarelo intermitente) e seleccione o novo programa e as respectivas opções. O indicador luminoso fica verde intermitente. Prima o botão Start/Pause e inicia-se o novo programa.
Roupa PT Triagem da roupa Tempos de secagem • Verifique os símbolos que constam das etiquetas das diversas peças para se certificar de que podem ser submetidas a secagem em tambor. • Efectue a triagem da roupa consoante o tipo de tecido. • Esvazie os bolsos e verifique os botões. • Feche os fechos de correr e outros fechos e ate os cintos e os laços sem apertar demasiado. • Torça as peças de roupa para eliminar a maior quantidade de água possível.
Problemas e soluções Se lhe parecer que a máquina de secar roupa não está a funcionar correctamente, antes de contactar o Centro de Assistência (consulte Assistência), consulte atentamente as seguintes sugestões para a resolução dos problemas. Problema: Possíveis causas / Soluções: A máquina de secar roupa não arranca. • • • • O ciclo de secagem não se inicia. • • • • • PT A ficha não ficou bem encaixada na tomada eléctrica para que possa fazer contacto. Ocorreu um corte de corrente.
Assistência PT Sistema com bomba de calor Esta máquina de secar roupas é equipada com um sistema com bomba de calor para secar a sua indumentária. Para permitir o seu funcionamento, a bomba de calor utiliza gases com efeito de estufa (gases fluorados) que são contemplados pelo protocolo de Kyoto. Os gases F são contidos numa unidade hermeticamente lacrada. Esta unidade lacrada contém 0,29 kg de gás R134aF que é um agente arrefecedor. GWP = 1430 (0.4 t C02).
Mode d’emploi SÈCHE-LINGE Table des matières Installation, 56 FR Français Où installer le sèche-linge Ventilation Raccordement électrique Mise à niveau du sèche-linge Informations préliminaires Précautions, 58 Sécurité générale Économie d’énergie et protection de l’environnement Soin et entretien, 60 Interruption de l’alimentation éelectrique Nettoyage du filtre après chaque cycle Contrôle du tambour après chaque cycle Vidange du réservoir d’eau après chaque cycle Nettoyage du grupe filtre de la pomp
Installation • Placez votre sèche-linge à une certaine distance des cuisinières, fourneaux, radiateurs, ou plaques de cuisson à gaz, car 15 mm 15 mm les flammes peuvent endommager cet appareil. Pour garantir un fonctionnement optimal, installez votre sèche-linge dans une pièce à température ambiante entre 20 et 23 °C. Cependant, l’appareil fonctionnera si la température de la pièce se situe entre 14 et 30 °C.
aux consignes de sécurité. Ne la laissez jamais dans un endroit où elle peut être branchée à une prise et provoquer ainsi un choc électrique. Charge maximale: 9 kg FR ! Le câble électrique doit être contrôlé périodiquement. Si le câble est endommagé, il faut le faire remplacer par le fabricant, par son service après-vente ou par tout autre personnel qualifié afin d’éviter tout risque de danger. (voir Service après-vente).
Précautions FR ! Cet électroménager a été conçu et réalisé conformément aux normes internationales de sécurité. Ces consignes sont fournies pour des raisons de sécurité, il faut les respecter scrupuleusement.
• • • • • • contenant de l’huile végétale ou de l’huile de cuisson ou ayant été en contact avec des produits coiffants dans le sèche-linge, il convient de les laver au préalable à l’aide d’une dose supplémentaire de détergent. Cette précaution minimise, sans toutefois l’éliminer, le risque d’incendie. Les articles ne doivent pas être retirés du sèche-linge et empilés ou superposés lorsqu’ils sont chauds.
Soin et entretien FR Interruption de l’alimentation électrique ! Débranchez votre sèche-linge lorsque vous ne l’utilisez pas, lorsque vous le nettoyez et durant toutes les opérations d’entretien. Nettoyage du filtre après chaque cycle Le filtre est une pièce importante de votre sèche-linge : il accumule des peluches qui se forment durant le séchage. Par conséquent, une fois le séchage terminé, nettoyez le filtre en le rinçant sous l’eau courante ou avec votre aspirateur.
Quand vous le nettoyez ou que vous enlevez et replacez le bloc filtrant pour le nettoyage, faites attention à ne pas l’endommager et à ne pas vous couper. 4. En plus de la pompe à chaleur, il convient de toujours nettoyer soigneusement l’accumulation de poussière sur les plaques métalliques en utilisant un linge humide, une éponge ou un aspirateur. Ne pas utiliser les doigts. 5.
Description du sèchelinge FR Fonctions Ouvrir la porte Modèle et numéro de série Plaque signalétique Tirez sur la poignée Collecteur d’eau Filtre Arrivée d’air Pompe à chaleur (capot ouvert) Pieds réglables Poignée du couvercle de la pompe à chaleur (Tirer pour ouvrir) Tableau de commande Bouton On/Off Boutons d’options et témoins Témoin ECO Bouton Start/Pause Témoin de progression du programme Display Bouton Programme Programmes Automatiques Temps de Séchage Le bouton Start/Pause s’allume
Affichage L’écran se compose de trois parties avec un bouton pour chacune. FR Programmes Automatiques Lorsque vous sélectionnez un programme avec l’option Séchage par sonde, appuyez et relâchez le bouton jusqu’à ce que la sensibilité de la sonde de séchage s’affiche. Si l’option n’est pas disponible, l’affichage clignote et vous entendrez trois bips. ! Certains programmes de séchage ne sont pas compatibles avec certains niveaux.
Démarrage et programmes Sélection d’un programme FR 1. Raccordez le sèche-linge à la prise électrique. 2. Triez votre linge selon le type de textile (voir Linge). 3. Ouvrez le hublot et vérifiez si le filtre est propre et en place. Le collecteur d’eau doit être vide et en place (voir Entretien). 4. Remplissez la machine et vérifiez si les vêtements ne bloquent pas le joint. Fermez la porte. 5. Si le témoin Marche/Arrêt est éteint, appuyez sur le bouton Marche/Arrêt . 6.
Programmes spéciaux Chemises - Haute température • Ce programme est conçu pour les chemises en coton. • Le programme peut être utilisé pour une lessive de 3 kg (environ 10 chemises). • La durée de ce programme dépendra du poids de la charge de linge, du degré de séchage sélectionné et de la vitesse d’essorage utilisée lors du lavage. • Le linge séché à l’aide de ce programme est d’ordinaire prêt à être porté, mais certaines zones peuvent encore être légèrement humides au terme du programme.
FR Rafraîchissement Grâce à un courant d’air frais, l’oxygène pénètre dans les fibres et élimine les odeurs désagréables telles que les odeurs de tabac, de friture et de pollution. Grâce à ce programme court, vous pouvez facilement rafraîchir vos vêtements en tout juste 20 minutes. ! Ce programme sert à aérer vos vêtements pas à les sécher: ne l’utilisez par conséquent pas pour vos vêtements mouillés.
Tableau de programmes ! Si le témoin Marche/Arrêt n’est pas allumé, appuyez sur le bouton Marche/arrêt Programme Fonction Réglage Repassage Facile Programme court (environ 10 minutes) qui assouplit les fibres des vêtements prêts pour le repassage. 1. Placez le bouton PROGRAMME sur 2. Sélectionnez les options d’alarme si nécessaire. 3. Appuyez sur la touche Marche/Pause Programme froid de 20 minutes permettant d’aérer vos vêtements. 1. Placez le bouton PROGRAMME sur 2.
FR Programme Fonction Réglage Sèche vos vêtements foncé. 1. Placez le bouton PROGRAMME sur 2. Sélectionnez les options nécessaires. 3. Appuyez sur la touche Marche/Pause . Sèche vos vêtements en coton ou synthétique plus rapidement. 1. Placez le bouton PROGRAMME sur 2. Sélectionnez les options nécessaires. 3. Appuyez sur la touche Marche/Pause . Sèche vos vêtements de sport. Réchauffe votre serviette et votre peignoir de bain. Foncé Séchage Rapide Sportswear Remarques / Options disponibles .
Commandes • Bouton Programme ! Attention ! Si après avoir appuyé sur le bouton Démarrer, la position du bouton de programme a changé, la nouvelle position NE MODIFIERA PAS le programme sélectionné. Pour changer de programme, appuyez sur le bouton Start/ Pause pour mettre le programme en pause. Le témoin clignote en jaune. Sélectionnez le nouveau programme et les options souhaitées. Le témoin clignote alors en vert. Appuyez sur le bouton Start/Pause pour lancer le nouveau programme.
Linge FR Tri du linge Temps de séchage • Vérifiez les symboles sur les étiquettes des vêtements pour vous assurer que les articles peuvent être passés au sèche-linge. • Triez votre linge par type de textile. • Videz les poches et contrôlez les boutons. • Fermez les fermetures éclair et les crochets et attachez les ceintures et les cordons, sans serrer. • Essorez chaque article de manière à éliminer autant d’eau que possible.
Dépannage Votre appareil semble ne pas fonctionner correctement ? Avant de contacter votre réparateur agréé (voir Réparation), parcourez les quelques pages suivantes. Problème : Causes possibles/Solutions : Le sèche-linge ne démarre pas. • L’appareil n’est pas branché dans la prise de courant ou il n’est pas suffisamment branché pour effectuer un contact. • Il y a eu une panne de courant. • Le fusible a grillé. Essayez de raccorder un autre appareil à la prise. • Vous utilisez une rallonge.
Réparation 10/2016 Xerox Fabriano FR Système à pompe à chaleur Ce sèche-linge est équipé d’un système à pompe à chaleur pour sécher votre linge. Pour son fonctionnement, la pompe à chaleur utilise des gaz à effet serre (gaz fluorés) qui sont visés par le protocole de Kyoto. Les gaz F sont enfermés dans une unité étanche. Cette unité étanche contient 0,29 kg de gaz R134a F qui agit comme réfrigérant. GWP = 1430 (0.4 t C02). Si cette unité est abîmée, il faut la remplacer par une neuve.