
Instruction for Use


c\?~:lyR1I;I\.nF\aT~"k
LIIF\!TS
Packing
LJ
Do not throw the packing into the garbage: first sort out the
different materials (i.e.: steel, cardboard, polystyrene) fol-
lowing local regulations.
Declaration of conformity
This appliance is inteded to come into contact with foodstuffs
and conforms to D.L. 108 of 25.01.1992 (European Directive
89/109/EEC).
This appliance
is
CFC and HFC free
The foam and the circuit contain ecological material and require
particular attention in the recycling phase. The cooling circuit,
particularly the condenser, which
is
situated
at
the rear of the
appliance, must not be damaged. You can obtain detailed infor-
mation on scrapping from local environmental-protecting
boads. In case of doubts, please consult the manufacturer.
!(\!(-J!?!
".po!J?
APBh{Ar\lCE
The appliance you have just bought allows, dependent on models,
the storage of fresh foods and if
it
is equipped with the low tem-
perature compartment marked by a symbol
-,
the freezing-in
of small quantities of foods, the storage of commercially frozen
foods and the production of ice cubes. The appliance fitted with
super insulation have been designed to grant high performances
with
a
reduced energy consumption.
Please
read these instructions
carefully, you will find the description of your appliance and the
useful hints to obtain the best performance to store foods.
"""P"~?);3y~?-J%,~
nr
T
4
"
b
bt
YE
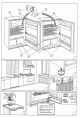
.AesP'LSANCE
(Fig.
I)
1) Temperature control knob of both compartments (thermostat)
2) Light switch
3) Low temperature compartment
4) Grids (adjustable in height)
5) Separator
6) Crispers
7)
Inner door liner with racks
8)
Butter and eggs compartment
"A
'",'5-;q',;p,:1"3*1!
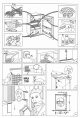
Please ensure that the appliance
Is
undamaged. Transit dam-
ages must be reported to your delaer within 24 h of receipt of
the appliance. We suggest you wait
1
hour approx before con-
necting the appliance to the mains to allow the refrigerant circuit
to be effective. The appliance should not be installed close to
heat sources, central heating, cookers, boilers, sunlight, etc. It
must however be located in
a
well ventilated dry space. If the
appliance is installed under kitchen furniture, leave
a
50mm air
gap
(Fig.
2).
Ensure that the appliance is level; adjust, if requi-
red, the front foot
(Fig.
3).
Fit the spacers (if provided) on the
top of the condenser
(Fig.
4).
To
ensure free air circulation, en-
sure that the ventilation grid situated above the appliance is not
obstructed
(Fig.
5).
Clean the interior with a sponge dampened
in a solution of warm water and bicarbonate of soda or vinegar.
r\!STALL,qTrQV
OF
TyE
A~~~~A~~~~
!J?IQEq
,cl
!fi~~~'('2"
(Fig.
16
-
17).
This appliance can be installed under
a
worktop, situated at a
distance
of
850
mm from the floor. Proceed
as
follows:
-
Remove screws
9
and
10
(at the front and rear) and remove
the worktop of the appliance
(Fig.
16).
-
Cut a ventilation opening in the worktop
(Fig.
17).
-
Install the appliance under the worktop and fix it at the front
by means of the screws 1
O
previously removed from the work-
top of the appliance.
-
Maintain the distance from the rear wall as shown
(Fig.
17),
=!
"
""n?cf\L
-
-
COT\$FqE~TM=J$\
\!D
Q"eQi,\,lQv
Check that the voltage on the rating plate, situated
at
the right
hand side of the crisper corresponds to the voltage in your home
(Fig.
6).
The earthing of this appliance is compulsory by law. The
manufacturer will accept no liability for injury to persons
or
damage to objects arising from the non-observance
of
this
requirement.
If the plug and the wall socket do not comply, have the socket
replaced by
a
qualified electrician. He should also check that
the section of the socket wires can withstand the power absorb-
ed by the appliance. The use of adapters, multiple sockets and
extension cords is not advisable. If absolutely necessary, use
simple or multiple adapters and extension cords in compliance
with local safety regulations, paying attention not to exceed
the maximum amperage, which is marked on the simple adap-
tors and on extension cords and that of the total power
marked on the multiple adapters. With the appliance plugged
in, the interior light should come on when the refrigerator
door is opened, unless the thermostat control knob
is
set
to
O
symbol. Adjust the thermostat control knob
as
suggested in
the next chapter. The refrigerator
is
ready for use.
For Great Britain only:
FLECTy!c.Ae
!"\!cQTX/r,4,TI~V
WARNING
-
THIS APPLIANCE MUST
BE
EARTHED
Fuse replacement
If the mains lead of this appliance
is
fitted with
a
BS
1363A 13
amp fused plug, to change
a
fuse in this type of plug use an
A.S.T.A. approved fuse to
BS
1362 type and proceed
as
follows:
1. Remove the fuse cover (A) and
fuse
(B)
2. Fit replacement 13A fuse into
fuse cover
3.
Refit both into plug.
IMPORTANT
The fuse cover must
be refitted when changing
a
fuse
and if the fuse cover is lost the
plug must not be used until
a
cor-
rect replacement is fitted.
Correct replacements are identified by the colour insert or the
colour embossed in words on the base of the plug. Replace-
ment fuse covers are available from your local electrical store.
Cc\'\\"FCyf'l\."
73
4
aryn!Oc3qqr
-
.
..i
.
"
s
n!
"
3
!C
i
If the fitted plug is not suitable for your socket outlet, then
it
should be cut off and disposed of in order to avoid a possible
shock hazard should it be inserted into
a
13A socket elsewhe-
re. A suitable alternative plug should then be fitted to the
ca-
ble. The wires in this mains lead
are
coloured in accordance
with the following code:
BLUE "NEUTRAL" ("N")
BROWN
"LIVE"
("L")
GREEN AND YELLOW "EARTH" ("E)
1.
The
GREEN
AND
YELLOW
wire must be connected
to
the
terminal in the plug, which is marked with the letter
"E"
or by
the Earth symbol
-
or coloured green or green and yellow.
2. The
BLUE
wire must be connected
to
the terminal which
is
marked with the letter "N" or coloured black.
3. The BROWN wire must be connected to the terminal which
is marked with the letter
"L"
or coloured red.
l
For the Republic of Ireland only
The information given in respect of Great Britain will frequently