Instruction booklet TUMBLE DRYER GB English, 1 D Deutsch, 37 I Italiano, 13 E Español, 49 F Français, 25 P Contents GB Installation, 2-3 Where to put your dryer Ventilation Electrical connection Before you start using your dryer Português, 61 Dryer description, 4 NL A Nederlands, 73 Arabic, 96 The front The back Control panel Start and programmes, 5-6 Choosing a programme Table of programmes Laundry, 7-8 AS60V Sorting your laundry Wash care labels Special clothing items Drying times Warni
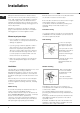
Installation GB ! Keep this instruction booklet on hand in order to refer to it when necessary. Take it with you when you move, and, should you sell this appliance or pass it on to another party, make sure that this booklet is supplied along with the dryer so that the new owner may be informed about warnings and suggestions on how the dryer works. ! Read these instructions carefully; the following pages contain important information on installation and suggestions on how the appliance works.
Open window venting ! Do not use extension cords. ! The power cord must not be bent or squashed. Installation The end of the tube should be directed downwards, to prevent warm moist air from condensing in the room or in the dryer. GB ! The power supply cord should be checked periodically and replaced by a cord specially prepared for this dryer and fitted only by authorised technicians (see Service). New or longer power cords are supplied at an extra charge by authorised dealers..
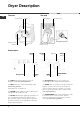
Dryer Description GB The front The back Control Panel Drum Rating plate Air Intake Vent Vent Tube fitted here Model & Serial numbers Caution: Hot! Filter Control panel ACTIVE Light HEAT Button Drying Guide ALARM Button Indicator TIMER Knob START Button PROGRAMMES Knob The START button begins drying a selected programme (see Start and Programmes). The Drying Guide allows you to consult a user friendly table of fabric types and load capacities.
Start and Programmes Choosing a programme 7. If you wish to eliminate the buzzer sound, press the ALARM button. GB 1. Plug the dryer into the electrical socket. 3. Open the door and make sure the filter is clean and in place (see Maintenance). 6. Set a delay time by using the TIMER knob if necessary. 9. About 10 minutes before the programme is completed, it enters the final COOL TUMBLE phase (fabrics are cooled), which should always be allowed to complete. Start and Programmes 5.
Start and Programmes Programmes GB Programme Automatic Drying (average loads) Automatic Drying (large loads) Easy Iron What it does... How to set it... Note: Dries completely: your clothes are ready to be worn. For average loads (from 1 to 3kg) of Cotton , polycotton or synthetics . 1. Select HIGH HEAT by pressing the HEAT button. 2. Position the PROGRAMMES knob on . 3. Press the START button , the ACTIVE light will turn on. ! If you select LOW HEAT, this programme will not dry your clothes.
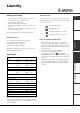
Laundry Sorting your laundry ● ● ● ● Check symbols on clothing labels to make sure that the articles can be tumble dried. Sort laundry by fabric type. Empty pockets and check buttons. Close zippers and hooks and tie loose belts and strings. Wring out each item in order to eliminate as much excess water as possible. GB Look at the labels on your garments, especially when tumble drying for the first time.
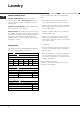
Laundry GB Special clothing items Times are approximate and can vary depending upon: Blankets and Bedspreads: acrylic items (Acilan, Courtelle, Orion, Dralon) must be dried with special care on LOW heat setting. Avoid drying for a long period of time. ● ● Pleated or creased garments: read the manufacturer’s drying instructions on the garment. Starched articles: do not dry these with non-starched items.
Warnings and Suggestions ● ● ● ● ● ● ● ● ● ● ● ● ● ● ● ● ● ● ● ● ● ● Saving energy and respecting the environment ● ● ● Wring out items to eliminate excess water before tumble drying (if you use a washing machine first, select a high spin cycle). Doing this will save time and energy during drying. Always dry full loads - you save energy: single items or small loads take longer to dry. Clean the filter after each use to contain energy consumption costs (see Maintenance).
Maintenance and Care GB Switching off the electricity Check the drum after each cycle Unplug your dryer when not using it, when cleaning it and during all maintenance operations. Turn the drum manually in order to remove small items (handkerchiefs) that could have been left behind. Cleaning the drum Clean the filter after each cycle The filter is an important part of your dryer: it accumulates lint and fluff that is formed while drying. Small items could also become trapped in the filter.
Troubleshooting One day your dryer seems not to be working. Before you call your Service Centre (see Service), go through the following troubleshooting suggestions: Possible causes / Solution: The tumble dryer won’t start. ● ● ● ● ● ● ● Its taking a long time to dry. ● ● ● ● ● ● ● Warnings and Suggestions ● The filter has not been cleaned (see Maintenance). The temperature setting is not ideal for the type of fabric you are drying (see Start and Programmes).
Service GB Before calling the Service Centre: ● ● Use the troubleshooting guide to see if you can solve the problem yourself (see Troubleshooting). If not, turn off the dryer and call the Service Centre closest to you. What to tell the Service Centre: name, address and post code. ● telephone number. ● the type of problem. ● the date of purchase. ● the appliance model (Mod.). ● the serial number (S/N). This information can be found on the data label inside the door of the machine.
Libretto di istruzioni ASCIUGATRICE GB English, 1 D Deutsch, 37 I Italiano, 13 E Español, 49 F Français, 25 P Indice I Installazione, 14-15 Dove installare l’asciugatrice Aerazione Collegamento elettrico Informazioni preliminari Português, 61 Descrizione del prodotto, 16 NL A Nederlands, 73 Arabic, 96 Lato anteriore Lato posteriore Pannello di controllo Avvio e programmi, 17-18 Scelta del programma Tabella dei programmi Bucato, 19-20 AS60V Controllo del bucato Etichette con le istruzioni p
Installazione I ! Tenere a portata di mano il presente libretto, così da poterlo consultare facilmente ad ogni evenienza. Tenere il libretto sempre vicino all’asciugatrice; nel caso in cui l’apparecchio venga venduto o ceduto ad altre persone, ricordarsi di consegnare loro questo libretto, così da permettere anche ai nuovi possessori di conoscere le avvertenze e i suggerimenti sull’utilizzo dell’asciugatrice.
Aerazione attraverso una finestra aperta ! Controllare regolarmente il cavo elettrico e, se necessario, farlo sostituire solo da tecnici qualificati che installeranno un altro cavo specifico per questo elettrodomestico (vedere la sezione Assistenza). Presso i rivenditori autorizzati è possibile acquistare cavi di ricambio e cavi più lunghi di quelli montati in fabbrica. ! Il produttore declina ogni responsabilità nei casi in cui le presenti regole non vengano rispettate.
Descrizione del prodotto I Lato anteriore Lato posteriore Prestazioni di esercizio Cestello Pannello di controllo Presa d’aria Collegamento per tubo di aerazione Numero di serie e numero di modello Attenzione, alta temperaturan Filtro Pannello di controllo pulsante TEMPERATURA Guida di asciugatura pulsante ALLARME Il pulsante START avvia il programma di asciugatura selezionato (vedere la sezione Avvio e programmi).
Avvio e programmi Scelta del programma 2. Selezionare il bucato in base al tipo di tessuto (vedere la sezione Bucato). 4. Caricare l’elettrodomestico, facendo attenzione ad evitare che qualche indumento possa frapporsi tra lo sportello e la relativa guarnizione. Chiudere lo sportello. 10. La fine del ciclo di asciugatura viene segnalato dall’avvisatore acustico. Aprire lo sportello, estrarre il bucato, pulire il filtro e metterlo nuovamente in posizione (vedere la sezione Manutenzione). Bucato 6.
Avvio e programmi Programmi I Programma Impostazione Note: 1. Selezionare TEMPERATURA ALTA premendo il pulsante TEMPERATURA. ! Impostando la TEMPERATURA Funzione Asciugatura Asciuga completamente: i automatica capi sono pronti per essere (medio carico) indossati. Per medi carichi (da 1 a 3 kg) di tessuti di Cotone , Misto cotone e poliestere o Sintetico . BASSA, questo programma non riuscirà ad asciugare i capi. Per fibre Acriliche o piccole quantità, selezionare il programma 2.
Bucato Controllo del bucato ● ● ● ● Controllare con attenzione le etichette degli indumenti, specialmente se si tratta della prima volta che si introduce il capo in un’asciugatrice. Di seguito sono riportati i simboli più comuni: Può essere inserito nell’asciugatrice Non inserire nell’asciugatrice Descrizione Controllare i simboli riportati sulle etichette dei vari capi, per verificare se l’indumento può essere introdotto nell’asciugatrice. Distinguere il bucato in base al tipo di tessuto.
Bucato I Tessuti particolari I tempi sono approssimativi e possono variare in base a: Coperte e copriletti: tessuti in acrilico (Acilan, Courtelle, Orion, Dralon) devono essere asciugati con estrema cura a temperatura BASSA. Non impostare mai tempi di asciugatura lunghi. • Quantità di acqua trattenuta dai capi dopo la centrifuga: le asciugamani e in genere i capi delicati trattengono molta acqua. Indumenti con pieghe o plissettati: leggere le istruzioni di asciugatura fornite dal produttore.
Avvertenze e suggerimenti Sicurezza I Descrizione Avvio e programmi Smaltimento e Riciclaggio Come parte del nostro costante impegno in difesa dell’ambiente, ci riserviamo il diritto di utilizzare componenti riciclati per diminuire i costi del cliente e ridurre lo spreco di materiali. • Smaltimento del materiale di imballaggio: seguire le normative locali in tema di smaltimento, così da permettere di riciclare l’imballaggio.
Cura e manutenzione I Scollegamento dell’apparecchio dalla rete elettrica L’asciugatrice deve essere sempre scollegata quando non è in funzione, durante le operazioni di pulizia e durante qualsiasi operazione di manutenzione. Pulizia del filtro dopo ogni ciclo Il filtro è un componente fondamentale dell’asciugatrice: la sua funzione è quella di raccogliere il laniccio e i nugoli che si formano durante l’asciugatura.
Ricerca guasti Potrebbe accadere che l’asciugatrice sembri fuori uso. Prima di contattare il centro di assistenza (vedere la sezione Assistenza), analizzare i seguenti suggerimenti per la risoluzione dei problemi: L’asciugatura impiega troppo tempo. • Il filtro potrebbe non essere stato pulito correttamente (vedere la sezione Manutenzione). • La temperatura impostata potrebbe non essere adatta al tipo di tessuto da asciugare (vedere la sezione Avvio e programmi).
Assistenza Prima di chiamare il centro di assistenza: I • Provare a risolvere il problema in modo autonomo servendosi dei consigli della sezione Risoluzione dei problemi. • In caso contrario, spegnere l’asciugatrice e chiamare il più vicino centro di assistenza. Assistenza Notizie da comunicare al centro di assistenza: • nome, indirizzo e codice postale • numero di telefono • tipo di problema verificatosi • data di acquisto • modello dell’apparecchio (Mod.
Notice d’utilisation et installation SÈCHE-LINGE GB English, 1 D Deutsch, 37 NL I Italiano, 13 E Español, 49 A Nederlands, 73 Arabic, 96 F Français, 25 P Português, 61 Table des Matières F Installation, 26-27 Où installer votre sèche-linge Ventilation Connexions électrique Avant de commencer à utiliser votre sèche-linge Description du sèche-linge, 28 Vue de face Vue de l’arrière Panneau de commandes Démarrage et programmes, 29-30 Choisir un programme Tableau des programmes AS60V Linge, 31-32
Installation F ! Conservez cette notice d’utilisation et d’installation à portée de main de manière à pouvoir vous y référer si nécessaire. Emmenez-la avec vous si vous déménagez, et, si vous vendez cet appareil ou que vous le donniez à un tiers, faites en sorte que cette notice accompagne le sèche-linge de manière à ce que le nouveau propriétaire soit informé des avertissements et suggestions concernant le fonctionnement de ce sèche-linge.
Ventilation par fenêtre ouverte ! Le cordon d’alimentation ne doit pas être courbé ou écrasé. ! Le cordon d’alimentation électrique doit être vérifié périodiquement et remplacé par un cordon préparé spécialement pour ce sèche-linge, et installé uniquement par des électriciens agréés (voir Service Après-vente). Des cordons d’alimentation neufs ou plus longs sont fournis par les revendeurs agréés contre un supplément.
Description du sèche-linge F Vue de face Vue de l’arrière Plaque signalétique Tambour Panneau de commande Numéro du Modèle et Numéro de Série Orifice d’entrée d’air Tuyau de ventilation fixé ici Filtre Attention: Chaud! Panneau de commandes bouton TEMPÉRATURE Guide de Séchage voyant lumineux ACTIVITÉ bouton d’ALARME Indicateur bouton de MINUTERIE bouton DÉPART bouton des PROGRAMMES Le bouton DÉPART commence le séchage selon un programme sélectionné (voir Démarrage et Programmes).
Démarrage et Programmes Choisir un programme 2. Triez votre linge en fonction du type de textiles (voir Linge). 3. Ouvrez la porte et en assurant-vous que le filtre soit propre et en place (voir Entretien). 9. 10 minutes environ avant que le programme ne soit terminé, celui-ci entre dans la phase finale de REFROIDISSEMENT (les textiles sont refroidis), que vous devez toujours laisser se terminer. Démarrage et programmes 5.
Démarrage et Programmes Programmes F Programme Ce qu’il fait... Comment le régler... Remarque: ! Si vous sélectionnez TEMPÉRATURE DOUCE, ce programme ne sèchera pas vos vêtements. Pour les fibres en acrylique ou les petites charges, sélectionnez le Séchage Minuté. Ce programme peut aussi être utilisé pour les charges lourdes si vous voulez obtenir un résultat légèrement plus sec. ! Si vous sélectionnez 1.
Linge Étiquettes d’Entretien Vérifiez les symboles sur les étiquettes des vêtements pour vous assurer que les articles peuvent être passés au sèche-linge. ● Triez votre linge par type de textile. ● Videz les poches et vérifiez les boutons. ● Fermez les fermetures Éclair et les crochets et attachez les ceintures et les cordons. ● Essorez chaque article de manière à éliminer autant d’eau que possible. ! Ne chargez pas de vêtements mouillés qui dégouttent dans le sèche-linge.
Linge F Vêtements spéciaux Ces temps sont approximatifs et peuvent varier en fonction des paramètres suivants : Les Couvertures et Dessus de lits : articles en acrylique (Acilan, Courtelle, Orion, Dralon) doivent être séchés avec des précautions particulières, à BASSE température. Évitez de les sécher pendant une durée prolongée. Vêtements plissés ou froissés : lisez les instructions de séchage du fabricant figurant sur le vêtement.
Avertissements et Suggestions ● ● ● ● ● ● ● ● ● ● ● ● ● ● ● ● Information recyclage et enlèvement de nos produits Dans le cadre de notre engagement envers la protection de l’environnement, nous nous réservons le droit d’utiliser des pièces recyclées de qualité afin de réduire les coûts pour notre clientèle et de limiter les gaspillages de matières premières. ● Élimination du matériau d’emballage: respectez les réglementations locales, de manière à ce que ’emballage puisse être recyclé.
Entretien et Nettoyage F Éteignez l’électricité Nettoyage du tambour Débranchez votre sèche-linge lorsque vous ne l’utilisez pas, lorsque vous le nettoyez et durant toutes les opérations d’entretien. ! Pour nettoyer le tambour, ne pas utiliser d’abrasifs, de laine d’acier ni de produits de nettoyage pour acier inoxydable. Nettoyez le filtre après chaque cycle Un film coloré peut parfois apparaître à la surface du tambour en acier inoxydable.
Que faire en cas de panne Votre sèche-linge semble ne pas fonctionner. Avant d’appeler votre Centre de Service d’Entretien (voir Service d’Entretien), passez en revue les suggestions de dépannage suivantes : Problème : Causes possibles / Solution : ● ● ● ● ● ● L’appareil met longtemps à sécher. ● ● ● ● ● ● ● ● Avertissements et Suggestions ● Le filtre n’a pas été nettoyé (voir Entretien).
Service Après-Vente F Avant d’appeler le Centre de Service Après-Vente : ● ● Utilisez le guide de dépannage pour voir si vous pouvez résoudre le problème vous-même (voir Que faire en cas de panne). Si non, éteignez le sèche-linge et appelez le Centre de Service Après-Vente le plus proche. Service Après-Vente Quelles informations donner au Centre de Service Après-Vente : ● Vos nom, adresse et code postal. ● Votre numéro de téléphone. ● Le type de problème. ● La date d’achat.
Bedienungsanleitung WÄSCHETROCKNER GB English, 1 D Deutsch, 37 NL I Italiano, 13 E Español, 49 A Nederlands, 73 Arabic, 96 F Français, 25 P Inhaltsverzeichnis D Installierung, 38-39 Aufstellung Ihres Wäschetrockners Belüftung Stromanschluss Vor der Inbetriebsetzung Ihres Wäschetrockners Português, 61 Beschreibung Ihres Wäschetrockners, 40 Vorderseite Rückseite Bedienblende Start und Programme, 41-42 Programmauswahl Programmtabelle AS60V Gewebeart, 43-44 Tipps zum Sortieren Ihrer Wäsche Pfle
Installierung D ! Bewahren Sie diese Bedienungsanleitung an einem sicheren Ort auf, um sie bei Bedarf als Bezug verwenden zu können. Nehmen Sie sie bei einem Umzug mit und stellen Sie bei einem Verkauf oder der Weitergabe an eine andere Person sicher, dass diese Bedienungsanleitung zusammen mit dem Wäschetrockner abgegeben wird, damit sich der neue Eigentümer ausreichend über die Bedienung und mögliche Vorsichtsmaßnahmen bei der Verwendung des Wäschetrockners informieren kann.
Entlüftung durch ein offenes Fenster ! Das Stromkabel der Gerätes muss regelmäßig überprüft werden. Ein Austausch dieses darf nur von einem konzessionierten Elektroinstallateur vorgenommen werden (siehe Kundendienst). Neue oder längere Stromkabel sind von konzessionierten Service Partnern erhältlich. ! Der Hersteller übernimmt keinerlei Haftung, sollten diese Regeln nicht genau beachtet werden.
Beschreibung Ihres Wäschetrockners D Vorderseite Bedienblende Modell- & Seriennummer Rückseite Typenschild Trommel Belüftungsschlitze Anschluss für Abluftschlauch Filter Vorsicht,heiß! Bedienblende BETRIEBSKONTROLL-Leuchte Anzeige START-Taste TEMPERATURAUSWAHL-Taste ALARM-Taste Trocknungszeiten ZEITVORWAHL-Knopf Mit der START-Taste wird das ausgewählte Programm gestartet (siehe Start und Programme).
Start und Programme Programmauswahl 2. Die Wäsche je nach Gewebeart sortieren (siehe Gewebeart). 4. Die Maschine beladen und dabei sicherstellen, dass keine Wäschestücke zu nah an der Türdichtung sind. Die Tür schließen. 8. Die START-Taste zur Inbetriebsetzung des Wäschetrockners drücken. Die BETRIEBSKONTROLL-Leuchte wird eingeschaltet und bleibt an - selbst während einer Verzögerungsphase. Die Kontrollleuchte bleibt so lange eingeschaltet, bis die Trocknertür geöffnet wird.
Start und Programme D Programme Programme Automatisches Trocknen (durchschnittliche Beladungsmenge) Automatisches Trocknen (große Beladungsmenge) Leichtbügeln Funktion Einstellung Hinweis: Vollständiges Trocknen: macht die Wäsche tragfertig. Für eine Beladung von 1 - 3 kg). Geeignet für Baumwolle , Baumwoll-Mischgewebe oder Synthetik . 1. Durch Drücken der TEMPERATURAUSWAHL-Taste HOHE TEMPERATUR auswählen. 2. Den PROGRAMMWAHL-Knopf auf einstellen. 3. Die START-Taste drücken.
Gewebeart Tipps zum Sortieren Ihrer Wäsche Pflegeetiketten • Symbole auf den Etiketten überprüfen, um sicherstellen zu können, dass die entsprechenden Wäschestücke trocknergeeignet sind. • Die Wäsche nach Gewebearten sortieren. • Taschen leeren und Knöpfe überprüfen. • Reißverschlüsse und Haken schließen und lose Gürtel und längere Schnüre zusammenbinden. • Jedes Wäschestück auswringen, um schon im Voraus möglichst viel Wasser zu entfernen. ! Keine tropfend nasse Wäsche in den Trockner legen.
Gewebeart D Artikel, bei denen besondere Sorgfalt erforderlich ist Decken und Bettüberwürfe: Artikel aus Acrylfasern (Acilan, Courtelle, Orion, Dralon) müssen vorsichtig bei NIEDRIGER Temperatur getrocknet werden. Außerdem dürfen solche Artikel nicht zu lange getrocknet werden. Kleidungsstücke mit Falten oder plissierte Kleidungsstücke: Die am Artikel angegebenen Trocknungsanweisungen des Herstellers beachten.
Warnhinweise und Empfehlungen ● ● ● ● ● ● ● ● ● ● ● ● ● ● ● ● ● ● ● ● ● Gemäß der Europäischen Richtlinie 2002/96/EC über Elektround Elektronik-Altgeräte (WEEE) dürfen ElektrohaushaltsAltgeräte nicht über den herkömmlichen Haushaltsmüllkreislauf entsorgt werden. Altgeräte müssen separat gesammelt werden, um die Wiederverwertung und das Recycling der beinhalteten Materialien zu optimieren und die Einflüsse auf die Umwelt und die Gesundheit zu reduzieren.
Wartung und Pflege D Stromversorgung abschalten Trommelreinigung Den Trockner bei Nichtverwendung, während der Reinigung und allen Wartungsarbeiten vom Stromnetz trennen. ! Keine Scheuermittel, Stahlwolle oder Edelstahlreiniger zum Säubern der Trommel verwenden. Filter nach jedem Zyklus reinigen Der Filter stellt einen wichtigen Bestandteil Ihres Trockners dar: Er nimmt Flusen und Fasern auf, die sich während des Trocknens ansammeln. Außerdem können kleine Gegenstände am Filter hängen bleiben.
Fehlersuche Bei einer Gerätestörung bitte zunächst folgende, mögliche Ursachen überprüfen, bevor Sie sich an unseren autorisierten Kundendienst werden: Mögliche Ursache / Lösung: Trockner startet nicht. ● ● ● ● ● ● Wäsche trocknet nur langsam. ● ● ● ● ● ● ● ● Der Filter wurde nicht gereinigt (siehe Wartung). Die Temperatureinstellung eignet sich nicht für die zu trocknende Gewebeart (siehe Start und Programme).
Kundendienst D Bevor Sie den autorisierten Kundendiens anrufen: ● ● Versuchen Sie, mit Hilfe der Fehlersuchtabelle das Problem selbst zu lösen (siehe Fehlersuche). Falls Sie das Problem nicht selbst lösen können, schalten Sie den Trockner aus und rufen Sie den Kundendienst in Ihrer Nähe an. Vom Kundendienst benötigte Information: Name, Adresse und Postleitzahl Telefonnummer ● Kurze Beschreibung des Problems ● Kaufdatum ● Trocknermodell (Mod.
Folleto de instrucciones SECADORA GB English, 1 D Deutsch, 37 I Italiano, 13 E Español, 49 F Français, 25 P Índice de materias E Instalación, 50-51 Dónde instalar la secadora Ventilación Conexiones eléctrica Antes de empezar a utilizar la secadora Português, 61 Descripción de la secadora, 52 NL A Nederlands, 73 Arabic, 96 La sección delantera La sección trasera El panel de control Comienzo y programas, 53-54 Seleccionar un programa Tabla de programas La colada, 55-56 AS60V Clasificar la co
Instalación E ¡Guarde este manual de instrucciones a mano a fin de consultarlo cuando sea necesario. Llévelo con usted cuando se traslade, y, si vendiera este electrodoméstico o si lo pasa a terceros compruebe que este manual se incluya con la secadora de forma que el nuevo propietario quede informado acerca de las advertencias y recomendaciones, además del funcionamiento de la secadora.
Ventilación mediante una ventana abierta ¡No utilice cables alargadores. ¡El cable de alimentación no debe estar ni doblado ni torcido. ¡Compruebe que la secadora tenga la ventilación adecuada y que el extremo del tubo de ventilación no esté orientado hacia el conducto de entrada de aire. ¡El tubo de ventilación siempre debe estar ajustado a fin de ofrecer el rendimiento más óptimo. ¡Asegúrese que el tubo de ventilación y los respiraderos de entrada de aire no estén obstruidos o bloqueados.
Descripción de la secadora E La sección delantera Panel de control Modelo y número de serie La sección trasera Matrícula Tambor Respiradero de entrada de aire Tubo de ventilación ajustado aquí Filtro Precaución: Caliente Panel de control TERMOSTATO Tabla de programas de secado Luz de ENCENDIDO Botón de ALARMA El botón de INICIO comienza a secar un programa seleccionado (véase Comienzo y Programas). El TERMOSTATO selecciona la temperatura de secado (véase Comienzo y Programas).
Comienzo y Programas Seleccionar un programa Clasifique la colada según la clase de tejido (véase La colada). 3. Abra la puerta y asegúrese que el filtro está limpio y en posición (véase Mantenimiento). 4. Cargue la máquina y asegúrese que no haya ninguna prenda atrapada en el cierre de la puerta. Cierre la puerta. 5. Seleccione el programa de secado que desee, comprobando la tabla de programas (véase Programas) además de las indicaciones para cada tipo de tejido (véase La colada).
Comienzo y Programas Programas E Programa Secado automático (cargas normales) Secado automático (cargas grandes) Planchado fácil Secado temporizado hasta 120 minutos Fase de secado en frío Qué hace... Qué programa... Nota: Seca la ropa totalmente: las prendas están listas para usar. Para cargas normales (de 1 a 3 kg) de algodón , polialgodón o sintéticas . 1. Seleccione MUCHO CALOR presionando el TERMOSTATO. 2. Coloque el botón PROGRAMAS en . 3.
La colada Etiquetas de recomendaciones durante el lavado de la ropa Clasificar la colada Lea siempre las etiquetas de la prenda, especialmente cuando se sequen con calor por primera vez. Los símbolos que aparecen a continuación son los más comunes: Instalación Puede secarse con calor No secar con calor Descripción • Compruebe los símbolos en las etiquetas de la ropa a fin de asegurar que los artículos pueden secarse con calor. • Clasificar la colada por tipo de tejido.
La colada E Prendas especiales Los tiempos son aproximados y pueden variar dependiendo de: Mantas y sobrecamas: Los artículos acrílicos (Acilan, Courtelle, Orion, Dralón) deben secarse teniendo especial cuidado y en ajuste POCO calor. Evite secarlos durante mucho tiempo. Prendas plisadas o arrugadas: lea las instrucciones de secado del fabricante incluidas con la prenda. Artículos almidonados: no seque estos artículos con otras prendas no almidonadas.
Advertencias y recomendaciones ● ● ● ● ● ● Seguridad general ● ● ● ● ● ● ● ● ● ● ● ● ● Información sobre reciclado y disposición Como parte de nuestro compromiso continuo por ser responsables con el medio ambiente, nos reservamos el derecho de utilizar componentes reciclados de calidad para mantener los costes de nuestros clientes bajos y reducir el desperdicio de materiales. ● Desechar el material de embalaje: siga las normativas locales, de forma que el embalaje pueda reciclarse.
Mantenimiento y cuidados E Desconectar la electricidad Limpieza del tambor Desenchufe la secadora mientras no la esté utilizando, cuando la limpie y durante los trabajos de mantenimiento. ¡ No utilice productos de limpieza abrasivos, lana de acero o acero inoxidable para limpiar el tambor. Limpiar el filtro después de cada ciclo El filtro es una pieza importante de la secadora: acumula las pelusas y los hilos que se forman mientras se seca la ropa.
Resolución de problemas Si un día la secadora deja de funcionar. Antes de llamar al Centro de Servicio Técnico (véase Servicio), realice las siguientes comprobaciones: Problema: Posibles causas / Solución: ● ● ● ● ● ● Tarda mucho tiempo en secar. ● ● ● ● ● ● ● ● Advertencias y Mantenimiento y recomendaciones cuidados ● No se ha limpiado el filtro (véase Mantenimiento). El ajuste de temperatura no es ideal para el tipo de tejido que está secando (véase Comienzo y Programas).
Servicio E Antes de llamar al centro de servicio técnico: ● ● Utilice la guía de resolución de problemas para ver si puede resolver el problema usted mismo (véase Resolución de problemas). Si no es así, desconecte la secadora y llame al Centro de servicio técnico más cercano. Qué información debe facilitar al centro de servicio técnico: nombre, dirección y código postal. número de teléfono. ● el problema. ● la fecha de compra. ● el modelo del electrodoméstico (Mod.). ● el número de serie (N/S).
Folheto de instruções MÁQUINA DE SECAR ROUPA GB English, 1 D Deutsch, 37 NL I Italiano, 13 E Español, 49 A Nederlands, 73 Arabic, 96 F Français, 25 P Português, 61 Índice P Instalação, 62-63 Onde colocar a sua máquina de secar roupa Ventilação Ligação eléctrica Antes de iniciar a utilização da sua máquina de secar roupa Descrição da máquina, 64 Painel frontal Painel traseiro Painel de controlo Arranque e programas, 65-66 Escolher um programa Tabela de programas AS60V Roupa, 67-68 Escolher a
Instalação P ! Tenha este folheto de instruções à mão para consultá-lo sempre que necessário. Leve-o consigo se mudar de casa e, caso venda este aparelho, passe o folheto ao novo proprietário, de modo a certificar-se de que este folheto permanece com o equipamento e de que o novo proprietário pode estar informado acerca dos avisos e sugestões sobre o respectivo funcionamento.
Ventilação de janela aberta ! O fio de alimentação eléctrica deve ser verificado periodicamente e substituído por um fio preparado especialmente para esta secadora, apenas por técnicos autorizados (ver Reparações). Fios de alimentação novos ou mais longos são fornecidos sem custos adicionais por representantes autorizados. ! O fabricante recusa qualquer responsabilidade caso estas regras não seja seguidas. ! Se tiver dúvidas sobre o mencionado acima consulte um electricista qualificado.
Descrição da máquina de secar P Painel frontal Painel de controlo Números de modelo e de série Painel traseiro Tambor Chapa de classificação Cuidado Está Quente Filtro Entrada de ar Tubo de ventilação encaixado aqui Painel de controlo botão TEMPERATURA Guia de Secagem luz indicadora ACTIVA botão ALARME O botão INICIAR inicia a secagem num programa seleccionado (ver Arranque e Programas). O botão TEMPERATURA selecciona a temperatura de secagem (ver Arranque e Programas).
Arranque e Programas Escolher um programa 1. 3. Abra a porta e certifique-se de que o filtro está limpo e bem colocado (ver Manutenção). 4. Carregue a máquina e certifique-se de que nenhuma peça fica presa no fecho da porta. Feche a porta. 5. Escolha o programa de secagem após consulta da tabela de Programas (ver Programas), bem como as indicações para cada tecido (ver Roupa). - Defina a temperatura com o botão TEMPERATURA.
Arranque e Programas Programas P Programa Secagem automática (cargas médias) Secagem automática (cargas grandes) Engoma fácil Secagem temporizada até 120 minutos Fase de rotação a frio O que faz... Como defini-lo... Nota: Seca completamente: as suas 1. Seleccione TEMP. ELEVADA premindo o botão roupas ficam prontas a vestir. TEMPERATURA. Para cargas médias (de 1 a 3 2. Posicione o botão PROGRAMAS kg) de algodão , poli-algodão em . ou sintéticos . 3.
Roupa Etiquetas de cuidado na lavagem • Consulte os símbolos nas etiquetas das roupas, de modo a certificar-se de que os artigos podem ser utilizados na secadora. • Escolha a roupa por tipo de tecido. • Esvazie os bolsos e verifique os botões. • Feche os fechos de correr e desaperte cintos e correias. • Torça cada peça de modo a eliminar o máximo de água possível. Observe as etiquetas nas suas peças de roupa, especialmente se está a utilizar a secadora pela primeira vez.
Roupa P Peças delicadas Estes tempos são aproximados e podem variar dependendo de: Cobertores e cobertas de cama: artigos em acrílico (Acilan, Courtelle, Orion, Dralon) devem ser secos com especial cuidado com um TEMPERATURA BAIXA. Evite secar por um longo período de tempo. Peças pregueadas ou enrugadas: leia as instruções de secagem do fabricante da peça. Artigos com goma: não seque estes artigos com peças sem goma.
Avisos e Sugestões ● ● ● ● ● ● ● Segurança Geral ● ● ● ● ● ● ● ● ● ● ● ● ● ● Poupar energia e respeitar o ambiente ● Torça as peças de vestuário para eliminar o excesso de água antes de colocá-las na máquina de secar (se primeiro utilizar uma máquina de lavar, seleccione um ciclo de centrifugação elevado). Ao fazer isto, poupa tempo e energia durante a secagem. ● Seque sempre com cargas completas – assim, poupa energia: artigos únicos ou pequenas cargas podem demorar mais tempo a secar.
Manutenção e Cuidado P Desligar a electricidade Limpar o tambor Desligue a secadora quando não estiver em utilização, durante tarefas de limpeza e durante todas as operações de manutenção. ! Não utilize agentes de limpeza de aço inoxidável ou palha de aço, abrasivos, para limpar o tambor. Limpar o filtro depois de cada ciclo O filtro é uma parte importante da sua secadora: acumula restos de fibras e resíduos que se formam durante a secagem. Pequenos objectos também podem ficar presos no filtro.
Resolução de problemas Um dia a sua máquina parece não querer funcionar. Antes de contactar o seu Centro de Serviços (ver Reparação), analise as seguintes sugestões de resolução de problemas: Causas possíveis / Solução: A secadora não inicia. ● ● ● ● ● ● Demora muito tempo a secar ● ● ● ● ● ● ● ● Avisos e Sugestões ● O filtro não foi limpo (ver Manutenção). A definição de temperatura não é ideal para o tipo de tecido que está a secar (ver Arranque e Programas).
Reparação P Antes de contactar o Centro de Serviços: ● ● Utilize o guia de resolução de problemas para ver se consegue resolver o problema (ver Resolução de problemas). Caso contrário, desligue a secadora e contacte o Centro de Serviço mais próximo. O que dizer ao Centro de Serviço: nome, morada e código postal. ● número de telefone. ● o tipo de problema. ● a data de compra. ● o modelo do aparelho (Mod.). ● o número de série (S/N).
Gebruiksaanwijzing DROOGAUTOMAAT GB English, 1 D Deutsch, 37 I Italiano, 13 E Español, 49 F Français, 25 P Inhoud NL Installatie, 74-75 Het plaatsen van de droger Ventilatie Elektrische aansluiting Voor het eerste gebruik van de droger Português, 61 Beschrijving van de droogautomaat, 76 NL A Nederlands, 73 Arabic, 96 De voorkant De achterkant Bedieningspaneel Start en programma’s, 77-78 Een programma kiezen Programmatabel Wasgoed, 79-80 AS60V Het wasgoed sorteren Droogsymbolen Speciaal was
Installatie NL ! Bewaar deze gebruiksaanwijzing zodat u haar indien nodig kunt raadplegen. Neem de gebruiksaanwijzing mee als u verhuist en mocht u dit apparaat verkopen of aan iemand anders geven, geef dit boekje er dan bij, zodat de volgende eigenaar ook kennis kan nemen van de veiligheidsvoorschriften en aanbevelingen voor gebruik. ! Lees de instructies aandachtig door; op de volgende bladzijden vindt u belangrijke informatie over de installatie en aanbevelingen voor het gebruik van het apparaat.
Luchtafvoer door een open raam ● De droger moet waterpas worden geplaatst voor een optimale werking. Wanneer u de droger op de uiteindelijke plek hebt geïnstalleerd, controleer dan eerst of de zijkanten waterpas staan en doe daarna hetzelfde met de voor- en achterkant. Het stopcontact moet geaard zijn. Het stopcontact moet geschikt zijn voor de maximale stroom van het apparaat; deze wordt aangegeven op het typeplaatje (zie Beschrijving van de droogautomaat).
Beschrijving van de droogautomaat NL De voorkant De achterkant Bedieningspaneel Trommel Typeplaatje Model- en serienummers Luchtinvoeropening Luchtafvoerbuis hier plaatsen Waarschuwing: Heet Pluizenfilter Bedieningspaneel WARMTE toets Droogtabel ACTIEF lampje ALARM toets Als u de START toets indrukt, begint de droogautomaat met het geselecteerde programma (zie Start en programma’s).
Start en programma’s Een programma kiezen 1. 3. Doe de deur open en zorg ervoor dat het pluizenfilter schoon is en op zijn plaats zit (zie Reiniging en Onderhoud). 4. Vul de droogtrommel en zorg ervoor dat er geen wasgoed tussen de deur zit. Sluit de deur. 5. Kies het droogprogramma met behulp van de programmatabel (zie Programma’s) en de indicatoren voor elke stofsoort (zie Wasgoed). - Regel de temperatuur met de WARMTE toets.
Start en programma’s Programmatabel NL Programma Wat het doet... Hoe in te stellen... Opmerkingen door te drukken Automatisch Droogt volledig: uw kleding kan 1. Kies HOGE drogen op de WARMTE toets. direct worden gedragen. Voor 2. Zet de PROGRAMMA (gemiddelde gemiddelde ladingen (van 1 tot keuzeschakelaar op . lading) 3 kg) katoen , polykatoen of 3. Druk op de START toets , het synthetische stoffen . ACTIEF lampje gaat branden. ! op LAGE droogt dit programma uw kleding niet.
Wasgoed Het wasgoed sorteren Droogsymbolen • Controleer de droogsymbolen om te zien of de artikelen in de droogtrommel gedroogd kunnen worden. • Sorteer het wasgoed per stofsoort. • Leeg de zakken en controleer de knopen. • Sluit ritsen en haakjes en bind losse riemen en ceinturen vast. • Wring elk artikel uit om zoveel mogelijk water kwijt te raken. Controleer de labels in uw kleding, vooral als u ze voor het eerst droogt. De volgende symbolen worden het meest gebruikt.
Wasgoed NL Speciaal wasgoed Deze tijden zijn richtlijnen en zijn afhankelijk van: Dekens en spreien: artikelen van acryl (Acilan, Courtelle, Orion, Dralen) moeten voorzichtig gedroogd worden op LAGE. Droog ze niet te lang. • Hoeveelheid water die zich na het centrifugeren nog in de kleding bevindt: handdoeken en fijne kleding houden veel water vast. Geplooide of rimpelde kleding: controleer de droogsymbolen in de kleding.
Veiligheidsinstructies en waarschuwingen ● ● ● ● ● ● ● ● ● ● ● ● ● ● ● ● ● ● ● ● Energiebesparing en respect voor het milieu ● Wring het wasgoed altijd eerst uit voor u het in de droger doet (als u het wasgoed in een wasmachine wast, centrifugeer het wasgoed dan op een hoog toerental). Dit bespaart tijd en energie tijdens het drogen. ● Droog altijd hele ladingen - dit bespaart energie: kleine ladingen of slechts een enkel kledingstuk hebben vaak een langere droogtijd.
Reiniging en onderhoud NL Haal de stekker uit het stopcontact Trommel reinigen Haal de stekker uit het stopcontact als u het apparaat niet gebruikt, tijdens het schoonmaken ervan en tijdens elk onderhoud. ! Gebruik geen schuurmiddelen, staalwol of reinigingsmiddelen voor roestvrij staal om de trommel te reinigen. Reinig het pluizenfilter na elk gebruik Het pluizenfilter is een belangrijk onderdeel van uw droger: het verzamelt pluis en stof dat ontstaat tijdens het drogen.
Problemen oplossen Mocht u problemen ondervinden met uw droger controleer dan eerst het volgende voor u de technische dienst belt (zie Technische dienst): Mogelijke oorzaken / Oplossing Droger start niet. ● ● ● ● ● ● Het duurt lang voor het wasgoed droog is. ● ● ● ● ● ● ● ● Veiligheidsinstruct ies en Waarschuwingen ● Het pluizenfilter is niet gereinigd (zie Reiniging en Onderhoud). De temperatuurinstelling is niet ideaal voor het soort stof dat u droogt (zie Start en programma’s).
Technische dienst NL Voor u de technische dienst belt: ● ● gebruik de tabel van het onderdeel problemen oplossen om te zien of u het probleem zelf kunt verhelpen (zie Problemen oplossen). Zo niet, zet de droger uit en bel de dichtstbijzijnde technische dienst. Informatie die de technische dienst nodig heeft: uw naam, adres en postcode. ● uw telefoonnummer. ● het soort probleem. ● de datum van aankoop. ● het model van het apparaat (Mod.). ● het serienummer (S/N).
A 85
A 86
A 87
A 88
A 89
A 90
A 91
A 92
A 93
A 94
A 95
195042589.05 W 02/2006 - SIMLEX .