Instruction booklet TUMBLE DRYER GB English, 1 E Español, 15 P Português, 29 Contents GB Important information, 2-3 Installation, 4 Door reversal instructions Where to put your dryer Ventilation Water drain Electrical connection Before you start using your dryer Dryer description, 5 To open the door The features Control panel Start and programmes, 6-8 ASL700CX Choosing a programme Table of programmes The controls Laundry, 9-10 Sorting your laundry Wash care labels Special clothing items Drying ti
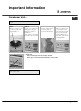
Important Information GB For your Condenser dryer to operate efficiently, you must follow the regular maintenance schedule shown below: Fluff Filter... ! You MUST clean the fluff filter after EVERY drying cycle. STEP 1. Open the door of your dryer. STEP 2. Pull out the filter (using the two finger grips). STEP 3. Clean any fluff deposits from the filter mesh. STEP 4. Refit the filter - NEVER run the dryer without the filter in position.
Important Information Condenser Unit... GB ! You MUST clean the fluff from the condenser EVERY month. STEP 1. Open the condenser cover - hold the handle and pull towards you. STEP 2. Remove the condenser by rotating the 3 clips then pulling the condenser towards you. (There may be some water in the tubes, this is normal). ● STEP 3. Flush the condenser, from the rear with water, to remove any fluff deposits. STEP 4.
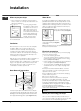
Installation GB Where to put your dryer Water drain Place your dryer at a distance from gas ranges, stoves, heaters, or cook tops because flames can damage the appliance. ● Minimum gap 10mm If you are going to install the appliance under a work counter, be sure to leave a 10mm space between the Minimum gaps top and any other objects 15mm on or above the machine and a 15mm space between the sides and lateral furnishings or walls. This is to ensure proper air circulation.
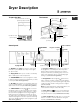
Dryer Description To open the door The features Water container Press and release the front panel in position shown GB Rating plate Model & Serial numbers Condenser unit (Cover open) Condenser cover Condenser cover handle (Pull to open) Air intake grille Filter Control panel PROGRAMMES Knob Indicator Drying Guide ON/OFF Button The ON/OFF button : If the dryer is running and this button is pressed, the dryer stops. Press again, the dryer restarts.
Start and Programmes GB Choosing a programme 1. Plug the dryer into the electrical socket. 2. Sort your laundry according to fabric type (see Laundry). 3. Open the door and make sure the filter is clean and in place and the water container is empty and in place (see Maintenance). 4. Load the machine and make sure items are not in the way of the door seal. Close the door. 5. If none of the lights are on: Press the ON/OFF button . 6.
Start and Programmes Programmes GB ! If none of the lights are lit; Press the ON/OFF button and then select programme. Programme What it does... Easy Iron Brief programme (approximately 1. Position the PROGRAMMES knob on . 10 minutes) that softens fibres of . clothing that is ready for ironing. 2. Press the START/PAUSE button How to set it... Note: ! This is not a drying programme (see previous page).
Start and Programmes The Controls GB ● PROGRAMMES knob ! Warning, if after pressing the START/PAUSE button , the programmes knob position has changed, the new position will NOT change the programme selected. To change a selected programme, press the START/PAUSE button ,the light flashes Amber to indicate the programme is paused. Select the new programme and any options required, the light will then flash green. Press the START/PAUSE button again and the new programme will start.
Laundry Sorting your laundry Wash Care Labels Check symbols on clothing labels to make sure that the articles can be tumble dried. ● Sort laundry by fabric type. ● Empty pockets and check buttons. ● Close zippers and hooks and tie loose belts and strings. ● Wring out each item in order to eliminate as much excess water as possible. ! Do not load dripping wet clothes into the dryer. Look at the labels on your garments, especially when tumble drying for the first time.
Laundry GB Special clothing items Times are approximate and can vary depending upon: Blankets and Bedspreads: acrylic items (Acilan, Courtelle, Orion, Dralon) must be dried with special care on LOW heat setting. Avoid drying for a long period of time. ● ● Pleated or creased garments: read the manufacturer’s drying instructions on the garment. Starched articles: do not dry these with non-starched items.
Warnings and Suggestions ! The appliance has been designed and built according to international safety standards. These warnings are given for safety reasons and must be followed carefully.
Maintenance and Care GB Switching off the electricity Cleaning the drum ! Unplug your dryer when not using it, when cleaning it and during all maintenance operations. ! Do not use abrasives, steel wool or stainless steel cleaning agents to clean the drum. Clean the filter after each cycle The filter is an important part of your dryer: it accumulates lint and fluff that is formed while drying. When finished drying, clean the filter by rinsing it under running water or with your vacuum cleaner.
Troubleshooting One day your dryer seems not to be working. Before you call your Service Centre (see Service), go through the following troubleshooting suggestions: Problem: Possible causes / Solution: The tumble dryer won’t start. ● ● ● ● ● ● ● Drying cycle will not begin. ● Its taking a long time to dry. ● ● ● ● ● ● ● ● Empty water light is flashing but the dryer has only been running for a short period. Empty water light is on and the water container is not full.
Service GB Before calling the Service Centre: Use the troubleshooting guide to see if you can solve the problem yourself (see Troubleshooting). If not, turn off the dryer and call the Service Centre closest to you. ● ● What to tell the Service Centre: name, address and post code. ● telephone number. ● the type of problem. ● the date of purchase. ● the appliance model (Mod.). ● the serial number (S/N). This information can be found on the data label inside the door of the machine.
Folleto de instrucciones SECADORA GB English, 1 E Español, 15 P Português, 29 Índice de materias E Información Importante, 16-17 Instalación, 18 Instrucciones para invertir la puerta Dónde instalar la secadora Ventilación Evacuación del agua Conexiones eléctrica Antes de empezar a utilizar la secadora Descripción de la secadora, 19 Para abrir la puerta Características El panel de control Comienzo y programas, 20-22 ASL700CX Seleccionar un programa Tabla de programas Controles La colada, 23-24 Cla
Instalación E Para que la secadora por condensación funcione de forma eficaz, debe seguirse el plan de mantenimiento regular siguiente: Filtro ! DEBE limpiar el filtro de pelusas después de CADA ciclo de secado. PASO 1. Abra la puerta de la secadora. PASO 2. Tire del filtro para sacarlo (usando las sujeciones para los dedos). PASO 3. Limpie toda acumulación de pelusas de la rejilla del filtro. PASO 4. Vuelva a colocar el filtro. NUNCA ponga en marcha la secadora si el filtro no está en su sitio.
Información Importante Unidad del condensador... E ! DEBE limpiar la acumulación de pelusas del condensador CADA MES. PASO 1. Abra la cubierta del condensador - Tire del mango hacia usted. PASO 2. Saque el condensador girando los tres pestillos y tirando del condensador. (Es probable que haya algo de agua en las tuberías; esto es normal). ● PASO 3. Limpie el condensador con agua desde la parte trasera para eliminar las pelusas acumuladas. PASO 4. Vuelva a colocar la unidad del condensador.
Instalación E Dónde instalar la secadora Evacuación del agua Instale la secadora lejos de estufas, calentadores o cocinas, ya que las llamas pueden dañar el electrodoméstico. ● Si va a instalar el espacio mínima 10 mm electrodoméstico debajo de una encimera, asegúrese de dejar un espacio de 10 mm entre la parte superior y espacio mínima 15 mm cualquier otro objeto que vaya encima o sobre la máquina y un espacio de 15 mm entre los costados y el mobiliario lateral o paredes.
Descripción de la secadora Para abrir la puerta Características Pulse y suelte el panel delantero en la posición indicada E Recipiente de agua Matrícula Modelo y número de serie Unidad del condensador (cubierta abra) Cubierta del condensador Mango de la cubierta del condensador (Tirar para abrir) Panel de control PROGRAMADOR Botón de ENCENDIDO/APAGADO El botón de ENCENDIDO/APAGADO : Si la secadora está funcionando y se pulsa este botón, la secadora se parará.
Comienzo y Programas E Seleccionar un programa 1. Enchufar la secadora a la toma eléctrica. 2. Clasifique la colada según la clase de tejido (véase La colada). 3. Abra la puerta y asegúrese que el filtro está limpio y en posición y que el recipiente de agua está vacío e instalado (véase Mantenimiento). 4. Cargue la máquina y asegúrese que no haya ninguna prenda atrapada en el cierre de la puerta. Cierre la puerta. 5. Si no hay ninguna luz enciende: Pulse el botón de Encendido/Apagado . 6.
Comienzo y Programas Programas E ! Si no hay ninguna luz encendida; pulse el botón de ENCENDIDO/APAGADO programa. y, a continuación, seleccione el Programa Qué hace... Qué programa... Nota: Planchado fácil Breve programa (unos 10 minutos) que ablanda las fibras de las prendas y las deja listas para planchar. 1. Sitúe el PROGRAMADOR en 2.
Comienzo y Programas Controles E ● PROGRAMADOR ! Advertencia: si tras pulsar el botón de INICIO/PAUSA se cambia la posición del programador, la nueva posición NO MODIFICARÁ el programa seleccionado. Para cambiar un programa seleccionado, pulse el botón INICIO/PAUSA . La luz parpadea de color ámbar para indicar que el programa está en pausa. Seleccione el nuevo programa y las opciones que desee. La luz parpadeará en verde. Pulse el botón INICIO/PAUSA otra vez para que empiece el nuevo programa.
La colada Etiquetas de recomendaciones durante el lavado de la ropa Clasificar la colada • Compruebe los símbolos en las etiquetas de la ropa a fin de asegurar que los artículos pueden secarse con calor. • Clasificar la colada por tipo de tejido. • Vaciar los bolsillos y comprobar los botones. • Cerrar las cremalleras y los corchetes y atar los cinturones y cordones sueltos. • Escurra las prendas a fin de eliminar la mayor cantidad agua como sea posible. ¡ No meter ropas muy mojadas en la secadora.
La colada E Prendas especiales Los tiempos son aproximados y pueden variar dependiendo de: Mantas y sobrecamas: Los artículos acrílicos (Acilan, Courtelle, Orion, Dralón) deben secarse teniendo especial cuidado y en ajuste POCO calor. Evite secarlos durante mucho tiempo. Prendas plisadas o arrugadas: lea las instrucciones de secado del fabricante incluidas con la prenda. Artículos almidonados: no seque estos artículos con otras prendas no almidonadas.
Advertencias y recomendaciones ¡ El electrodoméstico ha sido diseñado y fabricado según las normas internacionales de seguridad. Por razones de seguridad le comunicamos las siguientes advertencias. Por favor, léalas con atención. Seguridad general ● ● ● ● ● ● ● ● ● ● ● ● ● ● ● ● ● ● ● ● Esta secadora ha sido diseñada para uso doméstico y no profesional. No tocar el electrodoméstico con los pies descalzos o con las manos o pies mojados.
Mantenimiento y cuidados E Desconectar la electricidad Limpieza del tambor ¡ Desenchufe la secadora mientras no la esté utilizando, cuando la limpie y durante los trabajos de mantenimiento. ¡ No utilice productos de limpieza abrasivos, lana de acero o acero inoxidable para limpiar el tambor. Limpiar el filtro después de cada ciclo El filtro es una pieza importante de la secadora: acumula las pelusas y los hilos que se forman mientras se seca la ropa.
Resolución de problemas Si un día la secadora deja de funcionar. Antes de llamar al Centro de Servicio Técnico (véase Servicio), realice las siguientes comprobaciones: Problema: La secadora no se pone en marcha. Posibles causas / Solución: ● ● ● ● ● ● ● No comienza el ciclo de secado. ● Tarda mucho tiempo en secar. ● ● ● ● ● ● ● ● La luz de vaciado de agua está parpadeando pero la secadora sólo ha estado funcionando durante un breve periodo de tiempo.
Servicio E Antes de llamar al centro de servicio técnico: Utilice la guía de resolución de problemas para ver si puede resolver el problema usted mismo (véase Resolución de problemas). Si no es así, desconecte la secadora y llame al Centro de servicio técnico más cercano. ● ● Piezas de repuesto Esta secadora es una máquina compleja. Si intenta repararla usted mismo o una persona no autorizada puede ocasionar daños a la secadora, además de invalidar la garantía de piezas de repuesto.
Folheto de instruções MÁQUINA DE SECAR ROUPA GB English, 1 E Español, 15 P Português, 29 Índice P Informações Importantes, 30-31 Instalação, 32 Instruções de inversão da porta Onde colocar a sua máquina de secar roupa Ventilação Drenagem da água Ligação eléctrica Antes de iniciar a utilização da sua máquina de secar roupa Descrição da máquina, 33 Para abrir a porta Características Painel de controlo Arranque e programas, 34-36 ASL700CX Escolher um programa Tabela de programas Controlos Roupa, 37-
Informações Importantes P Para que a sua secadora de condensador funcione de forma eficaz, deve seguir o plano de manutenção regular apresentado em baixo: Filtro... ! TEM limpar o filtro de cotão a CADA ciclo de secagem. PASSO 1. Abra a porta da secadora. PASSO 2. Puxe o filtro para fora (utilizando as reentrâncias para os dedos). PASSO 3. Limpe os depósitos de cotão da quadrícula do filtro. PASSO 4. Instale novamente o filtro – NUNCA utilize a secadora sem o filtro instalado.
Informações Importantes Unidade do condensador... P ! É NECESSÁRIO limpar o cotão TODOS os meses. PASSO 1. Abra a tampa do condensador - segure na pega e puxe na sua direcção. PASSO 2. Retire o condensador, rodando os 3 grampos e puxando o condensador na sua direcção. (Pode existir alguma água nos tubos, o que é normal). ● PASSO 3. Lave o condensador, a partir da parte posterior, com água para retirar quaisquer depósitos de cotão. PASSO 4.
Instalação P Onde colocar a sua máquina Instale a sua máquina a alguma distância de ligações de gás, fogões, aquecedores e placas de cozinha, uma vez que as chamas podem danificar o aparelho. ● mínima espaço 10 mm Se pretende instalar o aparelho por baixo de uma bancada ou de um balcão, não se esqueça de deixar um espaço de 10 mm entre a mínima espaço 15 mm bancada e quaisquer objectos ou acima do tampo da máquina e um espaço de 15 mm entre as partes laterais da máquina e mobiliário ou paredes.
Descrição da máquina de secar Para abrir a porta Características Pressione e liberte o painel frontal na posição apresentada Recipiente de água Chapa de classificação P Números de modelo e de série Unidade do condensador (tampa abra) Entrada de ar Tampa do condensador Pega da tampa do condensador (Puxar para abrir) Filtro Painel de controlo botão dos PROGRAMAS Indicador Luzes Progresso ou Atraso Luz Limpar condensador Luz Limpar filtro Botão Luz botão e luz Botões e luzes de LIGAR/DESLIGAR Esva
Arranque e Programas P Escolher um programa 1. Ligue a secadora a uma tomada de corrente eléctrica. 2. Escolha a sua roupa de acordo com o tipo de tecido (ver Roupa). 3. Abra a porta e certifique-se de que o filtro está limpo e bem colocado e de que o recipiente da água está vazio e na respectiva posição (ver Manutenção). 4. Carregue a máquina e certifique-se de que nenhuma peça fica presa no fecho da porta. Feche a porta. 5. Se nenhuma das luzes estiver acesa: Pressione o botão LIGAR/DESLIGAR . 6.
Arranque e Programas Programas P ! Se nenhuma das luzes estiver acesa; Prima o botão LIGAR/DESLIGADO Programa Engoma fácil Algodão Extra seco Algodão Armário Sintéticos Armário O que faz... Como defini-lo... Nota: Breve programa (aproximadamente 10 minutos) que amacia as fibras da roupa que está pronta para ser engomada. 1. Defina o interruptor PROGRAMA para a posição 2. Seleccione qualquer Opção, se requerido. 3.
Arranque e Programas P Controlos Botão dos PROGRAMAS ● ! Cuidado, se a posição do botão dos PROGRAMAS fôr alterada após premir o botão INICIAR/PAUSA , a nova posição NÃO alterará o programa seleccionado. Para alterar um programa seleccionado, prima o botão INICIAR/PAUSA ; a luz fica laranja e intermitente para indicar que o programa está em pausa. Seleccione o novo programa e quaisquer opções necessárias e, de seguida, a luz ficará verde. Prima novamente o botão INICIAR/PAUSA e o novo programa é iniciado.
Roupa Escolher a sua roupa Etiquetas de cuidado na lavagem • Consulte os símbolos nas etiquetas das roupas, de modo a certificar-se de que os artigos podem ser utilizados na secadora. • Escolha a roupa por tipo de tecido. • Esvazie os bolsos e verifique os botões. • Feche os fechos de correr e desaperte cintos e correias. • Torça cada peça de modo a eliminar o máximo de água possível. Observe as etiquetas nas suas peças de roupa, especialmente se está a utilizar a secadora pela primeira vez.
Roupa P Peças delicadas Estes tempos são aproximados e podem variar dependendo de: Cobertores e cobertas de cama: artigos em acrílico (Acilan, Courtelle, Orion, Dralon) devem ser secos com especial cuidado com um TEMPERATURA BAIXA. Evite secar por um longo período de tempo. Peças pregueadas ou enrugadas: leia as instruções de secagem do fabricante da peça. Artigos com goma: não seque estes artigos com peças sem goma.
Avisos e Sugestões ! O equipamento foi concebido e construído de acordo com normas de segurança internacionais. Estes avisos são apresentados por razões de segurança e devem ser seguidos minuciosamente.
Manutenção e Cuidado P Desligar a electricidade Limpar o tambor ! Desligue a secadora quando não estiver em utilização, durante tarefas de limpeza e durante todas as operações de manutenção. ! Não utilize agentes de limpeza de aço inoxidável ou palha de aço, abrasivos, para limpar o tambor. Limpar o filtro depois de cada ciclo O filtro é uma parte importante da sua secadora: acumula restos de fibras e resíduos que se formam durante a secagem. Pequenos objectos também podem ficar presos no filtro.
Resolução de problemas Um dia a sua máquina parece não querer funcionar. Antes de contactar o seu Centro de Serviços (ver Reparação), analise as seguintes sugestões de resolução de problemas: Problema: Causas possíveis / Solução: A secadora não inicia. ● ● ● ● ● ● ● O ciclo de secagem não inicia. ● Demora muito tempo a secar ● ● ● ● ● ● ● ● A luz Esvaziar água encontra-se em estado intermitente mas o secador apenas se encontra a funcionar há pouco tempo.
Reparação P Antes de contactar o Centro de Serviços: Utilize o guia de resolução de problemas para ver se consegue resolver o problema (ver Resolução de problemas). Caso contrário, desligue a secadora e contacte o Centro de Serviço mais próximo. ● ● Peças sobressalentes Esta secadora é uma máquina complexa. Repará-la sozinha ou através de um técnico não autorizado pode provocar danos a uma ou mais pessoas, pode danificar a máquina e pode invalidar a garantia das peças sobressalentes.
P 43
195066575.00 W 10/2007 - SIMLEX .