3gb10008.
3gb10008.fm5 Page 48 Wednesday, September 5, 2001 3:40 PM BEFORE USING THE WASHING MACHINE 1.Removing the packaging and check 6.Electrical connections After unpacking, make sure that the washing machine is undamaged. If in doubt, do not use the washing machine. Contact After-Sales Service or your local retailer. Keep the packaging materials (plastic bags, polystyrene parts, etc.) out of reach of children, as they are potentially dangerous.
gb10008.fm5 Page 49 Wednesday, September 5, 2001 3:40 PM FIRST WASH CYCLE We recommend the first wash cycle be made without laundry. This will remove any residual water used in testing your washing machine. 1.Turn on the tap. 2.Close the appliance door. 3.Pour a small amount of detergent (about 30 ml) into the detergent dispenser 4.Select a short program (see programme chart). 5.Press the On/Off button. . PRECAUTIONS AND GENERAL RECOMMENDATIONS 1.
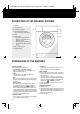
3gb10008.fm5 Page 50 Wednesday, September 5, 2001 3:40 PM DESCRIPTION OF THE WASHING MACHINE 1. Worktop 2. Control panel 3. Detergent dispenser 4. After-Sales Service sticker (on the back side of the door) 5. Door 6. Door handle To open the door press the button on the inside of the handle and pull Close the door by pushing it firmly (the lock will click into place) 7. Filter (behind cover) 8. Adjustable foot 8 PREPARATION OF THE WASHING Sort the laundry 1.
3gb10008.fm5 Page 51 Wednesday, September 5, 2001 3:40 PM DETERGENTS AND ADDITIVES Choice of the right detergent and additives The type of detergent depends on: type of fabric (cottons, easy care/synthetics, delicate items, wool). Note: use only specific detergents for wool. colour; washing temperature; degree and type of soiling. Notes: Whitish residues on dark fabrics are caused by insoluble detergents components used in modern phosphate-free powder detergents.
3gb10008.fm5 Page 52 Wednesday, September 5, 2001 3:40 PM Filling the detergents and additives 1. Pull out the detergent dispenser to its full extent. The dispenser will have three or four chambers depending on model. 2.Fill the detergent: A Programme with pre- and main wash Main wash programme without prewash When using liquid detergent, remove the coloured insert (if provided, C) and fit it in the compartment. The graduate scale on the insert makes dosing easier.
3gb10008.fm5 Page 53 Wednesday, September 5, 2001 3:40 PM 2. Pre-bleach method: Laundry with heavy stains may be PRE-BLEACHED in the machine prior to carrying out a normal wash programme. Proceed by diluting the bleach in approximately 1l water outside of the washing machine in a small container. For a machine with temperature selector: Turn the programme selector to programme 4. Turn the temperature selector to Min.
3gb10008.fm5 Page 54 Wednesday, September 5, 2001 3:40 PM WASHING PROGRAMME Selecting the programme: 1.Plug in the appliance. 2.Turn on the water supply tap. 3.Set the Programme Selector knob to the desired programme. 4.Depending on model, set the Temperature Selector knob to the desired temperature. 5.Depending on model, set the Spin Speed Selector knob to the desired spin speed. 6.Select additional options, if desired, pressing the corresponding button.
3gb10008.fm5 Page 55 Wednesday, September 5, 2001 3:40 PM REMOVING THE FILTER 1. Switch off the appliance and drain the water (see next paragraph Draining residual water). 2. Open the filter cover with a coin. 3. Place a tray or container beneath the cover. 4. Slowly turn the filter anticlockwise without unscrewing it completely (using pliers to handle the filter grip makes screwing easier). 5. Wait until all the water has drained off. 6. Now unscrew the filter completely and remove it. 7.
3gb10008.fm5 Page 56 Wednesday, September 5, 2001 3:40 PM CARE AND MAINTENANCE Appliance exterior and control panel Door seal Clean using normal household cleaner (do not use abrasive products and no solvents). Dry with a soft cloth. Clean with a damp cloth when necessary. Periodically check the fold of the seal for foreign objects. Filter Check and clean the filter two or three times a year (see Removing the filter). Detergent dispenser 1.
3gb10008.fm5 Page 57 Wednesday, September 5, 2001 3:40 PM Water hose mesh filter Check and clean periodically. For machines with a straight water supply hose A 1.Turn off the tap. 2.Unscrew the hose from the tap. 3.Clean the internal filter. 4.Screw the supply hose back onto the tap. 5.Unscrew the hose from the machine. 6. Remove the filter from the washing machine with pliers and clean it. 7.Replace the filter and screw the hose connection back on to the machine. 8.
3gb10008.fm5 Page 58 Wednesday, September 5, 2001 3:40 PM TROUBLESHOOTING GUIDE The appliance will not start, no lamp lights up. Check whether: the appliance is plugged in; the wall socket is functioning correctly (use a table lamp or similar). ON/OFF button pressed. the water tap is open. If not, open the tap and switch the appliance first off, then on.
3gb10008.fm5 Page 59 Wednesday, September 5, 2001 3:40 PM AFTER-SALES SERVICE Before contacting After-Sales Service: 1.Try to remedy the problem yourself (see Troubleshooting guide). 2.Restart the programme to check whether the problem has solved itself. 3.If the machine continues to function incorrectly, call After-Sales Service. Specify: The nature of the problem. The exact model of the appliance. The service code (number after the word SERVICE).
3gb10008.fm5 Page 60 Wednesday, September 5, 2001 3:40 PM INSTALLATION Remove the transit screws The appliance is fitted with two transit screws and a transit bar to prevent internal damage while it is being moved. Before using the appliance the transit screws and transit bar MUST be removed. The appliance is fitted with two screws and a transit bar. 1.Remove the black screw (A) with a screwdriver. 2.Unscrew the screw (B) on the red transit bar with a screwdriver. 3.
3gb10008.fm5 Page 61 Wednesday, September 5, 2001 3:40 PM Connect the water inlet hose For models with straight hose A 1.Insert the dirt strainer (already premounted on the hose end or included in the accessories) into the threaded tap coupling. 2.Carefully screw the hose connection onto the tap preferably by hand. 3.Make sure there are no kinks in the hose. 4.Check water-tightness of tap and appliance connections by turning the tap completely on.
3gb10008.fm5 Page 62 Wednesday, September 5, 2001 3:40 PM ELECTRICAL CONNECTION Do not use extension leads or multi sockets. Electrical connections must be made in accordance with local regulations. 1) Warning - this appliance must be earthed This appliance is normally supplied with a mains lead having a plug fitted in the factory which has been checked for correct earth continuity.