3gb05539.fm Page 3 Friday, February 20, 2004 10:20 AM ENGLISH ESPAÑOL PORTUGUÊS ITALIANO }ooyt Black process 45.0° 100.
3gb05539.fm Page 4 Friday, February 20, 2004 10:20 AM 4 Black process 45.0° 100.
gb05539.fm Page 5 Friday, February 20, 2004 10:20 AM CONTENTS BEFORE USING THE WASHING MACHINE PRECAUTIONS AND GENERAL RECOMMENDATIONS DESCRIPTION OF THE WASHING MACHINE DOOR CHILD SAFETY (IF AVAILABLE) BEFORE THE FIRST WASH CYCLE PREPARING THE WASH DETERGENTS AND ADDITIVES REMOVING THE FILTER DRAINING RESIDUAL WATER CARE AND MAINTENANCE TROUBLESHOOTING GUIDE AFTER-SALES SERVICE TRANSPORT/HANDLING ELECTRICAL CONNECTION 5 Black process 45.0° 100.
3gb05539.fm Page 6 Friday, February 20, 2004 10:20 AM BEFORE USING THE WASHING MACHINE 1.Remove the packaging and check 6.Electrical connections • After unpacking, make sure that the washing machine is undamaged. If in doubt, do not use the washing machine. Contact After-Sales Service or your local retailer • Check that the accessories and supplied parts are all present • Keep the packing material (plastic bags, polystyrene parts, etc.
3gb05539.fm Page 7 Friday, February 20, 2004 10:20 AM PRECAUTIONS AND GENERAL RECOMMENDATIONS 1.Packaging 3.General recommendations • The packaging is 100% recyclable and is marked with the recycling symbol.
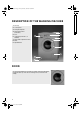
3gb05539.fm Page 8 Friday, February 20, 2004 10:20 AM DESCRIPTION OF THE WASHING MACHINE 1. Worktop 2. Control panel 3. Detergent dispenser 4. After-Service sticker (inside door) 5. Door 6. Child safety (inside door, if available) 7. Filter (inside compartment door) 8. Plinth 9. Adjustable feet 1 2 3 4 5 6 7 8 9 DOOR To open the single glass door hold the door handle, press the inside handle and pull the door up. Close the door with light force, it will lock home audibly. 8 Black process 45.0° 100.
3gb05539.fm Page 9 Friday, February 20, 2004 10:20 AM CHILD SAFETY (IF AVAILABLE) To secure the appliance against improper use turn the plastic screw on the interior of the door.
3gb05539.fm Page 10 Friday, February 20, 2004 10:20 AM DETERGENTS AND ADDITIVES The choice of detergent depends on: Dosage • type of fabric (cottons, easy care/synthetics, delicate items, wool). Note: Use only specific detergents for washing wool • colour • the wash temperature • degree and type of soiling Remarks: Whitish residues on dark fabrics are caused by insoluble compounds used in modern phosphatefree powder detergents. If this occurs, shake or brush out the fabric or use liquid detergents.
3gb05539.fm Page 11 Friday, February 20, 2004 10:20 AM Pouring in the detergents and additives The dispenser will have three (model “B”) or four (model “A”) chambers depending on model. Chamber • Detergent for the prewash Chamber • Detergent for the main wash • Stain remover • Water softener (water hardness 4) When using liquid detergent, remove the coloured insert from the detergent container and insert it in the first gap in chamber . The scale on the insert makes dosing easier.
3gb05539.fm Page 12 Friday, February 20, 2004 10:20 AM REMOVING THE FILTER We recommend that you check and clean the filter regularly, at least two or three times a year. Especially: • When the appliance does not drain or spin properly • If the pump is blocked by a foreign body (e.g. buttons, coins or safety pins) IMPORTANT: make sure the water has had time to cool before draining the appliance. 1. Switch off the appliance and unplug it. 2.
3gb05539.fm Page 13 Friday, February 20, 2004 10:20 AM DRAINING RESIDUAL WATER Before emptying the residual water, switch the appliance off and unplug it from the mains socket. Open the cover to the foreign body trap. Open the filter cover with the help of the coloured insert from the detergent container. Place a container beneath it. 1. Open the filter but do not withdraw it completely. Slowly turn the handle anticlockwise until the water drains out. 2. Wait until all the water has drained off. 3.
3gb05539.fm Page 14 Friday, February 20, 2004 10:20 AM Detergent dispenser A 1. Press the release lever in the prewash compartment downward and remove the drawer. 2. Remove the coloured grid (model “A” and “B”) from the softener compartment. Remove the insert from the softener compartment. For model “A”, also remove the insert from the chlorine bleach compartment. 3. Wash all the parts under running water. 4. Replace the parts and refit the detergent dispenser.
3gb05539.fm Page 15 Friday, February 20, 2004 10:20 AM TROUBLESHOOTING GUIDE Depending on the model, your washing machine is equipped with various automatic safety functions. This enables faults to be detected in good time and the safety system can react appropriately. These faults are frequently so minor that they can be solved within a few minutes. The appliance will not start, no indication lights up. Check whether: • “Start/Pause” indication is flashing.
3gb05539.fm Page 16 Friday, February 20, 2004 10:20 AM a. Water inlet fault (no or insufficient water supply) For models with a fault display, the “Water Tap Closed” indicator is on or the display alternately shows “FH”. Switch off the appliance by turning the programme selector to the “Off/0” position and unplug it. For models with no fault display, the washing machine stops in the appropriate step. Switch off the appliance and unplug it.
3gb05539.fm Page 17 Friday, February 20, 2004 10:20 AM AFTER-SALES SERVICE Before contacting After-Sales Service: 1. Try to remedy the problem yourself (see “Troubleshooting Guide”). 2. Restart the programme to check whether the problem has solved itself. 3. If the washing machine continues to function incorrectly, call After-Sales Service. Specify: • The nature of the problem. • The washing machine model. • The service code (number after the word SERVICE).
3gb05539.fm Page 18 Friday, February 20, 2004 10:20 AM ELECTRICAL CONNECTION For Great Britain only Warning - this appliance must be earthed Fuse replacement If the mains lead of this appliance is fitted with a BS 1363A 13amp fused plug, to change a fuse in this type of plug use an A.S.T.A. approved fuse to BS 1362 type and proceed as follows: 1. Remove the fuse cover (A) and fuse (B). 2. Fit replacement 13A fuse into fuse cover. 3. Refit both into plug.