
Instruction for Use


8
DRAINING
(varies according to model)
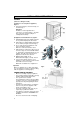
a) Drain hose on rear panel of appliance,
Figure 1
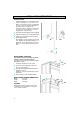
1.
Unhook the drain hose from the left clip, see
arrow A in Fig. 1.
Important:
Do NOT loosen the right drain hose
connection, see arrow B in Fig. 1, otherwise
there is the risk of leakage (danger of
scalding with hot water).
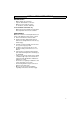
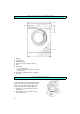
b) Appliance internal drain hose, Figure 2
1.
Pull downwards on the loop until the end of the
hose is pulled completely out of the holder.
2.
Pull out the hose upwards until the mark on the
hose is visible (see Figure 2, arrow in Fig. 3).
3.
Close off the circular opening that is now
exposed using the stopper.
•
Drain hose connection to water outlet.
1.
Fit the drain hose either to the siphon or hook
it over the edge of a sink or bath tub with the
“U” bend (Fig. 2). Small hand basins are not
suitable. The edge of the tub must be no
higher than 125 cm above the floor.
2.
Minimum drain height: 70 cm.
Maximum drain height (“U” bend): 125 cm.
3.
If you need to add an extension, use a
flexible hose of the same type and secure the
union with screw-on hose clips.
Maximum overall drain hose length 2.5 m
Important
Make sure that there are no kinks in the drain
hose run and take precautions against it falling
while the appliance is running (Fig. 3).
CONNECTION TO THE MAINS
•
Observe local utility company regulations.
•
The connection must be made with a correctly
installed, earthed and insulated socket.
•
The system must be earthed.
The manufacturer declines all responsibility
for injury to persons or pets and damage to
property caused by disregarding the above
instructions.
•
The data concerning voltage, consumption
and necessary fuse are supplied on the
inside of the appliance door.
•
The mains connection cable may only be
replaced by a qualified electrician.
•
The appliance conforms to European safety
regulations, EC directive 93/68/EWG and
EN 60555.
•
Do not use extension leads or multiplugs.
INSTALLATION INSTRUCTIONS
Fig. 3
3
1
Fig. 1
Fig. 2
min 70 cm
max 125 cm