Health & Safety, Use and Care and Installation guide www.whirlpool.
ENGLISH ..............................................................................
EN ENGLISH HEALTH & SAFETY, USE & CARE and INSTALLATION GUIDES THANK YOU FOR BUYING A WHIRLPOOL PRODUCT. In order to receive a more complete assistance, please register your appliance on www.whirlpool.eu/register Index Health and Safety guide SAFETY RECOMMENDATIONS. . . . . . . . . . . . . . . . . . . . . . . . . . . . . . . . . . . . . . . . . . . . . . . . . . . . . . . . . . . . . . . . . . . . . . . . 4 IMPORTANT SAFETY INSTRUCTIONS. . . . . . . . . . . . . . . . . . . . . . . . . . . . . . . . . . .
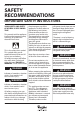
Health and Safety guide SAFETY RECOMMENDATIONS IMPORTANT SAFETY INSTRUCTIONS YOUR SAFETY AND SAFETY OF OTHERS IS VERY IMPORTANT. This manual and the appliance itself provide important safety warnings, to be read and observed at all times. This is the safety alert symbol. This symbol alerts you to potential hazards that can kill or hurt you and others. All safety messages will follow the safety alert symbol and either the word DANGER or WARNING.
EN WARNING Keep ventilation openings, in the appliance enclosure or in the built-in structure, clear of obstruction. WARNING Automatic ice-makers and/or water dispensers must be connected to a water supply that delivers potable water only, with main water pressure between 0,17 and 0,81 MPa (1,7 and 8,1 bar). To guarantee adequate ventilation, leave a space on both sides and above the appliance. The distance between the rear of the appliance and the wall behind the appliance should be at least 50mm.
The power cable must be long enough for connecting the appliance, once fitted in its housing, to the main power supply. Do not use extension leads. Do not pull the power supply cable. Do not use multiple plug adaptors if the appliance is fitted with a plug. ELECTRICAL CONNECTION FOR GREAT BRITAIN AND IRELAND ONLY Fuse replacement. If the mains lead of this appliance is fitted with a BS 1363A 13amp fused plug, to change a fuse in this type of plug use an A.S.T.A.
EN with liquids in the freezer compartment since they may break. Do not obstruct the fan (if available) with food items. After placing the food check if the door of compartments closes properly, especially the freezer door. Damaged gasket must be replaced as soon as possible. CHILDREN SAFETY Very young (0-3 years) and young children (3-8 years) shall be kept away unless continuously supervised.
domestic waste but must be taken to an appropriate collection centre for the recycling of electrical and electronic equipment. ENERGY SAVING TIPS Install the appliance in a dry, well ventilated room far away from any heat source (e.g. radiator, cooker, etc.) and in a place not exposed directly to the sun. If required, use an insulating plate. To guarantee adequate ventilation follow installation instructions.
EN The following statements refer to the portions of this software based in part on FreeRTOS v7.0.2, http://www.freertos.org. The use of this software is governed by the terms of GNU General Public License v. 2, which is available at: http://www.gnu.org/ licenses/gpl-2.0.html. A copy of the source code may be obtained by written request for the software by name to opensource@ whirlpool.com, along with the address for delivery.
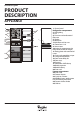
Use and Care guide PRODUCT DESCRIPTION APPLIANCE 2 3 4 5 6 7 8 9 10 11 12 13 14 21 25 10 16 15 17 18 1 19 20 22 23 24 1. Control panel Refrigerator compartment 2. LED lighting 3. Fan 4. Fan cover and antibacterial filter area 5. Shelves 6. Bottle rack 7. Multi-flow cold air area 8. Cheese box + Lid 9. Sensor cover 10. Active 0° compartment (to keep foods fresher for longer) 11. Rating plate with commercial name 12. Fruits and vegetables crisper 13. Fridge drawer divider 14.
EN CONTROL PANEL 1 2 3 4 5 6 7 8 9 10 21 22 23 Menu 11 12 13 14 15 16 17 18 19 20 1. FRIDGE TEMPERATURE button/indicator 2. FRIDGE TEMPERATURE DISPLAY (°C) 3. VACATION MODE indicator 4. TEXT DISPLAY 5. FREEZE CONTROL indicator 6. FREEZER TEMPERATURE DISPLAY (°C) 7. FREEZER TEMPERATURE button 8. ANTIBACTERIAL AIR FILTER alarm indicator 9. BLACK-OUT ALARM indicator 10. MALFUNCTION ALARM indicator 11. ON/STAND-BY button/indicator 12. FAST COOL button/indicator 13. ACTIVE 0 button/indicator 14.
TECHNICAL DATA PRODUCT DIMENSIONS Height 1885 mm Width 595 mm Depth 655 mm NET VOLUME FRIDGE (L) 186 L NET VOLUME CHILL COMPARTMENT (L) 16 L NET VOLUME FREEZER (L) 94 L DEFROST SYSTEM Fridge Automatic Freezer Automatic RISING TIME (H) 24 h FREEZING CAPACITY (KG/24H) 15.5 Kg/24h ENERGY CONSUMPTION (KWH/24H) 0.42 Kwh/24h NOISE LEVEL (DBA) 39 dba ENERGY CLASS A+++ Energy consumption is reduced up to 10% comparing to the same product declared A+++.
EN DOOR DOOR REVERSIBILITY Note: The direction of door opening can be changed. If this operation is performed by Aftersales Service it is not covered by the warranty. Is recommended to reverse door swing by two persons. Follow instruction in Installation Guide. REFRIGERATOR LIGHT The light system inside the fridge compartment uses LEDs light, allowing a better lightning as well as very low energy consumption. If the LED light system does not work, please contact the Service to replace it.
NO-FROST FREEZER COMPARTMENT No Frost freezers provide chilled air circulation around the storage areas, and prevent the formation of ice, thereby completely eliminating the need for defrosting. Frozen items don’t stick to the walls, labeling stays legible and storage space remains neat and clear.
HOW TO USE THE APPLIANCE EN FIRST TIME USE HOW TO START THE APPLIANCE After plugging in the appliance to the mains, press the On/Standby button to switch on. When switched on for the first time, the display will guide you to basic configuration (Set Language): a message in different languages is displayed in loop; Use the Menu button to scroll the list of languages and confirm the language by pressing OK button. After set language, the control panel will be turned on default status.
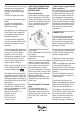
INSTALLATION INSTALLING SINGLE APPLIANCE To guarantee adequate ventilation, leave a space on both sides and above the appliance. The distance between the rear of the appliance and the wall behind the appliance should be at least 50mm. A reduction of this space will increase the Energy consumption of product. INSTALLING THE SPACERS Fit the spacers on the upper and bottom part of condenser (according the drawing) at the rear of the appliance.
EN FUNCTIONS USE OF MENU Touching the Menu button you will access additional functions and settings: 1. Language 2. Party Mode 3. Vacation 4. Smart display 5. Freeze control 6. Night tariff 7. Live 8. Exit When you touch Menu Button, the menu options will appear into the display: you can scroll with the menu , choose and confirm button through the OK button ON/STANDBY This function turns On/Stand-by the refrigerator. To put the product in Stand-by, press & hold the On/ Stand-by button for 3 seconds.
SMART DISPLAY This optional function can be used to save energy. To activate the Smart Display, choose the function from the menu, set to >ON< and press OK button to confirm the selection. To deactivate this function repeat the same procedure setting to >OFF< When activation of the Smart Display, the display goes off, except the 6th Sense Fresh Control indicator. If Smart Display is active – to adjust the temperature or use other functions, it is necessary to activate the display by pressing any button.
EN FAST FREEZE The use of this function is recommended when placing a very high quantity of food to be frozen in the freezer compartment. 24 hours before freezing fresh food, press the Freezer button to activate the Fast Freeze function. When activated, the Fast Freeze indicator turns on. After 24 hours place the food to be frozen in the middle freezing zone of freezer compartment. The function is automatically disabled after 48 hours, or can be manually disabled by pressing Fast Freeze button.
FREEZE CONTROL Freeze Control is an advanced technology that reduces temperature fluctuations in the whole freezer compartment to minimum, thanks to an innovative air system, totally independent from the fridge. Freeze burns are reduced up to 60% and food preserves its original quality and color. To activate the Freeze Control choose the function from the menu, set to >ON< and press OK button to confirm the selection. To deactivate this function repeat the same procedure setting to >OFF<.
QUICK ICE HOW TO MAKE ICE CUBES Put the empty ice cube trays into the freezer 24 hours before using the Quick Ice feature to cool them down. To achieve the best performance of the Quick Ice trays it is recommended to keep them permanently in the freezer and maintain temperature setting at -18°C or colder. Remove a Quick Ice tray by pulling it towards you. EN Remove the cover and fill the tray with potable water (maximum level = 2/3 of the overall capacity of the tray).
USING QUICK ICE TRAYS AS EUTETICS 22 Quick Ice trays can also be used as eutetics to help in keeping the food frozen in case of power failure. For the best usage of them, place them above food stored in the top drawer of the freezer compartment. In this position the trays can still be used to make ice cubes, however the time needed to do that may be longer.
EN ACTIVE 0 COMPARTMENT The Active 0 compartment is specifically designed to maintain a low temperature and a suitable humidity level, in order to keep foods fresher for longer (e.g. meat, fish, fruit and winter vegetables). ACTIVATING AND DEACTIVATING THE COMPARTMENT To activate/deactivate the Active 0 compartment, press the dedicated button on the control panel ( indicator in the figure below).
- put back the glass shelf. Note: the upper shelf and the side supports cannot be removed. To restore Active 0 compartment box operation, make sure you .replace the white plastic shelf underneath the box (with the glass shelf assembled into the plastic) before inserting the drawer and reactivating the function. The Active 0 compartment satisfies the requirements of a chill compartment according to EN 62552.
6TH SENSE LIVE REMOTE CONTROL / SET UP PROCEDURE The 6th sense live feature allows to operate and supervise the refrigerator remotry by external device. To enable the appliance to be remotely controlled, you first have to complete successfully the connectivity set up process. This process is necessary to register your refrigerator and connect to yur home network. The set up procedure has to be carried out only once.
AUTOMATIC SETUP INSTRUCTION (first time use) – WPS method This procedure is appliacable only if your router supports WPS2.0 (or greather) 1. On your Smart Appliance: • press the MENU button select : “7. LIVE”, accept it by button , • press MENU button to select “1.Setup feature” , and confirm it the button to activate .This activate provisioning process. The appliance is being set to a “search” mode for a local network.
MANUAL SETUP INSTRUCTION (first time use) - uAccess POINT METHOD This procedure uses the Micro Access Point technology and is applicable if Your router doesn not support WPS 1. Before starting the setup procedure please take note of the home wireless network name (SSID), its PASSWORD and the SAID of refrigerator. They will be required during the installation process. 2. Turn on your router and make sure the Internet connections is working. 3. On your Smart Appliance: • press the MENU button select : “7.
RESET PROCEDURE The reset procedure has to be carried out if you change the router setup properties (network name and password) or if the refrigerator Is not able to connect the cluod. On your Smart Appliance: • press the MENU button select : “7. LIVE”, accept it by button , • press MENU button to select “1. Reset default ”, confirm by button LIVE REMOTE CONTROL /DAILY USE The Remote Control mode allows to operate and supervise the refrigerator by smart device.
EN TROUBLESHOOTING Are there any differences between using a smart phone (or a tablet) with Android or iOS? You can use the operating system you prefer, there are no differences. Which WiFi protocols are supported? WiFi radio installed supports WiFi b/g/n for European countries. Which Version of WPS is supported? Appliance supports from WPS 2.0 or greater, please check the router documentation.
How much is the distance from Normally the coverage is for few • router to the appl. ( one room / rooms but WiFi signal is strongly two room)? dependent to wall materials. Signal strength can be verifed by: • If radio provisioned refrigerator is already provisioned, you can check the signal strength on MENU. If the RSSI value is greater then -75 the connections is good (.example RSSI=-65 is working well).
What can I do if the Connection State indicator continues to blink slowly and never lits solid on? Where do I find the MAC address of the refrigerator? If the Connection State indicator doesn’t lit up solidly, the refrigerator has been successfully connected to the router, but it is not able to connect the Internet. In order to get the appliance connected to the Internet, you have to check the router and/or the bearer settings.
FOOD-STORAGE TIPS FRIDGE COMPARTMENT The refrigerator is the ideal storage location for ready meals, fresh and preserved food, dairy products, fruit and vegetables and beverage. AIR VENTILATION The natural circulation of air in the refrigerator compartment results in zones with different temperatures. It is coldest directly above the fruits and vegetables crisper and at the rear wall. It is warmest at the top front of the compartment.
EN Legend TEMPERATE ZONE Suggested for the storage of tropical fruit, cans, drinks, eggs, sauces, pickles, butter, jam. COOL ZONE Suggested for storage of cheese, milk, daily food, delicatessen, yogurt. COOLEST ZONE Suggested for the storage of fish, meat, cold cuts. When Active 0° function is deactivated, this drawer can be used to store also other type of food, as well as winter fruit, dessert. FRUIT & VEGETABLE DRAWER FREEZING ZONE DRAWER (MAX COOL ZONE) Suggested to freeze fresh/cooked food.
FREEZER COMPARTMENT The freezer is the ideal storage location for store frozen food, make ice cubes and freeze fresh food in the freezer compartment. The maximum number of kilograms of fresh food TIPS FOR FREEZING AND STORING FRESH FOOD › We recommend to label and date all your frozen food. Adding a label will help you to identify foods and to know when they should be used before their quality deteriorates.Do not re-freeze defrosted food.
EN STORAGE TIME OF FROZEN FOOD MEAT STEWS Beef months 8 - 12 Meat, Poultry Pork, veal 6-9 DAIRY PRODUCTS Lamb 6-8 Butter Rabbit 4-6 Mince/Offal Sausages FRUITS Apples months 12 Apricots 8 6 Blackberries 8 - 12 Cheese 3 8 - 12 2-3 Double Cream 1-2 Blackcurrants / Redcurrants Cherries 1-2 Ice-cream 2-3 Peaches 10 Eggs 8 Pears 8 - 12 Plum 10 POULTRY months 2-3 10 Chicken 5-7 SOUPS AND SAUCES Turkey 6 Soup 2-3 Raspberries 8 - 12 Giblets 2-3 Meat Sauce 2-3
RECOMMENDATION IN CASE OF NO USE OF THE APPLIANCE ABSENCE / VACATION In case longer absence its recommended to use up food and to disconnect the appliance to save energy. MOVING 1. Take out all internal parts. 2. Wrap them well, and fix them together with adhesive tape so that they do not bang together or get lost. 3. Screw the adjustable feet so that they do not touch the support surface. 4. Close and fix door with adhesive tape and, again using adhesive tape, fix the power cable to the appliance.
EN CLEANING AND MAINTENANCE WARNING Before any cleaning or maintenance operation, unplug the appliance from the mains or disconnect the electrical power supply. Never use abrasives. Never clean refrigerator parts with flammable fluids. › Periodically clean the appliance with a cloth and a solution of lukewarm water and neutral detergent specifically for refrigerator interiors. › Clean the outside of the appliance and the door seal with a damp cloth and dry with a soft cloth.
TROUBLESHOOTING GUIDE & AFTER-SALES SERVICE BEFORE CONTACTING AFTER-SALES SERVICE... Performance problems often result from little things you can find and fix yourself without tools of any kind. FUNCTIONAL SOUNDS Sounds coming from your appliances are normal since it has a number of fans and engines to regulate performances that switch on and off automatically. SOME OF THE FUNCTIONAL SOUNDS CAN BE REDUCED THROUGH: › Leveling the appliance and installing it on an even surface.
EN TROUBLESHOOTING GUIDE Problem Possible Cause Solution THE APPLIANCE IS NOT WORKING There may be an appliance power supply problem. › Check if power cable plugged into a live socket with the proper voltage. › Check if the protection devices and fuses of the electrical system in your home THERE IS WATER IN THE DEFROST PAN This is normal in hot, damp weather. The pan can even be half full. › Make sure the appliance is level so that the water does not overflow.
THE APPLIANCE TEMPERATURE IS TOO HIGH There could be various causes (see “Solutions”) › Make sure that the condenser (back the appliance) is free of dust and fluff. › Make sure that the door properly closed. › Make sure that the door seals properly fitted. › On hot days or if the room is warm, the motor naturally runs longer. › If the appliance door has been left open for a while or if large amounts of food have been stored, the motor will run longer in order to cool down the interior of the appliance.
EN AFTER-SALES SERVICE BEFORE CALLING THE AFTER-SALES SERVICE 1. See if you can solve the problem by yourself with the help of the suggestions given in the TROUBLESHOOTING GUIDE. 2. Switch the appliance off and back on again to see if the fault persists IF AFTER THE ABOVE CHECKS THE FAULT STILL OCCURS, GET IN TOUCH WITH THE NEAREST AFTER-SALES SERVICE To receive assistance, call the number shown on the warranty booklet or follow the instructions on the website www.whirlpool.
7 SERVICE 42
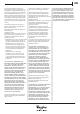
1. 4x C B A 1x 1x EN D 1x min. 50 mm 2. 3.
4. 5. 6.
7. 8. EN 9.
10. 11.
12. 13. 14. 15.
16. 17. B 18. 19.
EN 400010794091 Whirlpool® is a registered trademark of Whirlpool, USA 001 n