® CABRIO™ FABRIC CARE SYSTEM ELECTRIC DRYER Use & Care Guide For questions about features, operation/performance, parts, accessories or service call: 1-800-253-1301 In Canada, call: 1-800-807-6777 or visit our website at www.whirlpool.com or www.whirlpool.ca SÉCHEUSE ÉLECTRIQUE CABRIO™ AVEC SYSTÈME DE SOIN DES TISSUS Guide d’utilisation et d’entretien Au Canada, pour assistance, installation ou service, composez le : 1-800-807-6777 ou visitez notre site internet à www.whirlpool.
TABLE OF CONTENTS TABLE DES MATIÈRES DRYER SAFETY..............................................................................3 INSTALLATION INSTRUCTIONS ..................................................4 Tools and Parts ............................................................................4 Location Requirements ...............................................................4 Electrical Requirements - U.S.A. Only .........................................5 Electrical Requirements - Canada Only....
DRYER SAFETY Your safety and the safety of others are very important. We have provided many important safety messages in this manual and on your appliance. Always read and obey all safety messages. This is the safety alert symbol. This symbol alerts you to potential hazards that can kill or hurt you and others. All safety messages will follow the safety alert symbol and either the word “DANGER” or “WARNING.
INSTALLATION INSTRUCTIONS Tools and Parts Location Requirements Gather the required tools and parts before starting installation. Read and follow the instructions provided with any tools listed here. ■ Flat-blade screwdriver ■ #2 Phillips screwdriver ■ Adjustable wrench that opens to 1" (2.
Installation spacing for recessed area or closet installation The following spacing dimensions are recommended for this dryer. This dryer has been tested for spacing of 0" (0 cm) clearance on the sides and rear. Recommended spacing should be considered for the following reasons: ■ Additional spacing should be considered for ease of installation and servicing. ■ Additional clearances might be required for wall, door and floor moldings.
If your outlet looks like this: Electrical Requirements - Canada Only WARNING 3-wire receptacle (10-30R) Then choose a 3-wire power supply cord with ring or spade terminals and UL listed strain relief. The 3-wire power supply cord, at least 4 ft (1.22 m) long, must have three 10-gauge copper wires and match a 3-wire receptacle of NEMA Type 10-30R.
Electrical Connection - U.S.A. Only Power Supply Cord Direct Wire WARNING WARNING Fire Hazard Fire Hazard Use a new UL listed 30 amp power supply cord. Use 10 gauge solid copper wire. Use a UL listed strain relief. Use a UL listed strain relief. Disconnect power before making electrical connections. Disconnect power before making electrical connections. Connect neutral wire (white or center wire) to center terminal (silver).
■ Put power supply cord through the strain relief. Be sure that the wire insulation on the power supply cord is inside the strain relief. The strain relief should have a tight fit with the dryer cabinet and be in a horizontal position. Do not further tighten strain relief screws at this point.
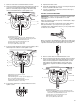
1. Remove center silver-colored terminal block screw. 2. Remove neutral ground wire from external ground conductor screw. Connect neutral ground wire and the neutral wire (white or center wire) of power supply cord under center, silver-colored terminal block screw. Tighten screw. 5. Tighten strain relief screws. 6. Insert tab of terminal block cover into slot of dryer rear panel. Secure cover with hold-down screw. 7. You have completed your electrical connection. Now go to “Venting Requirements.
3. Connect ground wire (green or bare) of direct wire cable to external ground conductor screw. Tighten screw. 1. Loosen or remove center silver-colored terminal block screw. 2. Connect neutral wire (white or center wire) of power supply cord to the center, silver-colored terminal screw of the terminal block. Tighten screw. E A A B C C F B D E D A. External ground conductor screw B. Neutral ground wire C. Center silver-colored terminal block screw D. Neutral wire (white or center wire) E.
When connecting to the terminal block, place the hooked end of the wire under the screw of the terminal block (hook facing right), squeeze hooked end together and tighten screw, as shown. Optional 3-wire connection Use for direct wire or power supply cord where local codes do not permit connecting cabinet-ground conductor to neutral wire. 1. Remove center silver-colored terminal block screw. 2. Remove neutral ground wire from external ground conductor screw.
Venting Requirements WARNING ■ Remove excess flexible metal vent to avoid sagging and kinking that may result in reduced airflow and poor performance. ■ Do not install flexible metal vent in enclosed walls, ceilings or floors. Elbows 45° elbows provide better airflow than 90° elbows. Fire Hazard Use a heavy metal vent. Do not use a plastic vent. Do not use a metal foil vent. Failure to follow these instructions can result in death or fire.
Plan Vent System NOTE: The following kits for close clearance alternate installations are available for purchase. Please see the “Assistance or Service” section to order. ■ Over-the-Top Installation: Choose your exhaust installation type Recommended exhaust installations Typical installations vent the dryer from the rear of the dryer. B Part Number 4396028 ■ C Part Number 4396037 - 0" (0 cm) to 18" (45.72 cm) mismatch D Part Number 4396011 - 18" (45.72 cm) to 29" (73.
Vent system chart 3. Examine the leveling legs. Find the diamond marking. NOTE: Performance of rear exhaust to either side of the dryer is equivalent to adding one elbow. To determine maximum exhaust length, add one elbow to the chart. Number of 90º turns or elbows Type of vent Box or Louvered hoods Angled hoods 0 Rigid metal Flexible metal 64 ft (20 m) 36 ft (11 m) 58 ft (17.7 m) 28 ft (8.5 m) 1 Rigid metal Flexible metal 54 ft (16.5 m) 31 ft (9.4 m) 48 ft (14.
Reverse Door Swing You can change your door swing from a right-side opening to a left-side opening, if desired. 1. Place a towel or soft cloth on top of the dryer or work space to protect the surface. Remove the door assembly 1. Open the dryer door. 2. Remove the bottom screw from each of the 2 hinges that attach the dryer door to the front panel of the dryer. 3. Loosen the top screw from each of the 2 hinges in Step 2. Reverse the strike 1. Remove the door strike from the dryer door opening. 2.
4. Install the 2 hinges to the front panel of the dryer using 4 screws. Use the non-slotted side to attach the hinge to the front panel. 5. Install screws in the top hinge holes in the door. Do not tighten screws. Leave approximately ¼" (5 mm) of screw exposed. A Complete Installation 1. Check that all parts are now installed. If there is an extra part, go back through the steps to see which step was skipped. 2. Check that you have all of your tools. 3. Dispose of/recycle all packaging materials. 4.
DRYER USE Starting Your Dryer WARNING WARNING Explosion Hazard Keep flammable materials and vapors, such as gasoline, away from dryer. Do not dry anything that has ever had anything flammable on it (even after washing). Failure to follow these instructions can result in death, explosion, or fire. WARNING: To reduce the risk of fire, electric shock, or injury to persons, read the IMPORTANT SAFETY INSTRUCTIONS before operating this appliance. This manual covers several different models.
■ Adjust Dryness. Drying and Cycle Tips NOTE: Dryness selections can be made only while using Automatic Cycles. How the AccelerCare™ Drying System Works Moisture-sensing strips and temperature sensors inside the dryer drum monitor how fast the load is drying, how hot the air should be and when clothes are dry. The system automatically stops the cycle to help save time and avoid overdrying. Select the correct cycle and dryness level or temperature for your load.
Damp The Damp light illuminates in an Automatic Cycle when the laundry is approximately 80% dry. Damp Dry Signal beeps, if selected. See “Options.
Modifiers Options You can customize your cycles by selecting options. Automatic Cycle Modifiers Use the Dryness Modifier to select dryness levels for the Auto Dry Cycles. Press DRYNESS until the desired Dryness setting illuminates. The preset dryness setting is Normal when an Automatic Cycle is selected. You can select a different dryness level, depending on your load, by pressing Dryness and choosing More, Normal, Less or Damp.
End of Cycle Signal End of Cycle Signal The End of Cycle Signal produces an audible sound when the drying cycle is finished. Promptly removing clothes at the end of the cycle reduces wrinkling. Press END OF CYCLE SIGNAL until the desired volume (Loud, Soft or Off) is selected. NOTE: When the WRINKLE SHIELD™ setting is selected and the End of Cycle Signal is on, a tone sounds every 5 minutes until the clothes are removed, or the WRINKLE SHIELD™ setting ends.
7. You must select a time by pressing TIME ADJUST Up or Down. Reset time as needed to complete drying. Refer to the following table. 8. Press (and hold) START button (about 1 second). This chart shows examples of items that can be rack dried and the suggested cycle, temperature setting and drying time. Actual drying time will depend on the amount of moisture items hold. Rack Dry Setting Temp. Time* Wool Sweaters Block to shape and lay flat on the rack.
Moving care Changing the Drum Light The dryer light automatically turns on inside the dryer drum when you open the door. For power supply cord-connected dryers: 1. Unplug the power supply cord. 2. Make sure leveling legs are secure in dryer base. 3. Use masking tape to secure dryer door. To change the drum light 1. Unplug dryer or disconnect power. 2. Open the dryer door. Locate the light bulb cover on the back wall of the dryer. Remove the screw located in the lower right corner of the cover.
“L2” Diagnostic Code (low or no line voltage condition): The drum will turn, but there may be a problem with your home power supply keeping the dryer's heater from turning on. The dryer will continue to run when this diagnostic code is present. Press any key to clear the code from the display and return to the estimated time remaining. ■ Try the following: Check to see if a household fuse has blown or circuit breaker has tripped. Electric dryers use two household fuses or breakers.
■ Stains on load or drum ■ Was dryer fabric softener properly used? Add dryer fabric softener sheets at the beginning of the cycle. Fabric softener sheets added to a partially dried load can stain your garments. Odors ■ Have you recently been painting, staining or varnishing in the area where your dryer is located? If so, ventilate the area. When the odors or fumes are gone from the area, rewash and dry the clothing.
WHIRLPOOL CORPORATION MAJOR APPLIANCE WARRANTY ONE YEAR LIMITED WARRANTY For one year from the date of purchase, when this major appliance is operated and maintained according to instructions attached to or furnished with the product, Whirlpool Corporation or Whirlpool Canada LP (hereafter “Whirlpool”) will pay for Factory Specified Parts and repair labor to correct defects in materials or workmanship. Service must be provided by a Whirlpool designated service company.
Notes 27
SÉCURITÉ DE LA SÉCHEUSE Votre sécurité et celle des autres est très importante. Nous donnons de nombreux messages de sécurité importants dans ce manuel et sur votre appareil ménager. Assurez-vous de toujours lire tous les messages de sécurité et de vous y conformer. Voici le symbole d’alerte de sécurité. Ce symbole d’alerte de sécurité vous signale les dangers potentiels de décès et de blessures graves à vous et à d’autres.
INSTRUCTIONS D’INSTALLATION ■ Un circuit séparé de 30 ampères. Outillage et pièces ■ Rassembler les outils et pièces nécessaires avant de commencer l’installation. Lire et suivre les instructions fournies avec les outils indiqués ici. Une prise électrique avec liaison à la terre située à moins de 2 pi (61 cm) de l’un des côtés de la sécheuse. Voir “Spécifications électriques”. ■ Un plancher robuste capable de supporter un poids total (sécheuse et charge) de 200 lb (90,7 kg).
14" max.* (35,6cm) 18"* (45,7 cm) 3"* (7,6 cm) 48 po2* (310 cm 2) 24 po2* (155 cm2 ) 1" (2,5 cm) 29" (73,7 cm) 1"* 1" (2,5 cm) (2,5 cm) Cette sécheuse est équipée d’un cordon électrique homologué par la CSA International à introduire dans une prise murale standard 14-30R. Le cordon mesure 5 pi (1,52 m). Veiller à ce que la prise murale se trouve à proximité de l’emplacement définitif de la sécheuse. 3"* (7,6 cm) 29¼" 5" (74,3 cm) (12,7 cm) B A ■ Prise murale à 4 fils 14-30R C A. Encastrement B.
IMPORTANT : Observer les dispositions de tous les codes et règlements en vigueur. Le conduit d'évacuation de la sécheuse ne doit pas être connecté à une évacuation de gaz, une cheminée, un mur, un plafond ou un vide de construction. Brides de serrage Utiliser des brides pour sceller tous les joints.
Planification du système d’évacuation ■ Choisir un type de système d’évacuation Pièce numéro 4396028 Installations d’évacuation recommandées ■ Les installations typiques consistent à acheminer le conduit d’évacuation à l’arrière de la sécheuse. Pièce numéro 4396011 - 18" (45,72 cm) à 29" (73,66 cm) de décalage C D Pièce numéro 4396014 - 29" (73,66 cm) à 50" (127 cm) de décalage E ■ F G A. Sécheuse B. Coude C. Mur D. Clapet de décharge E.
Tableau des systèmes d'évacuation REMARQUE : L’évacuation par l’arrière (côté gauche ou droit) fonctionne en ajoutant un coude. Pour établir la longueur maximale du conduit, ajouter un coude supplémentaire dans le tableau.
Si la sécheuse n'est pas d'aplomb, la relever à l'aide d'un bloc de bois. Utiliser une clé pour ajuster les pieds vers le haut ou vers le bas, et vérifier à nouveau si elle est d'aplomb. 5. Retirer les quatre chevilles de plastique situées à l'extérieur de l'ouverture de la porte de la sécheuse. Inversion du sens d'ouverture de la porte Le sens d'ouverture de la porte peut être changé du côté droit au côté gauche, si désiré. 1.
3. Retirer les quatre vis du côté opposé de la porte. Aligner les trous de vis inférieurs dans la charnière et la porte. Fixer deux vis inférieures. Serrer toutes les vis de la charnière. 7. Fermer la porte; vérifier l’engagement de la gâche. Achever l'installation 4. Installer les deux charnières sur le panneau avant de la sécheuse à l'aide de quatre vis. Utiliser le côté sans fente pour fixer la charnière sur le panneau avant. 5.
UTILISATION DE LA SÉCHEUSE Mise en marche de la sécheuse AVERTISSEMENT AVERTISSEMENT Risque d'explosion Garder les matières et les vapeurs inflammables, telle que l’essence, loin de la sécheuse. Ne pas faire sécher un article qui a déjà été touché par un produit inflammable (même après un lavage). Le non-respect de ces instructions peut causer un décès, une explosion ou un incendie. Risque d’incendie Aucune laveuse ne peut complètement enlever l’huile.
■ Le réglage de séchage par défaut est Normal lorsqu'on sélectionne un programme automatique. On peut sélectionner un degré de séchage différent, en fonction de la charge, en appuyant sur Dryness et en choisissant More (plus), Less (moins) ou Damp (humide). La sélection de More (plus), Less (moins) ou Damp (humide) ajuste automatiquement la durée détectée nécessaire. Après avoir sélectionné un degré de séchage, il est impossible de le modifier sans arrêter le programme. Sélectionner les options désirées.
Conseils pour les programmes ■ On recommande de sécher la plupart des charges en utilisant les préréglages de programme. ■ Consulter le tableau des préréglages des programmes automatiques ou minutés (à la section “Programmes”) pour un guide de séchage de charges diverses. ■ ■ La température de séchage et le degré de séchage sont préréglés lorsqu'on choisit un programme automatique.
Delicate (articles délicats) Utiliser ce programme pour le séchage à température extra basse des articles tels que la lingerie, les chemisiers et les tricots lavables.
Air Only (air seulement) Réglage WRINKLE SHIELD™ Utiliser le modificateur Air Only pour les articles qui doivent être séchés sans chaleur, tels que le caoutchouc, le plastique et les tissus sensibles à la chaleur. Ce tableau donne des exemples d'articles qui peuvent être séchés au réglage Air Only. Le réglage WRINKLE SHIELD™ aide à aplanir les faux plis qui se forment lorsqu'on ne peut pas sortir la charge de la sécheuse dès la fin d'un programme.
Changement des programmes, modificateurs et options Il est possible de changer les programmes automatiques et minutés, les modificateurs et les options à tout moment avant d'appuyer sur le bouton Start (mise en marche). ■ Trois brefs signaux sonores marquent le choix d'une combinaison non disponible. La dernière sélection ne sera pas acceptée. Changement des programmes après avoir appuyé sur Start 1. Appuyer deux fois sur la touche PAUSE/CANCEL (pause/ annulation). 2.
REMARQUE : Ne pas laisser un article pendre par-dessus le bord de la grille. ENTRETIEN DE LA SÉCHEUSE Nettoyage de l'emplacement de la sécheuse Éviter de laisser des éléments qui pourraient obstruer le débit de combustion et empêcher une bonne ventilation autour de la sécheuse. AVERTISSEMENT 4. Fermer la porte. 5. Appuyer sur le bouton POWER (alimentation). 6. Sélectionner un programme de séchage minuté et une température (voir tableau suivant).
Nettoyage au besoin 1. Enlever la charpie du filtre en la roulant avec les doigts. 2. Mouiller les deux côtés du filtre à charpie avec de l'eau chaude. 3. Mouiller une brosse en nylon avec de l'eau chaude et du détergent liquide. Frotter le filtre avec la brosse pour enlever l'accumulation de résidus. 4. Rincer le filtre à l'eau chaude. 5. Bien sécher le filtre à charpie avec une serviette propre. Réinstaller le filtre à charpie dans la sécheuse. Nettoyage de l’intérieur de la sécheuse 1.
DÉPANNAGE Essayer d’abord les solutions suggérées ici ou visiter notre site Web et consulter les références FAQ (Foire Aux Questions), ce qui vous évitera peut-être le coût d’une visite de service...www.whirlpool.ca ■ Code de service “F” et variantes (F1, F2, F20, etc.) : Faire un appel de service.
AVERTISSEMENT ■ Le modificateur Air Only (air seulement) a-t-il été sélectionné? Choisir la température appropriée aux types de vêtements à sécher. Voir “Modificateurs”. ■ La charge est-elle trop grosse et trop lourde pour sécher rapidement? Séparer la charge pour qu'elle culbute librement. Temps de programme trop court Risque d’incendie Utiliser un conduit d’évacuation en métal lourd. AVERTISSEMENT Ne pas utiliser un conduit d’évacuation en plastique.
ASSISTANCE OU SERVICE Avant de faire un appel pour assistance ou service, veuillez vérifier la section “Dépannage”. Cette vérification peut vous faire économiser le coût d’une visite de réparation. Si vous avez encore besoin d’aide, suivre les instructions ci-dessous. Lors d’un appel, veuillez connaître la date d’achat et les numéros au complet de modèle et de série de votre appareil. Ces renseignements nous aideront à mieux répondre à votre demande.
GARANTIE DES GROS APPAREILS MÉNAGERS WHIRLPOOL CORPORATION GARANTIE LIMITÉE DE UN AN Pendant un an à compter de la date d'achat, lorsque ce gros appareil ménager est utilisé et entretenu conformément aux instructions jointes à ou fournies avec le produit, Whirlpool Corporation ou Whirlpool Canada LP (ci-après désignées “Whirlpool”) paiera pour les pièces spécifiées par l'usine et la main-d'oeuvre pour corriger les vices de matériaux ou de fabrication.
W10151492A SP PN W10151493A © 2007 Whirlpool Corporation. All rights reserved. ® Registered Trademark/TM Trademark of Whirlpool, U.S.A., Whirlpool Canada LP Licensee in Canada Tous droits réservés. ® Marque déposée/TM Marque de commerce de Whirlpool, U.S.A., emploi sous licence par Whirlpool Canada LP au Canada 9/07 Printed in U.S.A. Imprimé aux É.-U.