20-VOLT COMPACT ELECTRIC DRYER Use & Care Guide For questions about features, operation/performance parts, accessories or service, call: 1-800-253-1301. or visit our website at... www.crosley.com Table of Contents .................................................
TABLE OF CONTENTS DRYER SAFETY..............................................................................3 INSTALLATION INSTRUCTIONS ..................................................4 Tools and Parts ............................................................................4 Location Requirements ................................................................4 Electrical Requirements ...............................................................6 Venting Requirements.................................
DRYER SAFETY Your safety and the safety of others are very important. We have provided many important safety messages in this manual and on your appliance. Always read and obey all safety messages. This is the safety alert symbol. This symbol alerts you to potential hazards that can kill or hurt you and others. All safety messages will follow the safety alert symbol and either the word “DANGER” or “WARNING.
INSTALLATION INSTRUCTIONS Tools and Parts Location Requirements Tools needed WARNING Gather the required tools and parts before starting installation. Read and follow the safety instructions provided with any tools listed here. ■ Flat-blade screwdriver ■ Level ■ Adjustable wrench ■ Vent clamps ■ Caulking gun and compound (for installing new exhaust vent) ■ Tin snips (new vent installations) Explosion Hazard Keep flammable materials and vapors, such as gasoline, away from dryer.
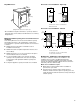
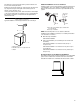
Recessed or closet installation - Dryer only Dryer Dimensions 3 20 " *(52.7 cm) 4 14" (35.6 cm) 18"(45.7 cm) 31"† (78.7 cm) 3" (7.6 cm) 0" (0 cm) A *Most installations require a minimum 5½" (14.0 cm) clearance behind the dryer for the exhaust vent with elbows. See “Venting Requirements.” B A. Side view - closet or confined area B. Recessed area 23 7 8" (60.6 cm) †Height with caster is 32½" (82.6 cm) 0" (0cm) Recessed or closet installation - Stacked 3" (7.6 cm) 3" (7.6 cm) 12" (30.
Electrical Requirements Venting Requirements WARNING WARNING Fire Hazard Electrical Shock Hazard Plug into a grounded 3 prong outlet. Use a heavy metal vent. Do not remove ground prong. Do not use a plastic vent. Do not use an adapter. Do not use a metal foil vent. Do not use an extension cord. Failure to follow these instructions can result in death or fire. Failure to follow these instructions can result in death, fire, or electrical shock. ■ A 120-volt, 60-Hz.
An exhaust hood should cap the vent to prevent rodents and insects from entering the home. Exhaust hood must be at least 12" (30.5 cm) from the ground or any object that may be in the path of the exhaust (such as flowers, rocks or bushes, etc.). If using an existing vent system, clean lint from the entire length of the system and make sure exhaust hood is not plugged with lint. Replace any plastic or metal foil vent with rigid metal or flexible metal vent.
Determine vent length 1. Select the route that will provide the straightest and most direct path outdoors. Plan the installation to use the fewest number of elbows and turns. When using elbows or making turns, allow as much room as possible. Bend vent gradually to avoid kinking. Avoid 90° turns when possible. good better 2. Determine vent length. The maximum length of the exhaust system depends upon: ■ The type of vent (rigid metal or flexible metal). ■ The number of elbows used. ■ Type of hood.
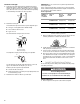
2. Insert cord brackets into slotted holes in rear panel and secure with screws provided. Connect Vent 1. Using a 4" (10.2 cm) clamp, connect vent to exhaust outlet in dryer. If connecting to existing vent, make sure the vent is clean. The dryer vent must fit over the dryer exhaust outlet and inside the exhaust hood. Make sure the vent is secured to exhaust hood with a 4" (10.2 cm) clamp. 2. Move dryer into final position. Do not crush or kink vent. Make sure dryer is level. 3.
DRYER USE Starting Your Dryer WARNING Before using your dryer, wipe the dryer drum with a damp cloth to remove dust from storing and shipping. 1. Clean the lint screen before or after each cycle. See “Cleaning the Lint Screen.” 2. Load clothes loosely into the dryer and close the door. Do not pack the dryer. Allow space for clothes to tumble freely. Explosion Hazard Keep flammable materials and vapors, such as gasoline, away from dryer.
Loading Cycles Load clothes loosely into the dryer. Do not pack the dryer. Allow space for clothes to tumble freely. The following chart shows the maximum load you can place in your compact dryer. Expect longer drying times.
DRYER CARE Cleaning the Dryer Location Keep dryer area clear and free from items that would obstruct the flow of combustion and ventilation air. WARNING To wash 1. Roll lint off the screen with your fingers. 2. Wet both the lint screen cover and body with hot water. 3. Wet a nylon brush with hot water and liquid detergent. Scrub lint screen cover and body with the brush to remove residue buildup. Explosion Hazard Keep flammable materials and vapors, such as gasoline, away from dryer.
TROUBLESHOOTING First try the solutions suggested here and possibly avoid the cost of a service call... ■ Is the load properly sorted? Sort lint givers (towels, chenille) from lint takers (corduroy, synthetics). Also sort by color. ■ Is the load too big or too heavy? Dry smaller loads so lint can be carried to the lint screen. ■ Was the load overdried? Use correct dryer settings for load type. Overdrying can cause lint-attracting static electricity. See “Drying, Cycle, and Temperature Tips.
ASSISTANCE OR SERVICE Before calling for assistance or service, please check “Troubleshooting.” It may save you the cost of a service call. If you still need help, follow the instructions below. When calling, please know the purchase date and the complete model and serial number of your appliance. This information will help us to better respond to your request.
Notes 15
CROSLEY® DRYER WARRANTY ONE-YEAR FULL WARRANTY For one year from the date of purchase, when this dryer is operated and maintained according to instructions attached to or furnished with the product, Whirlpool Corporation will pay for Factory Specified Parts and repair labor costs to correct defects in materials or workmanship. Service must be provided by a Whirlpool designated service company. Whirlpool Corporation will not pay for: 1.