T- Box Hood AKR3000/IX AKR3070/IX AKR3060/IX 1 WHIRLPOOL INSTRUCTION MANUAL
Dear Customer, If you follow the recommendations contained in this Instruction Manual, our appliance will give you constant high performance and will remain efficient for many years to come.
future reference. * This cooker hood designed to be used only in the Ducted Mode * Only a qualified and trained service technician can undertake the work of installation and servicing. * Check that the mains voltage corresponds to the one indicated on the rating plate fixed inside the hood. * Check that the domestic power supply guarantees adequate earthing. * Do not connect the hood to exhaust ducts carrying combustion fumes (boilers, fireplaces, etc.
overheated oil can burst into flame. * The hood should not be used by children or person not instructed on its correct usage. MAINTENANCE * Proper maintenance of the Range Hood will assure proper performance of the unit. * Disconnect the hood from the main supply before carrying out any maintenance work. * Clean and/or replace grease filters after specified period of time. * Clean the hood using a damp cloth and a neutral liquid detergent. * DISPOSAL: Do not dispose this product as unsorted municipal waste.
supervision or instruction concerning use of the appliance by a person responsible for their safety. Children should be supervised to ensure that they do not play with the appliance. * There shall be adequate ventilation of the room when the range hood is used at the same time as appliances burning gas or other fuels. * There is a fire risk if cleaning is not carried out in accordance with instructions. * Do not leave bare flames under the range hood.
COMPONENTS Ref Qty 1 2/3pcs 2 3 1pcs 2pcs 3pcs 1pcs 1pcs 1pcs 2pcs 1pcs 2pcs 2pcs 2pcs 4 5 6 7 8 9 10 11 12 Components Grease filter Hood body steel bolt Cross self-drill bolt Exhaust Exterior chimney Inner chimney Cross discal thread bolt Fixing frame Cross discal bolt-big head Flat rubber band Plastic distensible sleeve Ref Qty Documentations 13 1pc Instruction Manual 14 1pc Warranty Card INSTALLATION & USE Note 1: Carefully remove the protective film from chimney and front panel prio
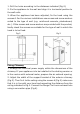
1. Drill the holes according to the distances indicated (Fig.2). 2. Fix the appliance to the wall and align it in horizontal position to the wall units. 3. When the appliance has been adjusted, fix the hood using the screws A. For the various installations use screws and screw anchors suited to the type of wall (e.g. reinforced concrete, plasterboard, etc.).
Fig.4 Fig.5 DUCT FIXING Caution: To reduce the risk of fire, recommend use aluminium ductwork. 1. Attach an adequate length of φ150mm round duct into the recessed area of the air outlet adapter. 2. The duct has to be secured using two screws from two sides of the air outlet adapter. Make sure the duct is fixed well on.
Caution: To reduce the risk of fire, use metal ductwork only. 1. Decide where the ductwork will run between the hood and the outside. 2. A straight, short duct run will allow the hood to perform most efficiently. 3. Long duct runs, elbows, and transitions will reduce the performance of the hood. Use as few of them as possible. Larger ducting may be required for best performance with longer duct runs. 4. Attach an adequate length of φ150mm round duct to the air outlet adapter.
OPERATION OF CONTROLS 1. Press ‘E’ to turn ON / OFF the lamp Normal Mode Operation 1. Press ‘B’ to turn ON at speed 1 / Adjust speed 2. Press ‘C’ to turn ON at low speed 3 / Adjust speed 3. Press ‘D’ to turn ON Turbo Speed / Turn OFF the appliance Timer Mode Operation 1. Press ‘A’ once to turn OFF after 15 min 2. Press ‘A’ twice to turn OFF immediately MAINTENANCE Switch off or unplug the appliance from the mains supply before carrying out any maintenance work.
dry before refitting. 3. To install the grease filter, press the latch on the filter again. Make sure the filter is securely engaged after assembly. WARNING: 1. Always switch off the electrical supply before carrying out any operation on the appliance. 2. Only a qualified and trained service technician can undertake the work of blubs replacement and servicing. CAUTION: 1. The surface and the cover of the lamp may be hot. TAKE CARE while replacing. 2. Bulbs may be hot. Take care while replacing.
Cleaning tips: * Hot water with soap or detergent is all that is usually needed. * Follow all cleaning by rinsing with clear water. Wipe dry with a clean, soft cloth to avoid water marks. * For discolorations or deposits that persist, use a non-scratching household cleanser or stainless steel polishing powder with a little water and a soft cloth. * For stubborn cases use a plastic scouring pad or soft bristle brush together with cleanser and water.
TROUBLE SHOOTING In case if the Cooker Hood is not working or working improperly, before calling the after sales service, switch off the appliance, unplug the power supply and refer to the guide below to determine the problem S.No.