
Installation manual


240 EdwardsStreet,SE
CEeveiand,Tennessee37311
Tet:423472-3333
Fax::t23-478-67;O
or smoke damage should the packing material ignite.
NOTE: A range should NOT be installed directly over kitchen carpeting unless an insnladng
pad or I/4" thick piece of plywood is placed between the range and carpet.
COPIES OF THE STANDARD LISTED ABOVE MAY BE OBTAINED FROM:
NATIONAL FIRE PROTECTION ASSOCIATION
Batterymarch Park
Quincy, MA 02259
COPIES OF THE STANDARD LISTED ABOVE MAY BE OBTAINED FROM:
AMERICAN GAS ASSOCIATION
1515 Wilson Boulevard
Arlington, VA 22209
E. ANTI-TIP DEVICE INSTALLATION INSTRUCTIONS
NOTE: A risk of rant tip over exist if the appliance is not installed in accordance with the
installation instructions provided. The proper use of this device minimizes the risk of TIP-
OVER. In using this device the consumer must still observe the safety precautions as stated
in the USE AND CARE MANUAL and avoid using the oven door and/or lower drawer as a
step stool.
Installation instructions are provided for wood and cement in either floor or wall. Any other
type of constructions may require special installation techniques as deemed necessary to pro-
vide adequate fastening of the ANTI-TIP bracket to the floor or wall.
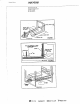
Step 1 - Locating the Bracket
A, Mark the floor or wall where either the right or left "EDGE" of the 30" opening is to be
located.
B. Place the BRACKET SIDE, see figure 1, at the marked "EDGE" and against the back
wall.
C. Use the bracket as a template and mark the required holes, as shown in figure 1, for the
type of construction you will be using.
Step 2 - Anti-Tip Bracket Installation
A. Wood Construction:
1. Floor: Located the center of the two holes identified in figure 1 as "FLOOR-WOOD'.
Drill a 1/8" pilot hole in the center of each hole (a nail or awl may be used if a drill is not
_'_l ,MA_]'AG Admiral 7| zaui,_,JE N N -A_I:_ "i:_._a_j J¢ C,_.¢f