6gb33042.
6gb33042.fm Page 15 Friday, July 9, 2004 2:51 PM BEFORE USING THE REFRIGERATOR • Your new appliance is exclusively for domestic use. The freezer compartment can be used for freezing fresh and cooked food, making ice cubes, and storing frozen and deepfrozen food; defrosting is a manual procedure. The refrigerator compartment, which has an automatic defrost feature, is used for the storage of fresh food and beverages. To get the most out of your new appliance, read the user handbook thoroughly.
6gb33042.fm Page 16 Friday, July 9, 2004 2:51 PM PRECAUTIONS AND GENERAL RECOMMENDATIONS • Use the refrigerator compartment only for storing fresh foods and the low temperature compartment only for making ice cubes, storing frozen foods and freezing fresh foods (only in the compartment marked ). • Do not cover or obstruct the air vents of the appliance. • Do not store liquids in glass containers in the low temperature compartment - risk of bursting.
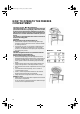
6gb33042.fm Page 17 Friday, July 9, 2004 2:51 PM HOW TO OPERATE THE REFRIGERATOR COMPARTMENT This appliance is a refrigerator with a star freezer compartment. Defrosting of the refrigerator compartment is completely automatic. Optimal performance is obtained at temperatures between +16°C and +32°C. Switching on the refrigerator for the first time Insert the plug into the mains socket. The thermostat is used to adjust the temperature of both compartments: refrigerator and freezer.
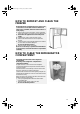
6gb33042.fm Page 18 Friday, July 9, 2004 2:51 PM HOW TO OPERATE THE FREEZER COMPARTMENT The freezer is a star compartment. This compartment can be used to store frozen foods for the period of time indicated on packaging. The freezer can also be used to freeze fresh food by positioning it on the rack; place frozen food in the lower part of the compartment so that there is no contact with fresh food that has yet to be frozen.
gb33042.fm Page 19 Friday, July 9, 2004 2:51 PM HOW TO DEFROST AND CLEAN THE FREEZER Defrost the freezer compartment once or twice a year, or when the ice on the walls reaches a thickness of about 3 mm. If possible, defrost the freezer when it is nearly empty. 1. Remove the food from the freezer, wrap in newspaper and group together in a cool place or in a portable cooler. 2. Disconnect the appliance from the mains power supply. 3. Leave the door open to allow the frost to melt. 4.
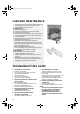
6gb33042.fm Page 20 Friday, July 9, 2004 2:51 PM CARE AND MAINTENANCE • Periodically clean air vents and the condenser at the rear of the appliance with a vacuum cleaner or a brush. • Clean the outside using a soft cloth. Prolonged disuse 1. Empty the refrigerator. 2. Disconnect the appliance from the power supply. 3. Defrost and clean the interior. 4. In the event of prolonged disuse, leave the door open to prevent the formation of mould, odours and oxidation. 5. Clean the appliance.
6gb33042.fm Page 21 Friday, July 9, 2004 2:51 PM AFTER-SALES SERVICE Before contacting After-Sales Service: 1. See if you can solve the problem yourself with the help of the “Troubleshooting guide”. 2. Switch the appliance on again to see if the problem persists. If it does, switch off and wait for about an hour before switching on. 3. If the problem persists after this course of action, contact After-sales Service.
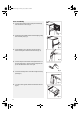
6gb33042.fm Page 22 Friday, July 9, 2004 2:51 PM Door reversibility 1. Unscrew the 2 fixing screws securing the central hinge and remove the 2 covers (Fig. 1). Fig. 1 2. Lift the doors off together with the central hinge by pulling them towards you (Fig. 2). Fig. 2 3. Lay the appliance on its left side, unscrew the fixing screws securing the 2 feet and remove them (Fig. 3). Fig. 3 4. Unscrew the pin from the bottom hinge and screw it on the other hinge (Fig. 4).
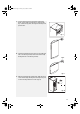
6gb33042.fm Page 23 Friday, July 9, 2004 2:51 PM 7. Unscrew the fixing screws securing the right and left hinges, remove them and refit them on opposite sides (Fig. 7). Refit the top panel, following the same steps as at points 6 and 5. Fig. 7 8. Position the bushings and top covers from the right hand side on the left (Fig. 8 and 9). Remove the bottom right bushing and fit it on the left (Fig. 8 and 9). Fig. 8 Fig. 9 9. Refit the central hinge by rotating it 180°.
6gb33042.fm Page 24 Friday, July 9, 2004 2:51 PM ELECTRICAL CONNECTION 1) For Great Britain only Warning - this appliance must be earthed Fuse replacement If the mains lead of this appliance is fitted with a BS 1363A 13amp fused plug, to change a fuse in this type of plug use an A.S.T.A. approved fuse to BS 1362 type and proceed as follows: 1. Remove the fuse cover (A) and fuse (B). 2. Fit replacement 13A fuse into fuse cover. 3. Refit both into plug.