- A Note To You 2 Understanding Safety 3 Knowin Your Dry&s ! eatures 5 g!tpng 6 G&g Your For Your 18 Laundry Tips 23 If Y?u Need EZZ r 29 Warranty 32 1-800-253-1301 Call us with questiom or comments.
A Note To You Thank you for buying a Whirlpool appliance. You have purchased a quality, world-cless home appliance. Years of engineering experience have gone into its manufacturing. To ensure many years of trouble-free operation, we have developed this Use and Care Guide. It is full of valuable information on how to operate and maintain your appliance properly and safely. Please read it carefully. Also, please complete and mail the Ownership Registration Card provided with your appliance.
Understanding Safety For your safety the information in this manual must be followed to minimize the risk of fire or explosion -Do not store or use gasoline or other flammable vapors and liquids in the vicinity of this or any other appliance. -WHAT TO DO IF YOU SMELL GAS: l l l l l Do not try to light any appliance. Do not touch any electrical switch; do not use any phone in your building. Clear the room, building or area of ail occupants. Immediately call your gas supplier from a neighbor’s phone.
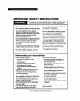
IMPORTANT SAFEl-Y INSTRUCTIONS To reduce the risk of fire, electrical shock, or injury to persons when using your dryer, follow basic precautions, including the following: l l l l l l Read all instructions before using your dryer. Do not machine wash or machine dry items cleaned, washed, soaked in, or spotted with wax, paint, gasoline, oil, dry cleaning solvents, and other flammable fluids. The fumes can create a fire hazard or explosion.
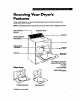
Knowing Features Your Dryer’s The parts and features of your dryer are illustrated below. Become familiar with all parts and features before using your dryer. NOTE: The drawings in this book may vary from your dryer model. They are designed to show the different features of all models covered by this book. Your model may not include all features.
Operating In This Your Dryer Section Page Before starting your dryer ...... ... ................... 6 Starting or stopping your dryer ................... 6 Page Selecting a cycle ...... ... ............... ... ................ 7 Using the drying rack ......... .. ............... ... .... 17 To obtain the best drying results, you must operate your dryer properly. This section gives you important information for efficient and safe use of your dryer.
Selecting a cycle You will find information you need to make correct cycle, time, and temperature decisions in this section. l Pages 7 to 11: Use these pages to find additional information about drying cycles that may be on your model. l Pages 12 to 16: Find the page that has a control panel similar to yours. Use the information on this page to guide you when making drying selections. NOTE: Your model will not look exactly like the illustrations.
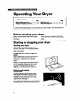
Using the automatic cycles Your DRY-MISER@ control senses the dryness of the load and automatically shuts off when the selected dryness is reached, For the first few loads: 1. Set the Cycle Control Knob to point to the center mark in your automatic cycle. 2. Select a heat setting to match your load. 3. Push the Start Button. The Cycle Control Knob will not move until the load is almost dry or the cool-down portion of the cycle has been reached.
Using the Air cycle (no heat) Fke Hazard Do not dry plastic or rubber items with heat. Use the Air cycle, or line dry. Failure to do so could result in fire or damaged items. The dryer does not heat when the Cycle Control Knob is set in the Air cycle. This cycle can be used to fluff or air dry bedding, plastic tablecloths, foam rubber pillows, stuffed toys, sneakers, etc. 1. Turn the Cycle Control Knob to the number of minutes you want in the Air cycle.
Using the TUMBLE PRESW’ cycle (on some models) This cycle removes wrinkles from clothing that has been packed in a suitcase or closet, and from items not removed from the dryer at the end of a cycle. 1. Set the Cycle Control Knob on TUMBLE PRESS. (If your model has a Temperature Selector, set the Temperature Selector to a high setting.) 2. Push the Start Button. The last few minutes of this cycle are without heat to help make the load easier to handle.
Using end of cycle signal and FINISH GUARD’ cycle selector (on some models) If your model has an End of Cycle signal and FINISH GUARD cycle selector, these features may be turned on or off. Follow these instructions: NOTE: The FINISH GUARD cycle operates at the end of your automatk cycle unless you have turned it off. Ii your model has a knob s4hctor: The top setting refers to the End of Cycle signal and the bottom setting refers to the FINISH GUARD cycle.
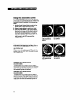
Cycle control knob with 3 temperature settings I Start Ltton Cycle control knob If your dryer has a Cycle Control Knob with 3 temperature settings (air, low, high), refer to the chart below and the chart on page 9 for cycle information. Loads tumble without heat during the last few minutes of all heated cycles. This makes a load easier to handle and helps keep wrinkles from setting in.
Cycle control Cycle cohd knob and a temperature Temperahh knob If your dryer has a Temperature Selector with 2 temperature settings (low, high), refer to the chart below and the chart on page 9 for cycle information. Loads tumble without heat during the last few minutes of all heated cycles. This makes a load easier to handle and helps keep wrinkles from setting in.
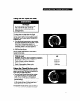
Cycle cohrol knob If your dryer has a Temperature Selector with 3 temperature settings (low, med, high), refer to the chart below and the chart on page 9 for cycle information. Loads tumble without heat during the last few minutes of all heated cycles. This makes a load easier to handle and helps keep wrinkles from setting in. Uslng your automatic cycle Use your automatic cycle and a heat setting to automatically dry most loads. The chart below suggests heat settings for various types of loads.
Cycle control knob and a temperature (4 CLEAN TOUCH” settings) Cycle con&l knob Temperature sol&or If your dryer has a Temperature Selector with 4 temperature settings (ex low, low, med, high), refer to the chart below and the chart on page 9 for cycle information. Loads tumble without heat during the last few minutes of all heated cycles. This makes a load easier to handle and helps keep wrinkles from setting in.
Cycle co&l knob Temperature l &tor (selectors vary with model) If your dryer has a Temperature Selector with 4 temperature settings (ex low, low, med, high), refer to the chart below and the chart on page 9 for cycle information. Loads tumble without heat during the last few minutes of all heated cycles. This makes a load easier to handle and helps keep wrinkles from setting in. Uslng your automatk cycle Use your automatic cycle and a heat setting to automatically dry most loads.
Using the drying rack (on some models) The drying rack lets you dry items that you may not want to tumble. The rack does not move, but the drum turns. 1. Fit rear legs of the rack into indentations in the back wall of the dryer. 2. Lower the front so the legs rest on the dryer opening. 3. Put wet items on top of the rack. Leave space between them so air can reach all surfaces. NOTE: Make sure nothing hangs over the edge of the rack. 4. Close the door. 5.
Caring For Your Dryer In This Section Malntenance+every Page Page load ............................. 18 Malntenanc~o needed ...... ... .................. 19 Dryers require regular maintenance. Follow the suggestions below to maintain your dryer properly. Maintenance-every Cleaning the lint load screen The lint screen is located under a lid on top of the dryer. Clean lt before each load. A screen blocked by lint can increase drying time. 1. Open the lid and pull the lint screen straight out. 2.
Maintenance-as needed Use the following suggestions about cleaning and lint removal to maintain your dryer and keep it operating efficiently. Cleaning a clogged lint screen Laundry detergents and fabric softeners can cause a residue build-up on the lint screen. A clogged lint screen can extend drying times. Clean the lint screen every six months or more frequently if it becomes clogged due to a residue build-up. Use the following method: 1. Wet both sides of lint screen with hot water. 2.
Changing the drum light (on some mad&) l l Electrlcal Shock and Fire Hazard Before removing light bulb, either unplug the dryer or disconnect the dryer at the main power supply. The bulb cover must be in place during dryer operation to prevent overheating and possible damage to fabrics. Operating the dryer with the bulb cover removed can cause the dryer to fail or create a fire hazard. 1. Unplug the dryer or disconnect the electricity leading to the dryer at the main power supply2.
Removing accumulated lint Lint can gather inside the dryer and be a fuel for fire. It is recommended the lint be removed every 2 to 3 years, or more often, depending on dryer usage. Cleaning should be done by a qualified person. If you have any questions, please call our Consumer Assistance Center at l-800-253- 130 1. For all electrk dryers, or gas dryers which have a lower front access panel NOTE: See page 22 if your dryer is gas and has a full front panel. 1.
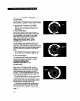
lf your dryer Is gas and has a lull front panel, remove front panel as iollows 1. Unplug the power supply cord or turn off the electrical power. 2. Open lint screen lid. Remove two screws from lint screen area. 3. Open top by pulling forward and up at each front corner (see View A). Rest raised top against wall behind dryer (top is hinged at rear). 4. Remove two internal screws from front panel flanges (near top front corners). Lift front panel slightly, lifting off lower clips (see View B).
Laundry Tips I In This Section PaOe 23 Savlng energy ............................................ 26 Items ........................... 24 Vacation care ............................................. 26 Before you dry ............................................. Drying special-care Using dryer fabric softeners ...................... .26 Solvlng laundering problems .................. .
Drying special-care items Most garments and household textiles have care labels with laundering instructions. Always follow label directions when they are available. General drying instructions for some special washables are included in this section. Heat sensitive fabrics, plastic, rubber or some stuffed items require drying without heat. Use an Air setting or line dry. The Air setting is useful for fluffing bedding and pillows, and dusting draperies and clothing. See Warning on page 9.
Remove drapery weights and hooks before laundering. Curtains, slipcovers l l l Draperies, slipcovers Sheers, some synthetic curtains Bonded or laminated fabrics Diapers, clothes Elastic baby Items 1. Use lowest temperature or an Air setting. 2. Leave room in dryer for load to fluff. 3. Remove from dryer while slightly damp. Do not overdry. For slipcovers, replace slipcovers while still slightly damp. They will dry to fit tightly. Dry only a few minutes. Do not overdry or tumble in high heat.
TInted, dyed or non-colorfast Items Dry according to fabric, weight and care label instructions. Wipe the dryer drum carefully to remove any dye or lint that can be transferred to other loads. See “Cleaning the dryer interior” on page 19. Towels Select cycle according to fabric type. Some towels, particularly those made of a blend of synthetic fibers and natural fibers (polyester and cotton blends), may shed more lint than other towels causing your dryer’s lint screen to get full faster.
Solving laundering problems Most laundering problems are easily solved. Check the following list for problems you may have and possible causes. If you need additional help, check the “Assistance or Service” section on pages 29 and 30. PROBLEM Greasy spots Lint CHECK IF CAUSES/SOLUTIONS Dryer fabric softeners were used Follow manufacturer’s product directions carefully. Undiluted washer fabric softener was used Dilute fabric softener before adding to the final rinse.
PROBLEM Shrinking Slow drying Statk electrkity 28 CHECK IF CAUSES/SOLUTIONS Items are overdried Remove items while there is still a trace of moisture. Some items should be removed while damp, then shaped and air dried. Fabric type and quality is suitable for drying Some knits are stretched during manufacturing. Washing and drying returns them to the original size. This is normal. Check quality of garment before buying. Follow fabric care label directions carefully.
If You Need Assistance Or Service This section is designed to help you save the cost of a service call. Part 1 of this section outlines possible problems, their causes, and actions you can take to solve each problem. Parts 2 and 3 tell you what to do if you still need assistance or service. When calling our Consumer Assistance Center for help or calling for service, please provide a detailed description of the problem, your appliance’s complete model and serial numbers and the purchase date. (See page 2.
SOLUTION CHECK IF Lint screen is clean. Clean lint screen. See instructions on page 18. See “Slow drying” section of table, page 28, for additional information. Exhaust duct or outside exhaust hood is clogged. 2. If you need assistance ... Call Whirlpool Consumer Assistance Center telephone number. Dial free from anywhere in the U.S.: 1-800-252-1301 and talk with one of our trained consultants.
WHIRLPOOL” Dryer Warranty LENGTH OF WARRANTY WHIRLPOOL WILL PAY FOR FULL ONE-YEAR WARRANTY From Date of Purchase FSP replacement parts and repair labor to correct defects in materials or workmanship. Service must be provided by an authorized WhirlpoolSM service company. WHIRLPOOL WILL NOT PAY FOR A. Service calls to: 1. Correct the installation of your dryer. 2. Instruct you how to use your dryer. 3. Replace house fuses or correct house wiring or plumbing. 4. Replace light bulbs. B.