® ® ELECTRONIC ELECTRIC DRYER Use & Care Guide For questions about features, operation/performance, parts, accessories or service, call: 1-800-253-1301 or visit our website at... www.whirlpool.com Table of Contents ................................................
TABLE OF CONTENTS DRYER SAFETY..............................................................................2 INSTALLATION INSTRUCTIONS ..................................................3 Tools and Parts ............................................................................3 Options .........................................................................................4 Location Requirements ...............................................................4 Electrical Requirements ....................
IMPORTANT SAFETY INSTRUCTIONS WARNING: To reduce the risk of fire, electric shock, or injury to persons when using the dryer, follow basic precautions, including the following: ■ ■ ■ ■ ■ ■ ■ ■ Read all instructions before using the dryer. Do not place items exposed to cooking oils in your dryer. Items contaminated with cooking oils may contribute to a chemical reaction that could cause a load to catch fire.
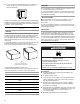
■ For close-clearance installations between 31.5" (80.01 cm) and 37" (93.98 cm), see “Plan Vent System” section for venting requirements. Stack Kit ® Are you planning to stack your DUET washer and dryer? To do so, you will need to purchase a Stack Kit. To order, call the dealer from whom you purchased your dryer or refer to the “Assistance or Service” section of this manual. Ask for Part Number 8541503. Door Reversal Kit 37" (93.
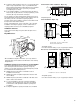
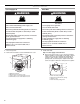
■ ■ A level floor with a maximum slope of 1" (2.5 cm) under entire dryer. If slope is greater than 1" (2.5 cm), install Extended Dryer Feet Kit, Part Number 279810. Clothes may not tumble properly and automatic sensor cycles may not operate correctly if dryer is not level. Custom undercounter installation - Dryer only 0" (0 cm) 38" min. (96.52 cm) For a garage installation, you will need to place the dryer at least 18" (46 cm) above the floor.
Recommended installation spacing for cabinet installation ■ Recommended installation spacing for recessed or closet installation, with stacked washer and dryer For cabinet installation, with a door, minimum ventilation openings in the top of the cabinet are required. 7"* (17.8 cm) The dimensions shown are for the recommended spacing. 48 in.2 * (310 cm2) 7"* (17.8 cm) 3"* (7.6 cm) 9"* (22.9 cm) 3"* (7.6 cm) 2 24 in. * (155 cm2) 1"* (2.5 cm) *Required spacing 6"* (15.
Electrical Requirements It is your responsibility ■ To contact a qualified electrical installer. ■ To be sure that the electrical connection is adequate and in conformance with the National Electrical Code, ANSI/NFPA 70-latest edition and all local codes and ordinances. The National Electric Code requires a 4-wire supply connection for homes built after 1996, dryer circuits involved in remodeling after 1996, and all mobile home installations.
Electrical Connection Power Supply Cord Direct Wire WARNING WARNING Fire Hazard Fire Hazard Use a new UL listed 30 amp power supply cord. Use 10 gauge solid copper wire. Use a UL listed strain relief. Use a UL listed strain relief. Disconnect power before making electrical connections. Disconnect power before making electrical connections. Connect neutral wire (white or center wire) to center terminal (silver). Connect neutral wire (white or center wire) to center terminal (silver).
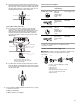
■ Put power supply cord through the strain relief. Be sure that the wire insulation on the power supply cord is inside the strain relief. The strain relief should have a tight fit with the dryer cabinet and be in a horizontal position. Do not further tighten strain relief screws at this point.
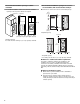
1. Remove center silver-colored terminal block screw. 2. Remove neutral ground wire from external ground conductor screw. Connect neutral ground wire and the neutral wire (white or center wire) of power supply cord under center, silver-colored terminal block screw. Tighten screw. A C 4-wire connection: Direct wire IMPORTANT: A 4-wire connection is required for mobile homes and where local codes do not permit the use of 3-wire connections. Direct wire cable must have 5 ft (1.
3. Connect ground wire (green or bare) of direct wire cable to external ground conductor screw. Tighten screw. D A 1. Loosen or remove center silver-colored terminal block screw. 2. Connect neutral wire (white or center wire) of power supply cord to the center, silver-colored terminal screw of the terminal block. Tighten screw. C E A B F D B C E A. External ground conductor screw B. Ground wire (green or bare) of power supply cable C. ¾" (1.9 cm) UL listed strain relief D.
When connecting to the terminal block, place the hooked end of the wire under the screw of the terminal block (hook facing right), squeeze hooked end together and tighten screw, as shown. Optional 3-wire connection Use for direct wire or power supply cord where local codes do not permit connecting cabinet-ground conductor to neutral wire. 1. Remove center silver-colored terminal block screw. 2. Remove neutral ground wire from external ground conductor screw.
Venting Requirements WARNING ■ Remove excess flexible metal vent to avoid sagging and kinking that may result in reduced airflow and poor performance. ■ Do not install flexible metal vent in enclosed walls, ceilings or floors. Elbows 45° elbows provide better airflow than 90° elbows. Fire Hazard Use a heavy metal vent. Do not use a plastic vent. Do not use a metal foil vent. Failure to follow these instructions can result in death or fire.
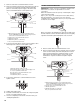
Plan Vent System Choose your exhaust installation type Recommended exhaust installations Typical installations vent the dryer from the rear of the dryer. Other installations are possible. B A C D E F G A H A. Dryer B. Elbow C. Wall D. Exhaust hood B C A. Standard rear offset exhaust installation B. Left or right side exhaust installation C. Bottom exhaust installation (not an option with pedestal installations) Alternate installations for close clearances Venting systems come in many varieties.
Determine vent path Install Leveling Legs ■ Select the route that will provide the straightest and most direct path outdoors. ■ Plan the installation to use the fewest number of elbows and turns. ■ When using elbows or making turns, allow as much room as possible. ■ Bend vent gradually to avoid kinking. ■ Use the fewest 90° turns possible. Determine vent length and elbows needed for best drying performance ■ WARNING Excessive Weight Hazard Use two or more people to move and install dryer.
10. Using pliers, tighten the coupling with an additional twothirds turn. Connect Inlet Hose The dryer must be connected to the cold water faucet using the new inlet hoses. Do not use old hoses. 1. Turn cold water faucet off and remove washer inlet hose. 2. Remove old rubber washer from inlet hose and replace with new rubber washer provided. If space permits, attach the brass female end of the “Y” connector to the cold water faucet.
12. If you live in a hard water area, use of a water softener is recommended to control the buildup of scale through the water system in the dryer. Over time, the buildup of lime scale may clog different parts of the water system, which will reduce product performance. Excessive scale buildup may lead to the need for certain part replacement or repair. 13. Select a Timed Dry heated cycle, and start the dryer. Do not select the Air Only Temperature setting.
To use an Automatic Cycle To use a Manual Cycle NOTE: A light next to each feature will glow green when the feature is selected or will glow amber when the feature is selectable. The light will not glow when the selection is unavailable with the cycle or option combinations selected. NOTE: A light next to each feature will glow green when the feature is selected or will glow amber when the feature is selectable.
NOTE: During the Enhanced Touch Up Cycle, you can change the settings for Time, Temperature, the WRINKLE SHIELD™ feature and Cycle Signal. During the Quick Refresh Cycle you can change the WRINKLE SHIELD™ feature and the Cycle Signal. Press STOP twice to stop the dryer and clear the settings. Select another cycle or option. ■ If you dry sheets in a mixed load or large items in the Bulky Items cycle, rearrange the load when the signal sounds. This will aid in the drying process.
Cycles Select the drying cycle that matches the type of load you are drying. See Automatic Preset or Manual Preset Cycle Settings chart. Cycle Control knob Automatic Cycles Automatic Cycles allow you to match the cycle to the load you are drying. See the following Automatic Preset Cycle Settings chart. Each cycle dries certain fabrics at the recommended temperature. A sensor detects the moisture in the load and automatically adjusts the drying time for optimal drying.
Air Only Use the Air Only setting for items that require drying without heat such as rubber, plastic and heat-sensitive fabrics. This chart shows examples of items that can be dried using Air Only. Type of Load Time* (Minutes) Foam rubber - pillows, padded bras, stuffed toys 20 - 30 Plastic - Shower curtains, tablecloths 20 - 30 Rubber-backed rugs 40 - 50 Olefin, polypropylene, sheer nylon 10 - 20 *Reset time to complete drying, if needed.
Cycle Signal The End of Cycle Signal produces an audible sound when the drying cycle is finished. Promptly removing clothes at the end of the cycle reduces wrinkling. Press CYCLE SIGNAL until the desired volume (Loud, Soft or Off) glows green. NOTE: When the WRINKLE SHIELD™ feature is selected and the End of Cycle Signal is on, an audible sound will be emitted every 5 minutes until the clothes are removed, or the WRINKLE SHIELD™ feature is finished.
4. Close the door. 5. Select a timed drying cycle and temperature, or an air cycle (see following chart). Items containing foam, rubber, or plastic must be dried on a clothesline or by using the Air Only temperature setting. 6. You must select a time by pressing the DRY TIME up or down buttons. Reset time as needed to complete drying. Refer to the following table. 7. Press and hold START button (about 1 second). NOTE: Check the lint screen and remove any lint accumulated from items dried on the rack.
3. Wipe drum thoroughly with a damp cloth. 4. Tumble a load of clean cloths or towels to dry drum. NOTE: Garments that contain unstable dyes, such as denim blue jeans or brightly colored cotton items, may discolor the dryer interior. These stains are not harmful to your dryer and will not stain future loads of clothes. Dry unstable dye items inside out to avoid transfer of dye.
TROUBLESHOOTING First try the solutions suggested here and possibly avoid the cost of a service call... Dryer Operation ■ Dryer will not run ■ ■ Has a household fuse blown, or has a circuit breaker tripped? There may be 2 household fuses or circuit breakers for the dryer. Check that both fuses are intact and tight, or that both circuit breakers have not tripped. Replace the fuse or reset the circuit breaker. If the problem continues, call an electrician. Was a regular fuse used? Use a time-delay fuse.
Dryer Results ■ Is the dryer located in a closet? Closet doors must have ventilation openings at the top and bottom of the door. The front of the dryer requires a minimum of 1" (2.5 cm) of airspace, and, for most installations, the rear of the dryer requires 5" (12.7 cm). See the Installation Instructions. ■ Has the Air Only temperature setting been selected? Select the right temperature for the types of garments being dried. See “Additional Features.
ASSISTANCE OR SERVICE Before calling for assistance or service, please check “Troubleshooting.” It may save you the cost of a service call. If you still need help, follow the instructions below. When calling, please know the purchase date and the complete model and serial number of your appliance. This information will help us to better respond to your request. If you need replacement parts If you need to order replacement parts, we recommend that you use only FSP® factory specified parts.
WHIRLPOOL CORPORATION MAJOR APPLIANCE WARRANTY ONE YEAR LIMITED WARRANTY For one year from the date of purchase, when this major appliance is operated and maintained according to instructions attached to or furnished with the product, Whirlpool Corporation or Whirlpool Canada LP (hereafter “Whirlpool”) will pay for Factory Specified Parts and repair labor to correct defects in materials or workmanship. Service must be provided by a Whirlpool designated service company.