
Technical Specifications


INSTALL THE ICE MAKER
Please replace current Page 9 in the Installation Guide with this insert.
Top/Bottom Freezer Models
IMPORTANT:
■ Depending on your model, you will have one of three styles of
connection. Read and follow the instructions specific to your
model.
■ You will be working inside the freezer compartment.
Access Water Fill Tube and Wiring Harness
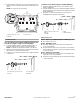
Style 1 - Open-Top Fill Tube with Wiring Cover
1. Remove the screw from the ice maker wiring cover.
2. Squeeze the top and bottom to release the snaps along the
top edge of the cover. Remove and discard the cover.
3. Pull the 4-wire ice maker harness out from behind the back of
the freezer as far as possible, and hang it over the edge of the
cutout.
NOTE: Do not remove any other wiring.
Style 2 - Flat Wiring Cover
1. Remove the screw from the ice maker wiring cover.
2. Unhook the tab on the right-hand side of the cover and
remove the wiring cover.
3. Look at the back of the wiring cover and locate the grooved
lines. Using pliers, bend the areas inside the grooved lines
back and forth until they break away from the cover.
4. Pull the 4-wire ice maker harness out from behind the back of
the freezer as far as possible, and hang it over the edge of the
cutout.
NOTE: Do not remove any other wiring.
Style 3 - Evaporator Cover Only
1. Remove the four plastic plugs to access the screws. Remove
the four screws. Set aside.
2. Remove the evaporator cover by disengaging it from the side
snaps.
NOTE: The evaporator cover has a plastic foam backing.
3. Punch through both the plastic foam backing and plastic
evaporator cover where indicated by the indentations on the
back of the cover.
4. Remove and discard the circular and rectangular cutouts to
create holes for the fill tube and wire harness to pass through.
W10519544A
A. Mounting hole
B. Open top fill tube
C. Snaps
D. Cover
E. Snap
F. Hex screw
A
B
D
E
F
C
A. Mounting hole
B. Hex screw
C. Tab
D. Wiring cover
E. Break off and discard.
B
C
D
E
A