210 mm 180 x 230 mm 145 mm DEUTSCH 210 mm 180 mm 145 mm Installation Seite 9 ENGLISH Installation FRANÇAIS Installation 180 x 260 mm 180 mm Bedienungsanleitung Seite 10 Page 16 Instructions for use Page 17 Page 24 Mode d’emploi Page 25 Installatie Pagina 32 Gebruiksaanwijzing Pagina 33 Instalación Página 40 Instrucciones de uso Página 41 Instalação Página 48 Instruções de utilização Página 49 ITALIANO Installazione Pagina 56 Istruzioni per l’uso Pagina 57 ΕΛΛΗΝ
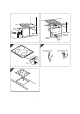
A R = Min. 6,5 mm Max. 8 mm 0 560 +2 mm 0 490 +2 mm 510 mm mm 52 mm Min. 50 mm 580 mm 0 +1 0 583 +2 mm 30 483 mm 553 mm R = 11,5 mm 0 0 560+2 0 490+2 mm mm 513 +2 mm R = 11,5 mm 6 mm R = Min. 6,5 mm Max. 8 mm B R = Min. 6,5 mm Max. 8 mm 0 750 +2 mm Min. 50 mm 0 490 +2 mm 510 mm +1 0 30 mm 52 mm 770 mm 483 mm 742 mm 0 773 +2 mm R = 11,5 mm Min. 50 mm 0 490+2 mm 0 750+2 mm 0 513 +2 mm R = 11,5 mm 6 mm R = Min. 6,5 mm Max.
Min. 10 cm Min. 5 mm Min. 5 mm Min. 3 cm Max.
ENGLISH IMPORTANT SAFETY INSTRUCTIONS YOUR SAFETY AND THAT OF OTHERS IS VERY IMPORTANT This manual and the appliance itself provide important safety messages, to be read and always observed. This is the danger symbol, regarding safety, warning of potential risks to users and others. All safety messages will be preceded by the danger symbol and the following words: DANGER Indicates a hazardous situation which, if not avoided, will result in serious injury.
SAFEGUARDING THE ENVIRONMENT Disposal of packing The packing material is 100% recyclable and marked with the recycling symbol ( disposed of in compliance with local regulations. ). The various parts of the packing must not be dispersed in the environment, but Disposal This appliance is marked in conformity with European Directive 2002/96/EC on Waste Electrical and Electronic Equipment (WEEE).
INSTALLATION After unpacking the product, check for any damage during transport. In case of problems, contact the dealer or the After-Sales Service. For built-in dimensions and installation instruction, see the pictures in page 2. PREPARING THE CABINET FOR FITTING Install a separator panel under the hob. The lower part of the product must not be accessible after installation. Do not fit the separator panel if an undertop oven is installed. - - • • • • • • min. 5 mm - WARNING min. 20 mm min.
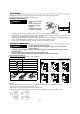
Connect the yellow/green earth wire to the terminal with the symbol . This wire must be longer than the other wires. 1. Remove the terminal block cover (A), undoing the screw and inserting the cover in the terminal block hinge (B). 2. Insert the power cable in the cable clamp and connect the wires to the terminal block as indicated in the connection diagram located near it. 3. Secure the power cable with the cable clamp. 4.
Timer The timer can be used to set the cooking time for a maximum of 99 minutes (1 hour and 39 minutes) for all the cooking zones. Select the cooking zone to be used with the timer, press the timer and a beep signals the function (see figure). The display shows “00” and the LED indication comes on. The Timer value can be decreased and increased by keeping the slider function “+” and “-” buttons pressed. When the set time has elapsed, an acoustic signal sounds and the cooking zone switches off automatically.
i Important: make sure to place the pans centered on the cooking zone in the way to cover the center of the single cooking zone. In case of big pot, oval, rectangular and elongated pans make sure to place the pans centered on the cooking zone. Examples of good pot placement and bad pot placement : CLEANING WARNING - Do not use steam cleaners. Before cleaning, make sure the cooking zones are switched off and that the residual heat indicator (“H”) is not displayed.
AFTER-SALES SERVICE Before contacting the After-sales Service: 1. See if you can solve the problem yourself with the help of the “Troubleshooting guide”. 2. Switch the appliance off and then on again it to see if the problem has been eliminated. If the problem persists after the above checks, contact the nearest After-Sales Service.
5019 400 00362 DE GB FR NL ES PT IT GR SE NO DK FI PL CZ SK HU RU BG RO UA Bauknecht, Polar and Ignis are registered trademarks of the Whirlpool group of companies. - © Copyright Whirlpool Europe s.r.l. 2012. All rights reserved - http://www.bauknecht.