® BY WHIRLPOOL CORPORATION GAS RANGE For questions about features, operation/performance parts, accessories or service, call: 1-800-253-1301. or visit our website at... www.eetateappliances.com Table of Contents ................................................. To the installer: Please leave this instruction book with the unit. To the consumer: Please read and keep this book for future reference.
TABLEOF CONTENTS RANG E SAFETY ............................................................................. The Anti-Tip Bracket .................................................................... PARTS AND FEATURES ................................................................ 2 3 4 COOKTOP USE .............................................................................. Cooktop Controls ......................................................................... Sealed Surface Burners ................
I I may result causing property WARNING: If the information - Do not store or use gasoline or any other appliance, damage, personal injury or death, in this manual is not followed exactly, or other flammable vapors a fire or explosion and liquids in the vicinity of this - WHAT TO DO IF YOU SMELL GAS: • • • • Do not try to light any appliance. Do not touch any electrical switch. Do not use any phone in your building. Immediately call your gas supplier from a neighbor's phone.
iMPORTANT SAFETY iNSTRUCTiONS WARNING: To reduce the risk of fire, electrical shock, injury to persons, or damage when using the range, follow basic precautions, including the following: [] WARNING: TO REDUCE THE RISK OF TIPPING OF THE RANGE, THE RANGE MUST BE SECURED BY PROPERLY INSTALLED ANTFTIP DEVICES. TO CHECK IF THE DEVICES ARE INSTALLED PROPERLY, SLIDE RANGE FORWARD, LOOK FOR ANTI-TIP BRACKET SECURELY ATTACHED TO FLOOR, AND SLIDE RANGE BACK SO REAR RANGE FOOT IS UNDER ANTI-TIP BRACKET.
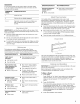
Range C D I \\\ M G A. Oven vent B. Left rear surface burner C. Left front surface burner F Doorstop clip G. Model and serial number plate (behind left side of storage drawer) H. Storage drawer I. Electronic oven control D. Surface burner grate E. Anti-tip bracket K. Right front surface burner L. Cooktop control panel M. Door gasket N. Self-clean latch O. Gas regulator J. Right rear surface burner COOKTOP USE To Set: 1. Push in and turn knob counterclockwise to IGNITE.
I REMEMBER: When range is in use or (on some models) during the Self-Cleaning cycle, the entire cooktop area may become hot. i IMPORTANT: Before cleaning, make sure all controls are off and the oven and cooktop are cool. Do not use oven cleaners, bleach To rust Clean: or removers. 1. Remove the burner cap from the burner base and clean according to "General Cleaning" section. 2. Clean the gas tube opening with a damp cloth. 3. Clean clogged burner ports with a straight pin as shown.
Usethefollowing chartasaguideforcookware material characteristics. COOKWARE CHARACTERISTICS Aluminum When power is first supplied to the appliance, "PF" or a flashing time will appear on the display. Press OFF/CANCEL to clear. • Heats quickly and evenly. • Suitable for all types of cooking. • Medium or heavy thickness is best for most cooking tasks. • Heats slowly and evenly. When the oven is not in use, the display shows the time of day. • Good for browning and frying.
TheTimercanbesetinhoursorminutes upto12hoursand 59minutes andcountsdownthesettime. NOTE: TheTimerdoesnotstartorstoptheoven. ToSet: 1. PressTIMER CANCEL*. Thetimerovenindicator lightwilllightup.Ifnoactionistaken after1minute, thedisplay willreturn tothetimeofdaymode. 2. PresstheTEMP/TIME "up"or"down"arrowpadtosetthe lengthoftime. 3. PressSTART/ENTER. When thesettimeends,four1-second toneswillsound. 4. PressTIMER CANCEL* anytime tocancel thetimerand/or stopreminder tones.
BAKEWARE To cook food evenly, hot air must be able to circulate. Allow 2" (5 cm) of space around bakeware and oven walls. Use the following chart as a guide. NUMBEROF PAN(S) POSITION ON RACK 1 Center of rack. 2 Side by side or slightly staggered. 3 or 4 Opposite corners on each rack. Make sure that no bakeware piece is directly over another.
Preheating AfterSTART/ENTER istouched, theovenwillenteratimed preheat conditioning cycle.TheTemp, Bake,andOnindicator lightswilllightup.TheElectronic OvenControl automatically selects theconditioning cycletimebasedontheoven temperature selected. Theconditioning cycletimewillnot change ifthetemperature isresetbefore thecyclecountdown ends.Thepreheat conditioning cycleiscomplete andtheovenis ready tousewhena1-second tonesounds, thecyclecountdown ends,andthesettemperature isdisplayed.
5. Press START/ENTER. Keep the kitchen well-ventilated during the Self-Cleaning help get rid of heat, odors, and smoke. The display will count down the time. When the time ends, the oven will shut off automatically "End" will appear on the display. 6. and cycle to Do not block the oven vent(s) during the Self-Cleaning cycle. Air must be able to move freely. Depending on your model, see "Oven Vent" or "Oven Vents" section. Press OFF/CANCEL or open the oven door to clear the display.
To Stop Self-Clean anytime: Press OFF/CANCEL. If the oven temperature is too high, the door will remain locked. It will not unlock until the oven cools. Cleaning • • Soap, water and a soft cloth or sponge are suggested first unless otherwise noted. ENAMEL SURFACES Food spills containing acids, such as vinegar and tomato, should be cleaned as soon as the entire appliance is cool. These spills may affect the finish.
BROILER PAN AND GRID (on some models) Do not clean in the Self-Cleaning Cleaning Method: • Mildly abrasive cleanser: Solution of 1/2cup (125 mL) ammonia to 1 gal. (3,75 L) water: Soak for 20 minutes, then scrub with scouring or steel-wool pad. • Replace bulb, then bulb cover by turning clockwise. 5. Plug in range or reconnect power. cycle, Scrub with wet scouring pad. • 4. Oven cleaner: For normal range use, it is not suggested to remove the oven door.
S I_-,,,_I_(-I;OIS:= Ii='I..... Surface _,. The storage drawer can be removed. Before removing, make sure drawer is cool and empty. • Is this the first time the surface burners have been used? Turn on any one of the surface burner knobs to release air from the gas lines. • Is the control knob set correctly? Push in knob before turning to a setting. • Are the burner ports clogged? See "Sealed Surface Burners" section. To Remove: 1.
Oventemperature too highortoo low • Does the oven temperature calibration need adjustment? See "Oven Temperature Control" section. Display shows messages Is the display showing "PF" or a flashing time? There has been a power failure. Clear the display. See "Display(s)" section. On some models, reset the clock, if needed. See "Clock" section. Is the display showing a letter followed by a number? Depending on your model, press OFF/CANCEL, OFF or CANCEL/OFF to clear the display. See "Display(s)" section.
WHIRLPOOLCORPORATION MAJOR APPLIANCEWARRANTY ONE YEAR LIMITED WARRANTY For one year from the date of purchase, when this major appliance is operated and maintained according to instructions attached to or furnished with the product, Whirlpool Corporation or Whirlpool Canada LP (hereafter "Whirlpool") will pay for FSP _ replacement parts and repair labor to correct defects in materials or workmanship. Service must be provided by a Whirlpool designated service company. ITEMS WHIRLPOOL WILL NOT PAY FOR 1.