UseAndCare F A Note To You 2 ki!EZfi:- 3 Parts And Features 6 Using Your Range 7 Caa For Your If You Need fg!$-?E 17 24 Warranty 26 140044ROPER Cdl us with qmtions STANDARD-CLEANING TO THE INSTALLER: PLEASE LEAVE THIS INSTRUCTION BOOK WITH THE UNIT. TO THE CONSUMER: PLEASE READ AND KEEP THIS BOOK FOR FUTURE REFERENCE. or commenls.
A Note To You Thank you for buying a Roper@ appliance. You have purchased a quality, mwldclass home appliince. Years of engineering experience have gone into its manufacturing. To ensure that you will enjoy many years of trouble-free operation, we have developed this Use and Care Guide. it is full of valuable information on how to opemte and maintain your appliance properly and safely. Please read it carefully. Also, please complete and mail the Owner&ii Registration Card provided with your appliance.
Important READ safety AND SAVE Instructions THESE INSTRUCTIONS Gas ranges have been thoroughly tested for safe and efficient operation. However, as with any appliince, there are specific installation and safety precautions which must be followed to ensure safe and satisfactory operation.
mDo not store things chibren might want above the range. Children oould be humed or injured whii climbing on it. b Do not leave children alone or unattended in area where the range is in use. They should never he allowed to sit or stand on any pert of the range. They could be burned or injured. l ~Donotopwatethemngeifitisdamaged ~~WorkingPwertyb Do not use the range for warming or heating the room. Persons couldbe burned or injured, or a fire could start.
l l Check to be sure glass cooking utensils are safe for use on the range. Only certain types of glass, glass-ceramic, ceramic, earthenware or other glazed utensils are suitable for cooktops without breaking due to the sudden change in temperature. Never leave surface burners unattended at high heat settings. A boilover could resuit and cause smoking and greasy spilbvers that may ignite. l Do not use water on grease fires. Never pick up a flaming pan.
Parts And Features Thk section contains captioned illustrations of your range. Use them to become familiar with the location and appsarance of all parts and features. NOTE: Because this Use and Care Guide covers several models, not all illustrations shown or features discussed will apply to your spedi model.
Using Your Range In This Section Page Using the surface burners ................ .7 Positioning racks and pans.. ............ .Q For best air circulation .................... .10 Llghtlng standing pilots .................. .ll Baklngkoasting ................................ 12 Page Adjustlng the oven temperature control ............................................... 13 Broillng .............................................. 14 Energy saving tips ............................ 15 The oven vent ............
--- -___ ~- -~I --~ Until you get used to the sefflngs, use the following as a guide. For best results, start cooking at the high setting; then turn the control knob down to continue a&ing. r SElTlNG UlE HI RECOMMENDED USE l l l Medium To light the burner. Afk the burner liihts, turn oontrol back to a desired setting. l l To start foods cooking. To bring liquids to a boil. l Tohokfarapidboil. l To fry chicken or pancakes. l I+ l icing.
l l l Pans should be easy to clean. Check to be sure there are no crevices, rough edges or areas where food might collect. Be sure pans do not tip, whether they are full or empty. Use cookware only as il was intended to be used. Follow pan instructions. This is very important for glass cookware because some should be used only in the oven. Other pans are marked as flameware and may be used on the surface bumers.
For best air circulation Hot air must circulate around the pans in the oven for even heat to reach all parts of the oven. Thii results in better baking. l Place the pans so that one is not directly over the other. l For best results, allow 1‘S-2 inches (4-5 cm) of space around each pan and between pans and oven walls. There must be a minimum space of 1 inch (2.5 cm). l Useonlyonecookiesheetintheovenat one time.
Lighting standing pilots (mode& FGP21OV,FGP3WB and FGPNOB) To light range pilots: 1. Make wre all controls are tumed off. 2. Remove the surface burner grates from the cookhp. Remove the cookop. (See “Removing the woklop” on page 18.) 3. To light, hold a lit match over the pilot light located between the front and back burners. The pilot flame should be %fo % in (.6-l cm) high. 4.
Baking/roasting NOTE: Do not attempt to light the oven bumer on electric ignition models during a power failure. See ‘Irqxtant Safety Instmctior& on page 4 for more information. 1. Poeltlon the rack(s) properly before turning on the oven. To change rack position, pull rack out to the stop, lift rack at front, and pull out For further information, see “Positioning racks and pans” on page 9. 2. Push In and turn the Oven Temperature Control counterclockwise to the baking/ Wing temrature you want.
Adjusting the oven temperature control Oven temperature controls will gradually shii after years of use. So, even though your new oven is properly adjusted to provide accurate temperatures, it may cook faster or dower than your old oven. If, after using the oven for a perid of time, you are not satisfied with the temperature settings, you ten adjust them by following thesesteps: 1. Make sure the Oven Temperature Control Knob is turned to the off position. Pull knob straight off and flip it over.
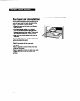
Broiling The broiler drawer is located bebw the oven door. Always broil wlth the oven dour Closed. Product Dmge Hazard Donotsteponorapplyexcessweight to broiler drawer whem open. Doing so could damage the dwr. 1. Pull the broiler drawer open. Broiler door will tilt down when opened. 2. Plawbroikpangridsogreasecan drain down sides into bwer part of the broiler pan. See picture. 3. Before the broiler Is turned on, place food on broiler pan and position the broiler pan at one of the three levels. 4.
-- Energy saving tips Although the energy used for onoking is usually a very small percentage of the total energy used in the home, cooking energy can be used effiiiently. Here are some tips to help you save energy when using your cooking product: l Use pans with flat bottoms, straight sides and tight-fitting lii. l Co&withaminimumofliquidorfatto help shorten t2iding time. l Preheat pans only when recommended and for the shortest time possibb.
The anti-tip brackets The range will not tip during normal use. However, tipping can occur if you apply too much forceorweig~totheopendoor~theanWipbracketsprope~yred. Personal Injury Hazard .To reduce risk of range tipping over, secure range with the properly installed anti-tip brackets supplied with range. l If range is moved for cleaning or service, check that anti-tip devices are engaged before using range. Failure to follow the above precautions could result in personal injury.
Caring For Your Range In This Section Page Surface burner grates ....................... 17 Removing the cooktop ................... .. 18 Surface burners ......................... ...... . 19 Your range is designed for easy care. You can & most cleaning with items found around your home. Cleaning your range whenever spills or soiling occurs will help to keep it looking and operating like new. Surface burner Removing the oven door ............. .... 20 Removlng the broiler carriage .........
Removing the cooktop 1. Remove surface burner grates. 2. Lift front of cooktop enough to clear front of range. Grasp cool burner openings. Lift and pull forward. Personal Injury Hazard Do not try to clean under the woktop without removing the cooktop first. Failure to do so could result in personal injury from the mop accidentally falling. Product Damage Hazard Do not drop the cooktop. Damage could result to the porcelain and the cooktop frame. 3. Wipe with warm, soapy water.
Surface burners 1. Remove the cooktop, following the instructions on page 18. 2. Wipe off surface burners with warm, eoapy water and a sponge after each use. To remove cooked-on food, soak the burners in a vinegar and water solution for 20 minutee. Scrub with a plastic scrubbing pad. 3. If poti are clogged, clean wlth a straight pin. DO NOT enlarge or distort the ports. DO NOT use a toothpick to clean the pot3s. 4. Occasionally check the burner flames forprop6rsizeandshapeassJmwn.
Removing the oven door Removing the oven door will help make it easier to clean the oven. Bum and Electrkal Shock Hazard Make sure all controls are OFF and the oven is cod before removing oven door. Failure to do so coukl result in burns or eledrical shock. To remove: 1. Open the door to the first stop position. 2. HokfthedooratbothsidesandIlftYat the same angle it is In. 3. To replace, fit the bottom corners of the door over the ends of the hinges. Push the door down evenly.
Removing the broiler carriage The broiler carriage can be removed for lighting standing pilot oven burner and for easier cleaning. To remove: 1. Pull broilar drawer open. Broiler doOr will tilt down when opened. 2. Remove the broiler pan and grid. 3. Slightly lift broiler carriage and pull all the way out. To replace: 1. Pushbroilercarriageinuntilcarriageis lcckedunderplacementtabinrearof broiler carriage body. Make sure spring clii at front of carriage snape into slot in broiler carriage body.
Cleaning chart Use the following table to help you clean all parts of your range. PART Control knobs I WHAT TO USE Sponge and warm, soapy water I I l l l HOW TO CLEAN Turn knobs to OFF and pull straight away from control panel. Wash, rinse and dry thoroughly. Do not soak. Do not use steel wool or abrasive cleansers. They may damage the finish of the kllOb0. Replace knobs. Make sure all knobs point to OFF. l Wash, rinse and dry thoroughly. l Do not use steel wool or abrasive cleansers.
PART Surface burners WHAT TO USE zrwtt; warm Warm, soapy water and a nonabrasive, gRtic =crubbing ped Viiar and water sohtbn Broiler drawer, pan and grid (clean after eech lJ=) Steel-wool pad and warm, soapy water oven racks Steel-wool pad and warm, soapy water Sponge and warm, soapy water Oven cavity HOW TO CLEAN l Remove the cc&top (See page 18.) l Wipe off spills immediately after burner hslscooied. For cookedon food: aRemove burner from burner support.
If You Need Assistance This section is designed to help you save the cost of a service call. Part 1 of this section outlines possible pmblems, their causes, and actions you can take to solve each problem. Parts 2 and 3 tell you what to do if you still need assistance or service. When calling our tollfree telephone number for help or calling for service, please provide a detailed description of the problem, your appliance’s coqlete model and serial numbers and the purchase date. (See page 2.
PROBLEM Bumer flames are uneven POSSIBLE CAUSE Burner ports are clogged. Burner namer lift off I=% am yellow, or an nolsy when turned Air/gas mixture is incorrect. SOLUTION Clean with a straight pin (see pages 19 and 23). lf thii fails, call an authorized Roper service technician for service. Contact an authorized Roper service technician to check air/gas mixture. Off Burner makes popping ft0b when on Control knob(s) will not turn Cooking results are not what you expected Bumer is wet from washing.
2. lf you need assistance ... Call our toll-free telephone number. Dial toll-free from anywhere In the U.SA.: l-80044-ROPER (14004474737) and talk with one of our trained consultants. The consultant can instruct you in how to obtain satisfactory operation from your appliince or, if sewkze is necessary, recommend a qualifted service company in your area. For further information, write to: Mr.
ROPER” Gas Range Warranty LENGTH OF WARRANTY WE WILL PAY FOR FULL ONE-YEAR WARRANTY (from date of purchase) FSP replacement parts and repair labor to correct defects in materials or workmanship. Service must be provided by an authorized Roper service company. WE WILL NOT PAY FOR A. Service calls to: 1. Correct the installation of your range. 2. Instruct you how to use your range. 3. Replace house fuses or correct house wiring or plumbing. 4. Replace owner accessible light bulbs. B.