Guía de uso y cuidado www.hotpoint.
ESPAÑOL . . . . . . . . . . . . . . . . . . . . . . . . . . . . . . . . . . . . . . . . . . . . . . . . . . . .
ES ESPAÑOL GUÍA DE SALUD Y SEGURIDAD, USO Y CUIDADO E INSTALACIÓN GRACIAS POR HABER ADQUIRIDO UN PRODUCTO HOTPOINT - ARISTON Si desea recibir asistencia y soporte adicionales, registre su producto en www.hotpoint.eu/register Index Guía de instalación INSTRUCCIONES DE SEGURIDAD . . . . . . . . . . . . . . . . . . . . . . . . . . . . . . . . . . . . . . . . . . . . . . . . . . . . . . . . . . . . . . . . . . . . . .
Guía de instalación INSTRUCCIONES DE SEGURIDAD ADVERTENCIA: El equipo y sus partes accesibles alcanzan altas temperaturas durante el uso, los niños menores de 8 años deben mantenerse alejados, a menos que estén bajo supervisión constante. ADVERTENCIA: No toque los elementos calientes ni las superficies calientes, corre el riesgo de quemarse. Mantenga los paños y otros materiales inflamables alejados del equipo, hasta que todos los componentes se hayan enfriado por completo.
Realice todas las tareas de corte del armario antes de instalar el aparato en el alojamiento y retire por completo todas las virutas de madera y el serrín. Después de la instalación, la base del aparato no debe ser accesible. No obstruya el espacio mínimo entre la encimera y el borde superior del horno. No quite el horno de la base de poliestireno hasta el momento de la instalación. normativa de seguridad vigente. Póngase en contacto con un centro de asistencia técnica autorizado.
PROTECCIÓN DEL MEDIO AMBIENTE ELIMINACIÓN DEL MATERIAL DE EMBALAJE El material de embalaje es 100% reciclable y está marcado con el símbolo de reciclaje . Por lo tanto, deberá desechar las diferentes piezas del embalaje de forma responsable, respetando siempre las normas locales sobre residuos.
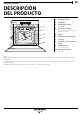
ES Guía de uso y cuidado DESCRIPCIÓN DEL PRODUCTO 1 2 3 4 6 5 5 4 4 3 3 2 2 1 1 7 8 9 10 5 1. 2. 3. Panel de control Ventilador Resistencia circular (no visible) 4. Guías para estantes (el nivel está indicado en la parte frontal del horno) 5. 6. 7. 8. 9. Puerta Resistencia superior/grill Lámpara Conexión de la sonda para carne Placa de datos (no se debe quitar) 10.
PANEL DE CONTROL 1 23 4 5 6 7 8 1. ENCENDIDO/APAGADO 4. ATRÁS 2. MENÚ 5. PANTALLA INICIO 6. BOTONES DE NAVEGACIÓN 8. Sirve para activar la función Para encender y apagar el horno. 7. OK / SELECCIONAR Sirve para volver al menú anterior. Sirve para obtener acceso rápido al menú principal. 3. FAVORITAS Para acceder a las 10 funciones más utilizadas. Sirve para seleccionar las funciones y confirmar los ajustes. Sirve para navegar por los menús, mover el cursor y cambiar los ajustes.
ES ACCESORIOS REJILLA GRASERA BANDEJA PASTELERA GUÍAS DESLIZANTES Se utiliza para cocinar o como soporte para sartenes, bandejas para hornear y otros recipientes de cocción aptos para horno. Se utiliza como bandeja de horno para cocinar carne, pescado, verduras, focaccia, etc. o para recoger los jugos de la cocción cuando se coloca debajo de la rejilla. Se utiliza para cocinar pan y pasteles, pero también para carne, pescado en papillote, etc. Facilita la introducción y la extracción de accesorios.
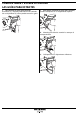
CÓMO EXTRAER Y VOLVER A COLOCAR LAS GUÍAS PARA ESTANTES 1. Para extraer las guías para estantes, levántelas (1) y saque la parte inferior con cuidado de su alojamiento (2): ahora puede extraer las guías. 1. Para volver a colocar las guías para estantes, primero colóquelas en su alojamiento superior. 1 2 2. Manténgalas elevadas cuando las acerque al compartimento. 3. 10 Colóquelas en los alojamientos inferiores.
MONTAJE DE LAS GUÍAS DESLIZANTES 1. Extraiga las guías para estantes. 2. Quite la protección de plástico de las guías correderas. 3. Fije el cierre superior de la corredera a la guía para los estantes y deslícela hasta el tope. (fig. A); baje el otro cierre hasta su posición. ES 5. Repita estos pasos en la otra guía para estantes del mismo nivel. Las guías deslizantes se pueden montar en cualquier nivel. 6. Vuelva a montar las guías para estantes. 7.
USO DEL ASADOR GIRATORIO 1. Inserte el pincho en el centro de la carne y deslícelo hasta que quede sujetada firmemente en la horquilla. 2. Coloque el segundo trinche en la barra y deslícelo hasta que sujete firmemente la carne. 3. 5. Introduzca el soporte en el segundo nivel y después introduzca la punta del pincho en el alojamiento situado en la pared trasera del compartimento del horno. 6. Deje reposar la parte redondeada de la barra en el soporte indicado.
ES FUNCIONES TRADICIONAL FUNCIONES ESPECIALES CONVENCIONAL* Para cocinar cualquier tipo de alimento en un nivel. Utilice el 3er estante. Para cocinar pizza y tartas saladas y dulces con relleno líquido, utilice el 1er o el 2º nivel. No es necesario precalentar el horno. GRILL Para asar filetes, pinchos morunos y salchichas, cocinar verduras gratinadas o tostar pan. Se recomienda poner los alimentos en el 4º o 5º nivel.
COCCIÓN LENTA Para cocinar de forma delicada carne (a 90 °C) y pescado (a 85 °C). Esta función cocina los alimentos lentamente para mantenerlos tiernos y suculentos. Gracias a la temperatura baja, los alimentos no se doran y el resultado es similar al de la cocción a vapor. Le recomendamos dorar antes la carne en una sartén para sellarla y evitar que se salgan los jugos.
ES CÓMO USAR EL HORNO Antes de usar el producto, lea atentamente las instrucciones de seguridad PRIMER USO 1. SELECCIONE EL IDIOMA La primera vez que encienda el aparato, tendrá que seleccionar el idioma y ajustar la hora: La pantalla mostrará una lista de idiomas disponibles. Português do Brasil English Italiano Please select language Pulse pulse o para resaltar el idioma deseado y para confirmar. Nota: También puede cambiar el idioma más tarde desde la opción «Configuración» del menú. 2.
USO DIARIO 1. SELECCIONAR UNA FUNCIÓN Pulse el botón para encender el horno: en la pantalla aparecerá el menú principal y una lista de funciones disponibles. Utilice o para mover el cursor hasta TEMPERATURA o GRILL y pulse : el valor parpadeará. Tradicional No Convencional PRECALENTAR Funciones de cocción manual tradicional Pulse o para navegar por el menú principal y resaltar la opción que desee seleccionar.
ES Si la temperatura recomendada se ajusta a lo que quiere, pulse . De lo contrario, proceda a cambiarla tal como se ha indicado previamente. -00:10 200°C TEMPERATURA INTRODUCIREN prevista de finalización de la cocción. Utilice o para mover el cursor a TIEMPO FINAL y pulse : el tiempo parpadeará. 02:00 200°C TIEMPOCOCCIÓN TEMPERATURA Precalent.
Seleccione “Recetas” del menú principal utilizando o . Pulse para confirmar y acceda a la lista de platos disponibles. Pinchos morunos introduciéndola en la toma situada en el lado derecho del compartimento del horno. Modifique (si es posible) los ajustes predefinidos según sea necesario o pulse .
ES Si desea guardar una función como favorita y memorizar los ajustes actuales para el futuro, mantenga pulsado cuando haya finalizado la cocción. Pulse para confirmar: la pantalla le dirá que guarde la función asignándole un número del 1 al 10 en su lista de favoritos. 1 Nota: El temporizador no activa ninguno de los ciclos de cocción. Para detener el temporizador en cualquier momento, pulse . Aire forzado Pulse OK para guardar, << para cancel.
Cuando haya seguido todas las instrucciones, pulse para continuar con el paso siguiente. Tras la confirmación final, el horno iniciará el ciclo de limpieza y la puerta se bloqueará automáticamente: inmediatamente aparecerá un mensaje mostrando una barra de progreso para indicar el avance del ciclo de limpieza. La puerta se bloquea durante la limpieza -00:59 TIEMPO Limpieza 15:00 TIEMPOFINAL 20 Cuando termine el ciclo, un mensaje parpadeará en la pantalla.
USO DIARIO CÓMO UTILIZAR LA TABLA DE COCCIÓN La tabla indica la mejor función, accesorios y nivel para cocinar los diferentes tipos de alimentos. Los tiempos de cocción se inician en el momento en que se coloca el alimento en el horno, excluyendo el precalentamiento (cuando sea necesario). Las temperaturas y los tiempos de cocción son orientativos y dependen de la cantidad de alimentos y del tipo de accesorio utilizado.
TABLA DE COCCIÓN ALIMENTO FUNCIÓN Bizcochos Bizcocho relleno (tarta de queso, strudel, tarta de fruta) Galletas, tartaletas Lionesas Merengues Pan/pizza/focaccia Tartas saladas (tarta de verduras, quiche) CONVENCIONAL REJILLA 22 GRILL PLATO O BANDEJA PARA HORNEAR SOBRE LA REJILLA TURBO GRILL GRASERA / BANDEJA PASTELERA PRECALENTAR TEMPERATURA (°C) TIEMPO DE COCCIÓN (MIN.
ES ALIMENTO FUNCIÓN PRECALENTEMPERATURA (°C) TAR TIEMPO DE COCCIÓN (MIN.
ALIMENTO FUNCIÓN PRECALENTEMPERATURA. (°C) TAR TIEMPO DE COCCIÓN (MIN.) 3 - Auto 10-15 - Auto 15-20 - Auto 20-30 - Auto 20-30 Asado relleno - 200 80-120 *** Carne cortada a trozos (conejo, pollo, cordero) - 200 50-100 *** Pizza congelada NIVEL Y ACCESORIOS 4 1 4 2 1 4 3-2 1 3 3 RECETAS CON SONDA TEMPERATURA RECOMENDADA PARA LA SONDA DE CARNE (°C) FUNCIÓN PRECALENTAR NIVEL TEMPERATURA (°C) TIEMPO DE COCCIÓN (MIN.
RECETAS PROBADAS RECETA FUNCIÓN Galletas de pastaflora Pasteles Bizcochos sin grasa 2 tartas de manzana Tostada Hamburguesas Cumplimentada por los órganos de certificación de conformidad con las normas IEC 60350-1 NIVEL TEMP. (°C) TIEMPO DE COCCIÓN (MIN.
LIMPIEZA No utilice aparatos de limpieza al vapor. Lleve a cabo todas las operaciones con el horno frío. Utilice guantes de protección durante todas las operaciones. Desconecte el horno de la red eléctrica. SUPERFICIES EXTERIORES Limpie las superficies con un paño húmedo de microfibra. Si están muy sucias, añada unas gotas de detergente neutro al agua. Seque con un paño seco.
LIMPIEZA DEL COMPARTIMENTO DE COCCIÓN CON EL CICLO DE LIMP. PIROLÍTICA No toque el horno durante el ciclo de limpieza pirolítica. Mantenga a los niños y a los animales alejados del Esta función le permite eliminar las salpicaduras de la cocción aplicando una temperatura de 500 °C aprox. A esta temperatura, los restos de comida se convierten en ceniza que puede limpiarse fácilmente con una esponja húmeda cuando el horno se haya enfriado.
MANTENIMIENTO Utilice guantes de protección durante todas las operaciones. Lleve a cabo todas las operaciones con el horno frío. Desconecte el horno de la red eléctrica. EXTRACCIÓN DE LA PUERTA 1. Abra la puerta por completo. 4. Sujete bien la puerta con las dos manos; no la sujete por el asa. Simplemente extraiga la puerta continuando cerrándola y a la vez levantándola hasta que se salga de su alojamiento. ~15° b 2. Baje los cierres tanto como sea posible. a a b 5.
ES INSTALACIÓN DE LA PUERTA 1. Mantenga la puerta cerca del horno y alinee los ganchos de las bisagras con sus alojamientos. 5. Presione suavemente para comprobar que los pestillos estén en la posición correcta. “CLICK” 2. Encaje la parte superior en las ranuras. 3. Baje la puerta y ábrala por completo. 6. Intente cerrar la puerta y compruebe que esté alineada con el panel de control. Si no lo está, repita los pasos de arriba: la puerta podría dañarse si no funciona correctamente. 4.
SUSTITUCIÓN DE LA BOMBILLA 1. Desconecte el horno de la red eléctrica. 2. Desenrosque la tapa de la lámpara, sustituya la bombilla y vuelva a enroscar la tapa de la lámpara. Nota: Utilice solo bombillas incandescentes de 25-40 W/230 V tipo E-14, T300 °C o bombillas halógenas de 2040 W/230 V tipo G9, T300 °C. La bombilla que se usa en el aparato está diseñada específicamente para electrodomésticos y no es adecuada para la iluminación general de estancias de una vivienda (Normativa CE 244/2009).
ES RESOLUCIÓN DE PROBLEMAS A menudo, los problemas o fallos que se presentan se pueden resolver fácilmente. Antes de contactar con el Servicio Postventa, compruebe la tabla siguiente para ver si puede resolver el problema por su cuenta. Si el problema persiste, póngase en contacto con el Servicio Postventa más cercano. Lea atentamente las instrucciones de seguridad antes de llevar a cabo cualquiera de las siguientes tareas PROBLEMA El horno no funciona. El horno no se calienta. La a hora parpadea.
PROBLEMA CAUSA POSIBLE La cocción no empieza o suena una señal acústica. La opción seleccionada no es compatible con la acción que quiere realizar. La luz se apaga durante la cocción. La función Eco se ha deshabilitado. La luz no funciona. Hay que cambiar la bombilla. El brillo de la pantalla es bajo. La función Eco se ha deshabilitado. El horno está apagado. Cuando se pulsan los botones no sucede nada. El bloqueo de teclas está activado. El panel de control está sucio.
ES DATOS TÉCNICOS WWW Puede consultar y descargar las especificaciones completas del producto, así como las clasificaciones de eficiencia energética de este horno en nuestro sitio web www.hotpoint.eu SERVICIO POSTVENTA ANTES DE PONERSE EN CONTACTO CON NUESTRO SERVICIO POSTVENTA 1. Compruebe si puede resolver el problema por su cuenta mediante alguna de las medidas descritas en la sección Resolución de problemas. 2. Apague el horno y vuelva a encenderlo para comprobar si se ha solucionado el problema.
Guía de instalación x2 90°C 34
ES 20 mm 345 mm 540 mm 95 mm 482 mm 595 mm 537 mm 89° máx 5,5 mm 572 mm 10 mm 595 mm 538 mm mín. 550 mm 600 mm mín. 550 mm mín. 560 mm 5 mm 583 + 2 mm mín.
= 001 = 400010849870 Impreso en Italia