Kasutus- ja hooldusjuhend www.hotpoint.
EESTI . . . . . . . . . . . . . . . . . . . . . . . . . . . . . . . . . . . . . . . . . . . . . . . . . . . . . . . . . .
ET EESTI TERVISHOIU JA OHUTUSE, KASUTAMISE JA HOOLDUSE ning PAIGALDAMISE JUHEND TÄNAME, ET OSTSITE HOTPOINT - ARISTON TOOTE Täielikuma hoolduse ja toe saamiseks registreerige oma seade aadressil www.hotpoint.eu/register Register Paigaldusjuhend OHUTUSJUHISED. . . . . . . . . . . . . . . . . . . . . . . . . . . . . . . . . . . . . . . . . . . . . . . . . . . . . . . . . . . . . . . . . . . . . . . . . . . . . . . . . . . . .
Paigaldusjuhend OHUTUSJUHISED OLULINE! LUGEGE LÄBI JA JÄRGIGE HOOLIKALT! Enne seadme kasutamist lugege hoolikalt läbi ohutusjuhendid. Hoidke need hilisemaks läbivaatamiseks käepärast. Nendes juhendites ja seadmel endal on olulised hoiatused, mida tuleb pidevalt järgida. Tootja ei vastuta, kui ohutusjuhendeid ei järgita, seadet kasutatakse valesti või määratakse sobimatud seaded.
samasuguse vastu välja. Toitejuhet tohib vahetada ainult kvalifitseeritud tehnik vastavalt tootja juhistele ja kehtivatele ohutuseeskirjadele. Võtke ühendust volitatud teenindusega. Kui seadme pistik ei sobi teie pistikupesaga, pöörduge kvalifitseeritud tehniku poole. Ärge kasutage pikendusjuhtmeid, mitmikpistikupesi ega adaptereid. Ärge kasutage seadet, kui selle toitekaabel või pistik on vigane, kui see ei tööta korralikult või kui see on kahjustatud või maha kukkunud.
KESKKONNAKAITSE Pakkematerjalide kõrvaldamine Pakkematerjal on 100% ringlussevõetav ja märgistatud ringlussevõtusümboliga. Pakendi osad tuleb kõrvaldada vastutustundlikult ja täies vastavuses kohalike jäätmekäitluseeskirjadega. Majapidamisseadmete utiliseerimine Seadme äraviskamisel muutke see mittekasutatavaks, lõigates ära toitejuhtme ja eemaldades uksed ja riiulid (kui need on olemas), nii et lapsed ei saaks sisse ronida ega lõksu jääda. See seade on toodetud taaskasutatavatest materjalidest.
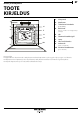
ET Kasutus- ja hooldusjuhend TOOTE KIRJELDUS 1 2 3 4 6 5 5 4 4 3 3 2 2 1 1 7 8 9 10 5 1. 2. 3. Juhtpaneel Ventilaator Tsirkulaarne küttekeha (ei ole näha) 4. Riiulisiinid (taseme number on märgitud ahju esiküljel) 5. 6. 7. 8. 9. Uks Ülemine küttekeha/grill Lamp Lihasondi ühendus Andmesilt (mitte eemaldada) 10. Alumine kütteelement (pole nähtaval) Pange tähele! Energiatarbimise vähendamiseks võib jahutusventilaator küpsetamise ajal aeg-ajalt välja ja tagasi sisse lülituda.
JUHTPANEEL 1 23 4 5 6 7 8 1. SISSE/VÄLJA 4. TAGASI 7. OK/VALI 2. MENÜÜ 5. DISPLEI 6. NAVIGEERIMISNUPUD 8. KÄIVITUS Ahju sisse ja välja lülitamiseks. Eelmisele menüüle naasmiseks. Kiirtee peamenüü juurde. 3. LEMMIKUD Funktsioonide valimiseks ja seadete kinnitamiseks. Valitud funktsiooni käivitamiseks. Menüüs liikumiseks, kursori liigutamiseks ja seadete muutmiseks. Juurdepääs 10-le enimkasutatud funktsioonile.
ET TARVIKUD REST NÕRGUMISPANN KÜPSETUSPLAAT LIUGSIINID Tugikonstruktsioon küpsetuspannide ja muude ahjukindlate küpsetusnõude toetamiseks küpsetamisel. Kasutamiseks ahjuplaadina liha, kala, köögiviljade, foccaccia jms küpsetamisel või siis küpsetusmahlade kogumiseks asetatuna resti alla. Ahjusaia ja saiakeste küpsetamiseks, aga ka liha, kala küpsetuspaberis jms valmistamiseks. Tarvikute ahju panemist ja ahjust välja võtmise hõlbustamiseks.
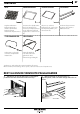
RIIULISIINIDE EEMALDAMINE JA ÜMBERPAIGUTAMINE 1. Riiulisiinide eemaldamiseks, tõstke siine ülespoole (1) ja tõmmake õrnale alumine osa oma pesast (2) välja: nüüd saab siinid eemaldada. 1. Riiulisiinide tagasipaigaldamiseks paigutage kõigepealt oma pessa siinide ülemine osa. 1 2 2. Hoidke neid kambri seina vastu paigutamisel üleval. 3. 10 Asetage need alumistesse pesadesse.
ET LIUGSIINIDE PAIGALDAMINE 1. Eemaldage riiulisiinid. 2. Eemaldage liugsiinide plastikust kaitse. 3. Kinnitage siini ülemine klamber riiulisiini külge ja libistage see nii kaugele, kui see liigub. (Joonis A) laske teine klamber alla oma kohale. 5. Korrake toimingut teisel samal tasemel asuval riiulisiinil. Liugsiinid võib kinnitada ükskõik millisele tasemele. 6. Paigaldage riiulisiinid tagasi. 7. Asetage tarvikud riiulisiinidele. 4.
GRILLVARDA KASUTAMINE 1. Asetage varras lihatüki keskele ja lükake sisse, kuni liha istub tugevalt kahvli otsas. 2. Lükake teine kahvel vardale ja libistage see nii kaugele, et see hoiaks liha kindlalt paigal. 3. Keerake kinnituskruvi kõvasti kinni, et kahvel oma kohal püsiks. 5. Asetage tugi teisele tasemele, seejärel sisestage varda ots küpsetuskambri tagaseinas olevasse pessa. 6. Toetage varda ümar ots vastavale toele. Röstimisvarda kasutamiseks valige funktsioon Turbogrill.
ET FUNKTSIOONID TAVALINE ERIFUNKTSIOONID CONVENTIONAL (TAVAPÄRANE KÜPSETAMINE)* Mis tahes tüüpi roogade küpsetamine ainult ühel ahjutasandil. Kasutage 3. ahjutasandit. Pitsa, soolaste pirukate või mahlase täidisega kookide küpsetamiseks kasutage 1. või 2. ahjutasandit. Ahju ei ole vaja eelkuumutada. DEFROSTING (SULATAMINE) Toidu kiirem sulatamine. Paigutage toit keskmisele ahjutasandile. Soovitatav on jätta toit pakendisse, et vältida selle pealispinna kuivamist.
SLOW COOKING (AEGLANE KÜPSETAMINE) Liha (temperatuuril 90°C) ja kala (temperatuuril 85°C) õrnaks küpsetamiseks. See funktsioon küpsetab toitu aeglaselt, et see jääks pehmeks ja mahlaseks. Madala temperatuuri tõttu ei pruunistu toidu pind ja lõpptulemus on sarnane aurutatud toidule. Soovitame liha enne pannil pruunistada, et mahlad välja ei nõrguks. Kala küpsetamine võtab aega alates kahest tunnist (300 g), kuni viie tunnini (3 kg) ja liha alates neljast tunnist (1 kg) kuni kuue või seitsme tunnini (3 kg).
ET KUIDAS PLIITI KASUTADA Lugege ohutusjuhised enne seadme kasutamist tähelepanelikult läbi SEADME ESMAKORDNE KASUTAMINE 1. VALIGE KEEL Seadme esimesel sisselülitamisel tuleb määrata keel ja kellaaeg: ekraanile kuvatakse võimalike keelte loend. 3. VÕIMSUSTARBE SEADMINE Ahi on programmeeritud tarbima elektrit koguses, mis vastab kodusele elektrivõrgule, mille nimivõimsus on suurem kui 3 kW: Kui teie majapidamises on võimalik tarbitav võimsus väiksem, tuleb seda väärtust vähendada.
IGAPÄEVANE KASUTAMINE 1. FUNKTSIOONI VALIMINE Ahju sisselülitamiseks vajutage nuppu. Ekraanile kuvatakse peamenüü võimalike funktsioonide loend. Settings No Traditional manual cooking functions Nuppudega ja saab liikuda peamenüüs ja märkida ära soovitud valiku. Kui soovitud valik on ekraanil märgitud, vajutage valiku kinnitamiseks ja liikuge seejärel seadete menüüsse (vt all) või funktsioonide loendisse.
ET Kui eelkuumutamine on lõppenud, annab helisignaal märku, et ahi on jõudnud seatud temperatuurini. Nüüd on aeg toit ahju panna ja alustada küpsetamisega, selleks vajutage : ahi valib automaatselt funktsiooni Tavapärane küpsetamine. Kui soovite kasutada mõnd muud küpsetusfunktsiooni, vajutage ja valige soovitud funktsioon.
Vajutage ja pange toit ahju. Funktsiooni aktiveerimiseks vajutage uuesti . Nende retseptide puhul on võimalik seada küpsetamise lõpuaega. Pange tähele! Kõlab helisignaal ja ekraanile kuvatakse toimingud, mida teil valitud funktsiooni puhul tuleb teha ja mis ajal (nt toitu ümber pöörata või kontrollida küpsetamise edenemist). . LIHATERMOMEETRIGA RETSEPTID Lihatermomeetriga saab küpsetamise ajal mõõta toidu sisetemperatuuri.
ET Hiljem oma lemmikfunktsioon taasvalimiseks hoidke all . ekraanile kuvatakse lemmikfunktsioonide loend. . KLAHVILUKK Nuppude lukustamiseks vajutage samal ajal ning hoidke all vähemalt viis sekundit. ja Conventional Forced Air Pizza Key lock has been activated Your selection of favourite recipes Funktsiooni valimiseks vajutage või , kinnitamiseks vajutage , ja seejärel vajutage aktiveerimiseks . . SEADED Seadete valimiseks peamenüüst vajutage või ja seejärel vajutage kinnitamiseks .
-00:59 TIME Cleaning 15:00 ENDTIME Kui tsükkel on lõpetatud, hakkab teade ekraanil vilkuma. Ekraanil kuvatakse puhastamisest jäänud temperatuuri näit ja uks jääb lukku, kuni temperatuur küpsetuskambris on langenud ohutule tasemele. Seejärel kuvatakse ekraanil praegune kellaaeg.
ET IGAPÄEVANE KASUTAMINE KUIDAS KÜPSETUSTABELIT LUGEDA Tabelis on eri toitude küpsetamiseks sobivaimad funktsioonid, tarvikud ja tasemed. Küpsetusaeg algab hetkest, kui toit pannakse ahju, kuid ei sisalda eelsoojendamiseks kuluvat aega. Küpsetustemperatuurid ja ajad on ligikaudsed ning sõltuvad toidu kogusest ja kasutatavast tarvikust. Kasutage algatuseks kõige madalamat soovituslikku väärtust ja kui toit ei ole piisavalt küps, kasutage kõrgemaid väärtusi.
KÜPSETUSTABELID FUNKTSIOON TOIT Pärmitaignast koogid Täidisega kook (juustukook, struudel, puuviljakook) Küpsised/marjakorvikesed Tuuletaskud Besee Sai/pitsa/focaccia Pikantsed saiakesed (juurviljapirukas, lahtine plaadipirukas) CONVENTIONAL (TAVAPÄRANE KÜPSETAMINE) REST 22 GRILL (GRILLIMINE) AHJUNÕUD VÕI KÜPSETUSPANN RESTIL TURBO GRILL (TURBOGRILL) NÕRGUMISPANN / KÜPSETUSPLAAT EELKUUMUTUS TEMPERATUUR (°C) KÜPSETUSAEG (min) - 160–180 30–90 - 160–180 30–90 - 160–200 35–90 - 160–2
ET FUNKTSIOON TOIT EELKUUTEMPERATUUR (°C) MUTUS KÜPSETUSAEG (min) - 190–200 20–30 - 180–190 20–40 - 180–190 20–40 *** - 190–200 45–65 - 190–200 80–110 - 200–230 50–100 Kalkunipraad/hanepraad 3 kg - 190–200 80–130 Küpsetatud kala / kala küpsetuspaberis (filee, terve) - 180–200 40–60 Täidetud köögivili (tomatid, suvikõrvitsad, baklažaan) - 180–200 50–60 Röstitud sai/leib - Kõrge 3–6 Kalafilee/lõigud - Keskmine 20 - 30* Vorstid/kebab/ ribi/kotletid - Keskmine - kõrge
TOIT FUNKTSIOON EELKUUTEMPERATUUR.
JÄRELEPEROOVITUD RETSEPTID RETSEPT FUNKTSIOON ET EELKUUMUTUS TASE Temperatuur (°C) KÜPSETUSAEG (min) - 3 150 40-50 Rasvavann/ küpsetusplaat - 3 150 35–45 Rasvavann/ küpsetusplaat - 1-4 150 30 - 45 4. tasand: küpsetusplaat 1. tasand: Rasvavann/ küpsetusplaat - 3 170 25 - 35 Rasvavann/ küpsetusplaat - 3 160 20–30 Rasvavann/ küpsetusplaat - 1-4 160 25 - 35 4. tasand: küpsetusplaat 1.
PUHASTAMINE Ärge kasutage aurupuhastusseadmeid. Nõutavad toimingud tuleb siis, kui ahi on külm. Kasutage kõikie toimingute juures kaitsekindaid. Eemaldage ahi vooluvõrgust. VÄLISPIND Puhastage välispindu ainult niiske mikrokiudlapiga. Kui pind on väga määrdunud, lisage paar tilka neutraalse pH-ga puhastusvahendit. Lõpetage puhastamine kuiva lapiga. Ärge kasutage traatnuustikut, abrasiivseid küürimispastasid ega abrasiivseid/söövitavaid puhastusvahendeid, kuna need võivad kahjustada seadme pinda.
KÜPSETUSKAMBRI PUHASTAMINE PYRO TSÜKLIGA Ärge puudutage ahju Pyro tsükli ajal. Hoide Pyro tsükli ajal lapsed ja loomad eemal ja See funktsioon võimaldab kuuma temperatuuriga (umbes 500 °C) eemaldada küpsetuspritsmed. Sellisel temperatuuril toidujäägid tuhastuvad ja tuha saab pärast ahju jahtumist niiske svammiga ära pühkida. Kui ahi on paigaldatud pliidi alla, siis veenduge, et kõik põletid ja elektrilised pliidiplaadid oleksid isepuhastusrežiimi ajal välja lülitatud.
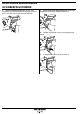
HOOLDAMINE Kasutage kõikie toimingute juures kaitsekindaid. Nõutavad toimingud tuleb siis, kui ahi on külm. Eemaldage ahi vooluvõrgust. AHJU UKSE EEMALDAMINE 1. 4. Võtke uksest mõlema käega kõvasti kinni – ärge hoidke seda käepidemest. Ukse eemaldamiseks lükake seda edasi kinni, tõmmates samal ajal ülespoole, kuni see oma pesast lahti tuleb. Tehke uks pärani lahti. ~15° b 2. Langetage fiksaatorid lõpuni. a a b 5. Pange uks pehme pinna peale ühele küljele maha. 3.
ET UKSE TAGASI PAIGUTAMINE 1. Hoidke ust ahju lähedal ja liigutage hingede haagid oma pesadega kohakuti. 5. Nihutage õrnalt, et veenduda, et fiksaatorid on õiges asendis. “CLICK” 2. Kinnitage ülemine osa pesadesse. 3. Laske uks alla ja seejärel avage täielikult. 6. Proovige ust sulgeda ja vaadake, et see oleks juhtpaneeliga ühel joonel. Kui pole, korrake ülalkirjeldatud toiminguid. kui uks ei liigu korralikult, võib see viga saada. 4. Langetage fiksaatorid algasendisse tagasi.
LAMBIPIRNI VAHETAMINE 1. Eemaldage ahi vooluvõrgust. 2. Keerake kate lahti, vahetage pirn ja keerake kate tagasi. Pange tähele! Kasutage ainult hõõglampe 25-40 W / 230 V, tüüp E-14, T300°C, või halogeenlampe 20-40 W / 230 V, tüüp G9, T300°C. Seadmes kasutatav lambipirn on loodud spetsiaalselt kodumasinatele ja ei sobi kodus tubade üldiseks valgustamiseks (EÜ määrus nr 244/2009). Pirnid on saadaval teeninduses.
ET RIKKEOTSING Võimalikud probleemid või rikked on sageli kergesti lahendatavad. Enne teenindusega ühenduse võtmist vaadake läbi järgnev tabel, ehk saade vea kõrvaldamisega ise hakkama. Kui tõrge jääb püsima, võtke ühendust lähima teenindusega. Enne allkirjeldatud tööde kallale asumist lugege tähelepanelikult läbi ohutusjuhised PROBLEEM VÕIMALIK PÕHJUS Voolukatkestus. Ahi ei tööta. Vooluvõrgust lahutatud. Tõrge. LAHENDUS Kontrollige, kas vool on olemas ja kas ahi on vooluvõrku ühendatud.
PROBLEEM VÕIMALIK PÕHJUS LAHENDUS Valitud funktsioon ei ühildu Küpsetamine ei alga ja/või kõlab toiminguga, mida soovite helisignaal. sooritada. Valige funktsioon uuesti. Eemaldage lihatermomeeter ja paigaldage tagasi. Tuli kustub küpsetamise ajal. Rakendatud on ökofunktsioon. Valige väljalülitamiseks seadete valikust ECO väärtuseks NO. Tuli ei põle. Pirn vajab vahetamist. Järgige pirni vahetamise juhiseid lõigus Hooldamine. Ekraan on tumedam. Rakendatud on ökofunktsioon.
ET TEHNILISED ANDMED WWW Toote täielikke tehnilisi näitajaid, sh ahju energiaklassi, saate vaadata ja alla laadida meie veebilehelt www. hotpoint.eu TEENINDUS ENNE TEENINDUSEGA ÜHENDUSE VÕTMIST 1. Uurige, kas teil on võimalik probleem omal jõul lõigus Rikkeotsing kirjeldatu abil lahendada. 2. Lülitage ahi välja ja uuesti sisse, et näha, kas viga püsib. KUI TÕRGE JÄÄB PÄRAST KÕIKI VAJALIKKE KONTROLLE PÜSIMA, VÕTKE ÜHENDUST LÄHIMA TEENINDUSEGA.
Paigaldusjuhend x2 90°C 34
ET 20 mm 345 mm 540 mm 95 mm 482 mm 595 mm 537 mm max 89° 5.5 mm 572 mm 10 mm 595 mm 538 mm min. 550 mm 600 mm min. 550 mm min. 560 mm 5 mm 583 + 2 mm min.
= 001 = 400010849870 Trükitud Itaalias