
Product Manual


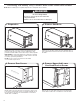
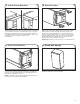
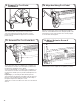
Table Of Contents
- Refrigerator and freezer SAFETY
- Installing Your Refrigerator or freezer
- OPERATING YOUR REFRIGERATOR or freezer
- CARING FOR YOUR REFRIGERATOR or freezer
- TROUBLESHOOTING
- SEGURIDAD DEL REFRIGERADOR Y EL CONGELADOR
- CÓMO INSTALAR EL REFRIGERADOR O CONGELADOR
- Desempaque
- Limpieza antes del uso
- Requisitos de ubicación
- Herramientas
- Requisitos eléctricos
- Cómo retirar la puerta de la unidad (opcional)
- Cómo volver a colocar la puerta de la unidad (opcional)
- Cómo invertir la puerta de la unidad (opcional)
- Cómo instalar las ruedas de alta resistencia y los pedales Silver Tread
- CÓMO OPERAR EL REFRIGERADOR O CONGELADOR
- Cuidado durante las vacaciones y las mudanzas
- Cortes de corriente
- Cómo cambiar el foco
- SOLUCIÓN DE PROBLEMAS
- SÉCURITÉ du réfrigérateur et congélateur
- Installation du réfrigérateur ou du congélateur
- UTILISER VOTRE RÉFRIGÉRATEUR ou congélateur
- Précautions à prendre pour les vacances ou le déménagement
- Pannes de courant
- Remplacer l’ampoule d’éclairage
- DÉPANNAGE

8
Remove the four 3/8" upper and lower hex-head bracket
screws with a TORX
®
T25
®
screwdriver or 3/8" nut driver.
Installing the Heavy Duty Casters and Silver Tread Foot Pedals
NOTE: Before installing the foot pedal, adjust the door swing direction, if desired.
Break off the corners of the foam corner posts to gain access
to the large caster bracket screws on the left and right rear of
the unit. Remove the two rear caster bracket screws with a
TORX
®
T40
®
screwdriver.
Replace the foam corner post on the non-hinged side, and
then place the unit on its side on top of cardboard or other
protective material. Make sure the door hinge is facing upward.
IMPORTANT: It is important that the door hinge face upward
during the entire caster installation to make sure the door will
not swing open during installation.
NOTE: If foam corner posts have been discarded,
2" x 4" boards may be used.
Using a 5/16" nut driver, remove the four skid bolts (two on
each side) from the lower front and rear of the unit. Remove
the skids.
1. Preparation
2. Remove Skid Bolts
4. Remove Upper And Lower
Hex-Head Bracket Screws
3. Remove Rear Screws
Back side of unit
WARNING
Excessive Weight Hazard
Use two or more people to move and install
refrigerator/freezer.
Failure to do so can result in back or other injury.