REFRIGERATOR USER INSTRUCTIONS THANK YOU for purchasing this high-quality product. If you should experience a problem not covered in TROUBLESHOOTING, please visit our website at www.whirlpool.com for additional information. If you still need assistance, call us at 1-800-253-1301. In Canada, visit our website at www.whirlpool.ca or call us at 1-800-807-6777. You will need your model and serial number, located on the inside wall of the refrigerator compartment.
IMPORTANT SAFETY INSTRUCTIONS WARNING: To reduce the risk of fire, electric shock, or injury when using your refrigerator, follow these basic precautions: ■ Plug into a grounded 3 prong outlet. Do not remove ground prong. ■ Do not use an adapter. ■ ■ ■ Do not use an extension cord. ■ Disconnect power before servicing. ■ ■ ■ ■ ■ Replace all parts and panels before operating. Remove doors from your old refrigerator. ■ ■ Use nonflammable cleaner.
Clean Before Using Electrical Requirements After you remove all of the packaging materials, clean the inside of your refrigerator before using it. See the cleaning instructions in “Refrigerator Care.” Important information to know about glass shelves and covers: Do not clean glass shelves or covers with warm water when they are cold. Shelves and covers may break if exposed to sudden temperature changes or impact, such as bumping. Tempered glass is designed to shatter into many small, pebble-size pieces.
Water Supply Requirements Gather the required tools and parts before starting installation. Read and follow the instructions provided with any tools listed here. TOOLS NEEDED: ■ Flat-blade screwdriver ■ ¹⁄₄" Nut driver ■ ⁷⁄₁₆" and ¹⁄₂" Open-end or two adjustable wrenches ■ ¹⁄₄" Drill bit ■ Cordless drill IMPORTANT: ■ All installations must meet local plumbing code requirements. ■ Do not use a piercing-type or ³⁄₁₆" (4.76 mm) saddle valve which reduces water flow and clogs more easily.
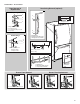
Connect to Refrigerator Depending on your model, the water line may come down from the top or up from the bottom. Follow the connection instructions for your model. 5. Using an adjustable wrench, hold the nut on the plastic water line to keep it from moving. Then, with a second wrench turn the compression nut on the copper tubing counterclockwise to completely tighten. Do not overtighten. A B Style 1 C 1. Remove plastic cap from water valve inlet port.
Replace and Remove Handles Standard Door ■ To replace the handle, align the handle on the door or drawer as shown. Using a Phillips screwdriver, attach the handle with the handle screws. ■ To replace the handle trim pieces, using your hand, apply firm pressure on the face of the trim and slide the trim piece toward the center of the handle. ■ To remove handles, reverse directions. 3. Remove the parts for the top hinge as shown in Top Hinge graphic. Lift the refrigerator door free from the cabinet. 4.
Refrigerator door 1. Remove the refrigerator handle assembly as shown in Graphic 2. Keep all parts together. 2. Remove door handle seal screw front. Move to opposite side of refrigerator door as shown in Graphic 5. 3. Remove the door stop. Move it to the opposite side of the refrigerator door as shown in Graphic 3. 4. Attach refrigerator handle on opposite side of the refrigerator door with the two screws as shown in Graphic 2. Replace handle trim as shown. 5. Tighten all screws.
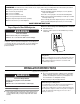
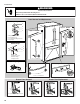
Standard Door - Freezer Door Door Swing Reversal (optional) Door Removal & Replacement 2 Top Hinge 1 A A 1 B C A A. ⁵⁄₁₆" Hex-Head Hinge Screws B D C A. Hinge Cover Screw B. Top Hinge Cover C. 5/16" Hex-Head Hinge Screws D. Top Hinge C A Center Hinge A A. Handle Trim B. Refrigerator Door Handle C. Flat-Head Handle Screws B C A. Hinge Pin Cover B. Center Hinge C. Hinge Screws Side View 3 Front View A. Door Stop Screws B. Door Stop A B 5 A Bottom Hinge 4 A B C D E A.
Standard Door - Freezer Drawer Door Removal & Replacement Door Swing Reversal (optional) 2 Top Hinge A A B C 1 B C A A. Hinge Screws D A. Hinge Cover Screw B. Top Hinge Cover C. 5/16" Hex-Head Hinge Screws D. Top Hinge B A Bottom Hinge A. Handle Trim B. Flat-Head Handle Screws C. Refrigerator Door Handle A B Side View 3 Front View C A. Hinge Pin Cover B. Bottom Hinge C. Hinge Screws A. Door Stop Screws B. Door Stop A B 5 A B C B A A. Handle Trim B. Flat-Head Handle Screws C.
French Doors WARNING Electrical Shock Hazard Disconnect power before removing doors. Failure to do so can result in death or electrical shock. Door Removal and Replacement Top Hinges A B C Style 2 - Handle Style 1 - Handle D 1 1 A. Hinge Cover Screw B. Top Hinge Cover C. 5/16" Hex Head Hinge Screws D. Top Hinge Bottom Hinges A A B C A. Hinge Pin Cover B. Bottom Hinge C. Hinge Screws A. ³⁄₃₂" or ¹⁄₈" Setscrew Wiring Plug Style 1 - Handle 2 Style 2 - Handle A A.
Door Closing and Door Alignment The base grille covers the leveling screws and roller assemblies located at the bottom of the refrigerator cabinet below the freezer door or drawer. Before making adjustments, remove the base grille and move the refrigerator to its final location. 1. Remove the base grille. Grasp the grille firmly and pull it toward you. ¹⁄₄" 2. Move the refrigerator to its final location.
Adjusting Controls Using the Controls The temperature controls are located at the top front of the refrigerator or freezer compartments. Temperature Controls For your convenience, the temperature controls are preset at the factory. When you first install your refrigerator, make sure the controls are still set to the recommended setting as shown.
Remember Water Filtration System ■ Allow 24 hours to produce the first batch of ice. Allow 3 days to completely fill the ice storage bin. Discard the first three batches of ice produced. The water filter is located in the upper right-hand corner of the refrigerator compartment. ■ The quality of your ice will be only as good as the quality of the water supplied to your ice maker. Avoid connecting the ice maker to a softened water supply.
To Clean Your Refrigerator: If you need to clean the condenser: NOTE: Do not use abrasive or harsh cleaners such as window sprays, scouring cleansers, flammable fluids, muriatic acid, cleaning waxes, concentrated detergents, bleaches or cleansers containing petroleum products on exterior surfaces (doors and cabinet), plastic parts, interior and door liners or gaskets. Do not use paper towels, scouring pads, or other harsh cleaning tools. 1. Unplug refrigerator or disconnect power. 2.
■ Hissing/Rattling - flow of refrigerant, movement of water lines, or from items placed on top of the refrigerator ■ Sizzling/Gurgling - water dripping on the heater during defrost cycle ■ Popping - contraction/expansion of inside walls, especially during initial cool-down ■ Water running - may be heard when ice melts during the defrost cycle and water runs into the drain pan ■ Creaking/Cracking - occurs as ice is being ejected from the ice maker mold.
The water dispenser will not operate properly ■ Refrigerator connected to a water supply and the supply shutoff valve turned on? Connect refrigerator to water supply and turn water shutoff valve fully open. ■ Kink in the water source line? Straighten the water source line. ■ New installation? Flush and fill the water system. See “Water Dispenser.” ■ Is the water pressure at least 35 psi (241 kPa)? The water pressure to the home determines the flow from the dispenser. See “Water Supply Requirements.
PERFORMANCE DATA SHEETS Interior Water Filtration System Model UKF8001AXX-750 Capacity 750 Gallons (2839 Liters) System tested and certified by NSF International against NSF/ANSI Standard 42 for the reduction of Chlorine Taste and Odor, Particulate Class I*; and against NSF/ANSI Standard 53 for the reduction of Lead, Mercury, Atrazine, Benzene, p-Dichlorobenzene, Carbofuran, Toxaphene, Cysts, Turbidity, Asbestos, Tetrachloroethylene and Lindane.
Interior Water Filtration System Model UKF8001AXX-200 Capacity 200 Gallons (757 Liters) System tested and certified by NSF International against NSF/ANSI Standard 42 for the reduction of Chlorine Taste and Odor, Particulate Class I*; and against NSF/ANSI Standard 53 for the reduction of Lead, Mercury, Atrazine, Benzene, p-Dichlorobenzene, Carbofuran, Toxaphene, Cysts, Turbidity, Asbestos, O-Dichlorobenzene, Ethylbenzene, Chlorobenzene, Endrin, Tetrachloroethylene and Lindane.
WHIRLPOOL CORPORATION MAJOR APPLIANCE WARRANTY LIMITED WARRANTY For one year from the date of purchase, when this major appliance is operated and maintained according to instructions attached to or furnished with the product, Whirlpool Corporation or Whirlpool Canada LP (hereafter “Whirlpool”) will pay for Factory Specified Parts and repair labor to correct defects in materials or workmanship that existed when this major appliance was purchased.
INSTRUCCIONES PARA EL USUARIO DEL REFRIGERADOR LE AGRADECEMOS la compra de este producto de alta calidad. Si usted experimenta un problema que no se haya cubierto en SOLUCIÓN DE PROBLEMAS, visite nuestro sitio de internet en www.whirlpool.com para obtener información adicional. Si considera que aún necesita ayuda, llámenos al 1-800-253-1301. En Canadá, visite nuestro sitio de internet en www.whirlpool.ca o llámenos al 1-800-807-6777.
Cómo deshacerse adecuadamente de su refrigerador viejo ADVERTENCIA Antes de tirar su viejo refrigerador o congelador: ■ Saque las puertas. ■ Deje los estantes en su lugar, así los niños no pueden meterse adentro con facilidad. Peligro de Asfixia Remueva las puertas de su refrigerador viejo. No seguir esta instrucción puede ocasionar la muerte o daño al cerebro. IMPORTANTE: El atrapamiento y asfixia de niños no es un problema del pasado.
Requisitos de ubicación ADVERTENCIA Peligro de Explosión Requisitos eléctricos ADVERTENCIA Peligro de Choque Eléctrico Mantenga los materiales y vapores inflamables, tales como gasolina, alejados del refrigerador. Conecte a un contacto de pared de conexión a tierra de 3 terminales. No seguir esta instrucción puede ocasionar la muerte, explosión, o incendio. No quite la terminal de conexión a tierra. No use un adaptador.
Requisitos del suministro de agua Reúna las herramientas y piezas necesarias antes de comenzar la instalación. Lea y siga las instrucciones provistas con cualquiera de las herramientas enlistadas aquí. HERRAMIENTAS NECESARIAS: ■ Destornillador de hoja plana ■ Llave de tuercas de ¹⁄₄" ■ Llaves de boca de ⁷⁄₁₆" y ¹⁄₂" o dos llaves ajustables ■ Broca de ¹⁄₄" ■ Taladro inalámbrico IMPORTANTE: ■ Todas las instalaciones deben hacerse de acuerdo a los requisitos locales de plomería.
Conexión al refrigerador Dependiendo de su modelo, la línea de agua puede bajar de la parte superior o subir de la parte inferior. Siga las instrucciones de conexión para su modelo. 5. Con una llave de tuercas ajustable, sostenga la tuerca sobre la línea de agua de plástico para evitar que se mueva. Luego, con una segunda llave, gire la tuerca de compresión que está en la tubería de cobre, en el sentido contrario de las manecillas del reloj para apretar completamente. No apriete demasiado.
Puerta(s) y cajón del refrigerador HERRAMIENTAS NECESARIAS: Llave de cubo de cabeza hexagonal de ⁵⁄₁₆", ³⁄₈", ¹⁄₄", destornillador Torx®† T20, destornillador Phillips N° 2 y un destornillador de hoja plana. IMPORTANTE: ■ Su refrigerador puede tener una puerta reversible estándar con una puerta en el congelador o un congelador tipo cajón, o dos puertas con congelador en la parte inferior. Siga las instrucciones específicas para el estilo de puerta de su modelo.
2. Mantenga las puertas del refrigerador cerradas hasta que esté listo para levantarlas y quitarlas de la carcasa. NOTA: Mientras quita las bisagras siempre disponga de un soporte adicional para la puerta del refrigerador. No se confíe en que los imanes de la junta de la puerta van a sostener la puerta en su lugar mientras trabaja. 3. Comenzando por la puerta del lado derecho, saque las piezas de la bisagra superior, como se muestra en la ilustración Bisagra superior.
Modelos con puerta en el congelador 1. Asegúrese de que la placa de la bisagra esté bien asegurada detrás del soporte del rodillo y que el pasador de la bisagra esté insertado en el orificio exterior. Apriete por completo todos los tornillos del soporte del rodillo. Vea la ilustración 6. 2. Saque la cuña que colocó debajo del borde frontal de la carcasa del refrigerador. Vuelva a poner en su lugar la puerta del congelador.
Puerta estándar–Congelador con puerta Cómo quitar y volver a poner la puerta en su lugar Cambio del sentido de abertura de las puertas (opcional) 2 1 Bisagra superior A A 1 A. Tornillos de cabeza hexagonal para bisagra de ⁵⁄₁₆" A B C B C D A. Tornillo de la cubierta de la bisagra superior B. Cubierta de la bisagra superior C. Tornillos de cabeza hexagonal para bisagra de ⁵⁄₁₆" D. Bisagra superior C A A. Adorno de la manija B. Manija de la puerta del refrigerador C.
Puerta estándar–Congelador de cajón Cómo quitar y volver a poner la puerta en su lugar Cambio del sentido de abertura de las puertas (opcional) 2 Bisagra superior A A B C 1 B C A D A. Tornillos para bisagra A. Tornillo para la cubierta de la bisagra B. Cubierta de la bisagra superior C. Tornillos de cabeza hexagonal para bisagra de ⁵⁄₁₆" D. Bisagra superior Bisagra inferior A B B A A. Adorno de la manija B. Tornillos de cabeza plana para la manija C.
Dos puertas con congelador en la parte inferior ADVERTENCIA Peligro de Choque Eléctrico Desconecte el suministro de energía antes de sacar las puertas. No seguir esta instrucción puede ocasionar la muerte o choque eléctrico. Cómo quitar y volver a poner la puerta en su lugar Bisagras superiores A B C D Estilo 2 - Manija Estilo 1 - Manija 1 1 A. Tornillo para la cubierta de la bisagra B. Cubierta de la bisagra superior C. Tornillos de cabeza hexagonal para bisagra de ⁵⁄₁₆" D.
Cierre y alineamiento de la puerta La rejilla de la base cubre los ensamblajes de tornillos niveladores y rodillos, ubicados en la base de la carcasa del refrigerador, debajo de la puerta o el cajón del congelador. Antes de hacer ajustes, quite la rejilla de la base y traslade el refrigerador hacia su ubicación final. 1. Quite la rejilla de la base. Tome la rejilla con firmeza y tire de ella hacia usted. ¹⁄₄" 2. Mueva el refrigerador a su ubicación final.
Uso de los controles Los controles de temperatura están ubicados en la parte frontal superior de los compartimientos del refrigerador o del congelador. Controles de temperatura Para su conveniencia, los controles de temperatura vienen prefijados de fábrica. Cuando instale el refrigerador por primera vez, asegúrese de que los controles estén todavía fijados en el ajuste recomendado, como se muestra.
Recuerde ■ ■ ■ Sistema de filtración de agua Deje transcurrir 24 horas para la producción del primer lote de hielo. Deje transcurrir 3 días para que se vuelva a llenar el depósito de hielo. Deshágase de los tres primeros lotes de hielo producidos. La calidad del hielo dependerá de la calidad del agua que suministre a su fábrica de hielo. Evite la conexión de la fábrica de hielo a un suministro de agua blanda.
Para los modelos de acero inoxidable, el acero inoxidable es resistente a la corrosión y no a prueba de corrosión. Para ayudar a evitar la corrosión del acero inoxidable, mantenga las superficies limpias, siguiendo las instrucciones de limpieza a continuación. ■ bastante tránsito de mascotas en el hogar, el condensador deberá limpiarse cada dos o tres meses para asegurar la máxima eficiencia.
Parece que el motor funciona excesivamente Es posible que su nuevo refrigerador funcione por períodos más largos que su refrigerador anterior debido al compresor y los ventiladores de alto rendimiento. Es posible que la unidad funcione por más tiempo si la habitación está caliente, si se ha agregado una gran cantidad de alimentos, si se abren las puertas con frecuencia o si se han dejado las mismas abiertas.
¿Tiene un filtro de agua instalado en el refrigerador? Saque el filtro y ponga a funcionar la fábrica de hielo. Si el volumen de hielo aumenta, el filtro puede estar obstruido o haberse instalado incorrectamente. Reemplace el filtro o vuelva a instalarlo correctamente. ■ ¿Se ha conectado un sistema de filtración de agua de ósmosis inversa al suministro de agua fría? Esto puede hacer que disminuya la presión de agua. Vea “Requisitos del suministro de agua”.
HOJA DE DATOS DEL RENDIMIENTO Sistema interno de filtración de agua Modelo UKF8001AXX-750 Capacidad 750 galones (2839 litros) Sistema probado y certificado por NSF International según la norma NSF/ANSI 42 para la reducción de cloro, sabor y olor, de partículas de clase I* y según la norma NSF/ANSI 53 para la reducción de plomo, mercurio, atrazina, benceno, paradiclorobenceno, carbofurano, toxafeno, quistes, turbidez, asbestos, tetracloroetileno y lindano.
Sistema interno de filtración de agua Modelo UKF8001AXX-200 Capacidad 200 galones (757 litros) Sistema probado y certificado por NSF International según la norma NSF/ANSI 42 para la reducción de cloro, sabor y olor, de partículas de clase I* y según la norma NSF/ANSI 53 para la reducción de plomo, mercurio, atrazina, benceno, paradiclorobenceno, carbofurano, toxafeno, quistes, turbidez, asbestos, O-diclorobenceno, etilbenceno, clorobenceno, endrina, tetracloroetileno y lindano.
GARANTÍA DE LOS ELECTRODOMÉSTICOS PRINCIPALES DE WHIRLPOOL CORPORATION GARANTÍA LIMITADA Durante un año a partir de la fecha de compra, siempre y cuando se dé a este electrodoméstico principal un uso y mantenimiento de conformidad con las instrucciones adjuntas o provistas con el producto, Whirlpool Corporation o Whirlpool Canada LP (en lo sucesivo denominado “Whirlpool”), se hará cargo del costo de las piezas especificadas de fábrica y del trabajo de reparación para corregir defectos en los materiales o en
INSTRUCTIONS D'UTILISATION DU RÉFRIGÉRATEUR Nous vous REMERCIONS d'avoir acheté ce produit de haute qualité. Si vous rencontrez un problème non mentionné dans la section DÉPANNAGE, veuillez visiter notre site Web www.whirlpool.com pour des informations supplémentaires. Si vous avez toujours besoin d'assistance, veuillez nous téléphoner au 1-800-253-1301. Au Canada, visitez notre site Web www.whirlpool.ca ou téléphonez-nous au 1-800-807-6777.
Mise au rebut adéquate de votre vieux réfrigérateur AVERTISSEMENT Avant de jeter votre vieux réfrigérateur ou congélateur : ■ Enlever les portes. ■ Laisser les tablettes en place de sorte que les enfants ne puissent pas y pénétrer facilement. Risque de suffoquer Enlever les portes de votre vieux réfrigérateur. Le non-respect de cette instruction peut causer un décès ou des lésions cérébrales. IMPORTANT : L’emprisonnement et l’étouffement des enfants ne sont pas un problème du passé.
Exigences d'emplacement AVERTISSEMENT Risque d'explosion Spécifications électriques AVERTISSEMENT Risque de choc électrique Garder les matériaux et les vapeurs inflammables, telle que l'essence, loin du réfrigérateur. Brancher sur une prise à 3 alvéoles reliée à la terre. Le non-respect de cette instruction peut causer un décès, une explosion ou un incendie. Ne pas utiliser un adaptateur. Ne pas enlever la broche de liaison à la terre. Ne pas utiliser un câble de rallonge.
Spécifications de l’alimentation en eau Raccordement de la canalisation d'eau Rassembler les outils et pièces nécessaires avant de commencer l'installation. Lire et suivre les instructions fournies avec les outils indiqués ci-dessous. OUTILLAGE REQUIS : Lire toutes les instructions avant de commencer. IMPORTANT : Si l'on met en marche le réfrigérateur avant que la canalisation d'eau ne soit raccordée, éteindre la machine à glaçons pour éviter tout bruit excessif ou éviter d'endommager le robinet d'eau.
Raccordement au réfrigérateur 4. Faire glisser l’écrou de compression sur la bague et serrer pour le fixer sur l'orifice d'arrivée d'eau. Selon le modèle, la canalisation d’eau peut être configurée vers le haut ou vers le bas. Suivre les instructions de raccordement appropriées à votre modèle. A Style 1 1. Enlever le capuchon de plastique du robinet d’arrivée d’eau. Connecter le tube en cuivre au robinet d’eau en utilisant un écrou et une bague de compression tel qu’illustré.
Porte(s) et tiroir du réfrigérateur OUTILLAGE NÉCESSAIRE : Clés à douille hexagonale de ⁵⁄₁₆", ³⁄₈" et ¹⁄₄", tournevis Torx®† T20, tournevis Phillips no 2, tournevis à lame plate. IMPORTANT : ■ Votre réfrigérateur peut comporter une porte réversible standard avec soit une porte de congélateur ou un tiroir de congélation, soit une porte à deux battants. Suivre les instructions spécifiques pour le style de porte de votre modèle.
3. En commençant par la porte du côté droit, ôter les pièces de la charnière supérieure – voir l'illustration de la charnière supérieure. Soulever la porte du réfrigérateur de l'axe de la charnière inférieure. 4. Ôter couvercle de l'axe de la charnière inférieure et la conserver pour utilisation ultérieure. Voir l'illustration de la charnière inférieure. 5.
Modèles de compartiments de congélation avec porte 1. S’assurer que la plaque de charnière est bien fixée à la bride de la roulette et que l’axe de charnière est inséré dans le trou extérieur. Serrer complètement toutes les vis des brides de roulettes. Voir l’illustration 6. 2. Retirer la cale que vous avez placée sous le bord avant de la caisse du réfrigérateur. Réinstaller la porte du congélateur. REMARQUE : Prévoir un support additionnel de la porte pendant la réinstallation des charnières.
Porte standard - Porte du compartiment de congélation Inversion du sens d'ouverture des portes (option) Dépose et réinstallation de la porte 2 1 Charnière supérieure A A 1 A. Vis de charnière à tête hexagonale de 5/16" A B C B C D A. Vis de couvercle de charnière supérieure B. Couvercle de charnière supérieure C. Vis de charnière à tête hexagonale de 5/16" D. Charnière supérieure C A A. Garniture de poignée B. Poignée du compartiment de réfrigération C.
Porte standard - Tiroir de congélation Dépose et réinstallation de la porte Charnière supérieure Inversion du sens d'ouverture des portes (option) 2 A A B C 1 B C D A A. Vis de charnière A. Vis du couvercle de la charnière B. Couvercle de la charnière supérieure C. Vis de charnière à tête hexagonale de 5/16" D. Charnière supérieure Charnière inférieure A B A A. Garniture de poignée B. Vis de la poignée à tête plate C. Poignée du compartiment de réfrigération B A.
Portes à deux battants AVERTISSEMENT Risque de choc électrique Déconnecter la source de courant électrique avant d'enlever les portes. Le non-respect de cette instruction peut causer un décès ou un choc électrique. Dépose et réinstallation de la porte Charnières supérieures A B C Style 2 - Poignée D Style 1 - Poignée 1 1 A. Vis du couvercle de la charnière B. Couvercle de la charnière supérieure C. Vis de charnière à tête hexagonale de 5/16" D.
Fermeture et alignement de la porte La grille de la base recouvre les vis de nivellement et les roulettes situées sous la caisse du réfrigérateur, sous la porte ou le tiroir du compartiment de congélation. Avant de réaliser les ajustements, retirer la grille de la base et déplacer le réfrigérateur à son emplacement définitif. 1. Retirer la grille de la base. Saisir la grille fermement et la tirer vers soi. ¹⁄₄" 2. Déplacer le réfrigérateur jusqu'à sa position de service finale.
Utilisation des commandes Le centre de commande est situé dans la partie supérieure avant des compartiments de congélation ou de réfrigération.
Distribution d’eau Taux de production des glaçons ■ La machine à glaçons devrait produire une quantité de glaçons complète environ toutes les 3 heures. ■ Pour augmenter la production de glaçons, diminuer la température du congélateur et du réfrigérateur. Voir “Utilisation des commandes”. Attendre 24 heures entre les ajustements. 1. Tenir un récipient sous le distributeur tout en appuyant sur le bouton. 2. Relâcher le bouton pour arrêter la distribution.
ENTRETIEN DU RÉFRIGÉRATEUR Nettoyage AVERTISSEMENT Risque d'explosion Utiliser un produit de nettoyage ininflammable. Le non-respect de cette instruction peut causer un décès, une explosion ou un incendie. Les compartiments de réfrigération et de congélation se dégivrent automatiquement. Toutefois, nettoyer les deux compartiments environ une fois par mois pour éviter une accumulation d'odeurs. Essuyer les renversements immédiatement.
DÉPANNAGE Essayer d’abord les solutions suggérées ici ou visiter notre site Internet et la FAQ (foire aux questions) pour éviter le coût d’un appel de service. Aux É.-U., www.whirlpool.com Au Canada, www.whirlpool.ca Fonctionnement du réfrigérateur Le réfrigérateur ne fonctionne pas AVERTISSEMENT Risque de choc électrique Le réfrigérateur semble bruyant Le bruit des réfrigérateurs a été réduit au cours des années.
■ S'agit-il d'une nouvelle installation? Attendre 24 heures après l'installation pour le commencement de la production de glaçons. Attendre 72 heures pour la production complète de glaçons. ■ La porte du congélateur est-elle complètement fermée? Bien fermer la porte du compartiment de congélation. Si la porte du compartiment de congélation ne ferme pas complètement, voir “Les portes ne ferment pas complètement” précédemment dans cette section.
Mauvais goût, odeur ou couleur grise des glaçons ■ Les raccords de plomberie sont-ils neufs? Des raccords de plomberie neufs peuvent causer une décoloration et un mauvais goût des glaçons. ■ Les glaçons ont-ils été gardés trop longtemps? Jeter les glaçons. Laver le compartiment à glaçons. Accorder 24 heures pour la fabrication de nouveaux glaçons. ■ Y a-t-il un transfert d'odeurs de nourriture? Utiliser des emballages étanches à l'air et à l'humidité pour conserver les aliments.
FEUILLES DE DONNÉES SUR LA PERFORMANCE Système de filtration d’eau intérieur Modèle UKF8001AXX-750 /Capacité : 750 gallons (2839 litres) Système testé et certifié par NSF International en vertu de la norme NSF/ANSI 42 (réduction du goût et de l'odeur du chlore, et particules (classe I*)); et en vertu de la norme NSF/ANSI 53 (réduction de plomb, mercure, atrazine, benzène, p-dichlorobenzène, carbofuran, toxaphène, kystes, turbidité, amiante, tétrachloroéthylène, et lindane).
Système de filtration d’eau intérieur Modèle UKF8001AXX-200 /Capacité : 200 gallons (757 litres) Système testé et certifié par NSF International en vertu de la norme NSF/ANSI 42 (réduction du goût et de l'odeur du chlore, et particules (classe I*)); et en vertu de la norme NSF/ANSI 53 (réduction de plomb, mercure, atrazine, benzène, p-dichlorobenzène, carbofuran, toxaphène, kystes, turbidité, amiante, O-dichlorobenzène, éthylbenzène, chlorobenzène, endrine, tétrachloroéthylène, et lindane).
GARANTIE DE GROS APPAREIL MÉNAGER WHIRLPOOL CORPORATION GARANTIE LIMITÉE Pendant un an à compter de la date d’achat, lorsque ce gros appareil ménager est utilisé et entretenu conformément aux instructions jointes à ou fournies avec le produit, Whirlpool Corporation ou Whirlpool Canada LP (ci-après désignées “Whirlpool”) paiera pour les pièces spécifiées par l’usine et la main-d’œuvre pour corriger les vices de matériaux ou de fabrication qui existaient déjà lorsque ce gros appareil ménager a été acheté.