COMPACTORS Use & Care Guide For questions about features, aperation/performance, pans, accessories or service, cal 1-800-253-1301 or visit our website at www whirlpool In Canada, for assistance, installation or service, call: 4-800-807-6777 or visit our website at www whirlpool.ca Table of Contents.
TABLE OF CONTENTS COMPACTOR SAFETY INSTALLATION INSTRUCTIONS Unpacking Location Requirements. Electrical Requirements Freestanding and Under counter Installation Changing the Decorative Panel. COMPACTOR USE. How Your Compactor Works Starting the Compactor Removing a Filled Bag .. Installing a New Ba COMPACTOR CARE Cleaning... TROUBLESHOOTING ASSISTANCE OR SERVICE. In the USA Loo in Canada Accessories. WARRANTY ROSS Soon COMPACTOR SAFETY messages. This is the safety alert symbol.
INSTALLATION INSTRUCTIONS Installer: Leave Use and Care Guide with the homeowner. Homeowner: Keep Use and Care Guide for future reference and for local electrical inspector's use, if required. Unpacking Excessive Weight Hazard Use two or more people to move and install compactor. Failure to do so can result in back or other injury. IMPORTANT: Do hot grasp console to move compactor, Begin in the room where the compactor will be located. Remove compactor from shipping carton.
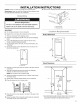
Clearance Dimensions B i A. Leave §° (15.2 cm) of clearance space to te right side of the compactor in order 10 remove the compactor bags. B. Leave 23" (58.4 crm) of clearance in front of the compactor in order to fully open or remove the compactor drawer. Electrical Requirements RK Electrical Shock Hazard Plug into a grounded 3 prong outlet. Do not remove ground prong. {Jo not use an adapter, Do not use an extension cord. Failure to follow these instructions can result in death, fire, or electrical shock.
Under counter Installation NOTE: installation hardware is not provided, See “Accessories” for ordering conversion kit. 1. Measure the height of your Kitchen cabinet opening. The top of the compactor should be at least '4" (3 mm) from the top of the kitchen cabinet opening. The rear wheels are preset for a kitchen cabinet opening height of 344" (87 em) (position 1).
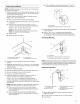
14. Check to see whether drawer opens freely. If the toe plate nibs against floor, see “Adjusting the Toe Plate” for further instructions. Adjusting the Toe Plate If the toe plate rubs the floor covering, the toe plate clearance nay be changed as follows: 1. Mark on each side of the toe plate the amount of foe plate that rubs the floor covering. 2. Remove the drawer from the unit, See Step 3 in the “Unpacking” section. 3.
Installation 1. Remove the mounting screws attaching the foot pedal to the compactor. Remove foot pedal. A. Mo tinting screws B. Foot pedal 2. Remove mounting screws attaching the toe guard to the compactor. Remove toe guard. 3. Remove the mounting screws attaching the decorative panel to the compactor. Remove decorative panel and discard mounting screws. 4. Align the bottom of the custom panel with the bottom of the drawer front. 5. Secure the panel from the back using four #8 x 1" wood screws as shown. 8.
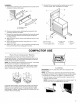
2. Place trash in compactor. ® Wrap or cover wet or messy trash. = Do not compact items that may develop offensive odors such as raw meat, fish, grapefruit rinds, disposable diapers, or personal hygiene items. = Load bottles or cans on their sides in the center of the drawer. Do not load bottles in an upright position, 3. Close the drawer. Starting the Compactor Depending on your model. you may have a single control (Style 1) or a dual control (Style 2) compactor. Style 1 To Start and Stop the Compactor 1.
Installing a New Bag Do not use any kind of bag other than those designed especially for use in your compactor. Order replacement compactor bags through your local dealer or by calling the toll-free number on the cover or in the “Assistance or Service” section. IMPORTANT: Before installing a new bag, be sure: m The drawer side is securely locked. w The container is clean and free of debris. 1. Place folded bag into the drawer. Open bag and pull top edges over the drawer top.
NOTE: Look ta see haw the drawer rollers move in the tracks. it will be easier to replace the drawer after you have finished cleaning. 2. Lift the front of the drawer to clear the stops. 3. Grasp the drawer on the sides and pull it out the rest of the way. Set the drawer down gently. 4, Vacuum the inside of the cabinet. Liquid spills or wet trash should be cleaned up by hand, or by using a vacuum cleaner designed to pick up liquids. 5.
ASSISTANCE OR SERVICE Before calling for assistance or service, please check “Troubleshooting.” it may save you the cost of a service call, if you still need help, follow the instructions below. When calling, please know the purchase date and the complete model and serial number of your appliance. This information will help us to better respond fo your request. if you need replacement parts If you need fo order replacement parts, we recommend that you only use FSP® factory specified parts.
WHIRLPOOL® COMPACTOR WARRANTY ONE-YEAR FULL WARRANTY ON COMPACTOR For one year from the date of purchase. when this compactor is operated and maintained according to instructions attached to or furnished with the product, Whirlpool Corporation or Whirlpool Canada LP will pay for rep” factory specified parts and repair labor costs to correct defects in materials or workmanship. Service must be provided by a Whirlpool designated service company.