www.aristonchannel.
SAFETY INSTRUCTIONS IMPORTANT TO BE READ AND OBSERVED Before using the appliance read these safety instructions. Keep them nearby for future reference. These instructions are valid if the country symbol appears on the appliance. If the symbol doesn’t appear on the appliance, it is necessary to refer to the technical instructions which will provide the necessary instructions concerning modification of the appliance to the conditions of use of the country.
take air directly from the outside by means of a pipe with an inner cross section of at least 100 cm2; the opening must not be vulnerable to any type of blockages. The system can also provide the air needed for combustion indirectly, i.e. from adjacent rooms fitted with air circulation tubes as described above. However, these rooms must not be communal rooms, bedrooms or rooms that may present a fire hazard. Liquid petroleum gas sinks to the floor as it is heavier than air.
Remove the nozzle using a 7 mm socket wrench. Screw the new injector in fully (diameter in hundredths of millimetre stamped on the injector), taking care not to cross the thread. Replace the burner reversing the operations in step 2 above. Replace the cover plate. Adjusting the minimum flame. Before installing the oven, remember to affix the gas calibration plate supplied with the injectors in such a way that it covers the existing information relating to gas calibration.
The power cable must be long enough to connect the appliance, once fitted in its housing, to the main power supply. Do not pull the power supply cable. Do not use extension leads, multiple sockets or adapters. Do not operate this appliance if it has a damaged mains cord or plug, if it is not working properly, or if it has been damaged or dropped. Keep the cord away from hot surfaces. The electrical components must not be accessible to the user after installation.
SAFEGUARDING THE ENVIRONMENT DISPOSAL OF PACKAGING MATERIALS The packaging material is 100% recyclable and is marked with the recycle symbol . The various parts of the packaging must therefore be disposed of responsibility and in full compliance with local authority regulations governing waste disposal.
EN PRODUCT DESCRIPTION 1 5 2 6 3 7 4 1. Control panel 2. Shelf guides (the level is indicated on the wall of the cooking compartment) 3. Recess for roasting spit (if present) 4. Door 5. Upper heating element/grill 6. Identification plate (do not remove) 7. Burner (not visible) CONTROL PANEL 1 2 3 1. Gas oven indicator light 2. Thermostat and grill selection knob 3. Minute minder 4 5 4. Turnspit and ovenlight knob 5.
REMOVE THE LATERAL GRILLES To remove the side grilles, press down the grilles and lift them up as shown. Then, extract the grilles from their seats. To refit the grilles, insert the top support, then slide them to be fitted close to the cavity and push them up to fix in their original position. b a BEFORE USE HEAT THE OVEN A new oven may release odours that have been left behind during manufacturing: this is completely normal.
OVEN LIGHT Turn the knob to to switch on the oven light. At the same time, will be activated also the turnspit (if present). EN SET THE MINUTE MINDER The Minute minder can be set to a maximum time of 60 minutes. The timer operates independently of the oven: it does not activate any function and won’t stop it. To activate the timer, turn the knob clockwise to the 60 minute position and then turned anti-clockwise to the desired time setting. When the set time has elapsed, the alarm will sound.
BEFORE USE Make sure that the oven has cooled down before carrying out any maintenance or cleaning. Do not use steam cleaners. Do not use wire wool, abrasive scourers or abrasive/corrosive cleaning agents, as these could damage the surfaces of the appliance. Wear protective gloves. The oven must be disconnected from the mains before carrying out any kind of maintenance work. EXTERIOR SURFACES Clean surfaces with a damp microfibre cloth. If they are very dirty, add a few drops of pH-neutral detergent.
EN DAILY USE Problem Possible cause Solution The oven or the burner will not switch on. Power cut. Check for the presence of mains electrical power and whether the oven is connected to the electricity supply. Wait at least one minute, then try to switch the oven on again and see if the problem persists. Disconnection from the mains electricity. Gas supply interrupted. Check that the gas tap upstream of the oven is open or that the liquid gas cylinder (if being used) is not empty.
x2 90°C 12
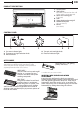
EN 530 826 591 581 895 551 min 5 860 585 min 5 50 860 510 585 min 5 50 510 5 13
= = x2 Manufacturer: WHIRLPOOL EMEA S.P.A. VIA CARLO PISACANE N.