ELECTRIC DOUBLE OVEN RANGE Use & Care Guide For questions about features, operation/performance, parts, accessories or service, call: 1-800-253-1301 or visit our website at www.whirlpool.com In Canada, call 1-800-807-6777 or visit our website at www.whirlpool.ca CUISINIÈRE ÉLECTRIQUE À DOUBLE FOUR Guide d’utilisation et d’entretien Au Canada, pour assistance, installation ou service, composez le 1-800-807-6777 ou visitez notre site Web à www.whirlpool.ca Table of Contents/Table des matières...........
TABLE OF CONTENTS TABLE DES MATIÈRES RANGE SAFETY .............................................................................3 The Anti-Tip Bracket ....................................................................3 COOKTOP USE ..............................................................................5 Cooktop Controls.........................................................................5 Dual Size Element ........................................................................5 Warm Zone......
RANGE SAFETY Your safety and the safety of others are very important. We have provided many important safety messages in this manual and on your appliance. Always read and obey all safety messages. This is the safety alert symbol. This symbol alerts you to potential hazards that can kill or hurt you and others. All safety messages will follow the safety alert symbol and either the word “DANGER” or “WARNING.
IMPORTANT SAFETY INSTRUCTIONS WARNING: To reduce the risk of fire, electrical shock, injury to persons, or damage when using the range, follow basic precautions, including the following: ■ WARNING: TO REDUCE THE RISK OF TIPPING OF THE RANGE, THE RANGE MUST BE SECURED BY PROPERLY INSTALLED ANTI-TIP DEVICES. TO CHECK IF THE DEVICES ARE INSTALLED PROPERLY, SLIDE RANGE FORWARD, LOOK FOR ANTI-TIP BRACKET SECURELY ATTACHED TO FLOOR OR WALL, AND SLIDE RANGE BACK SO REAR RANGE FOOT IS UNDER ANTI-TIP BRACKET.
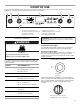
COOKTOP USE This manual covers different models. The range you have purchased may have some or all of the items listed. The locations and appearances of the items shown here may not match those of your model. A B C E D H F G A. Surface cooking area locator B. Left front duel element control knob C. Left rear control knob D. Electronic oven control Cooktop Controls WARNING E. Right rear control knob F. Right front dual element control knob G. Hot surface indicator light H.
To Use Single Element: 1. Push in and turn the control knob counterclockwise from the OFF position to the Single zone anywhere between HI and LO. 2. Push in and turn knob to OFF when finished. To Use Dual Element: 1. Push in and turn the control knob clockwise from the OFF position to the Dual zone anywhere between HI and LO. 2. Push in and turn knob to OFF when finished. Cleaning off the cooktop before and after each use will help keep it free from stains and provide the most even heating.
Use the following chart as a guide for cookware material characteristics. Home Canning When canning for long periods, alternate the use of surface cooking areas, elements or surface burners between batches. This allows time for the most recently used areas to cool. ■ Center the canner on the grate or largest surface cooking area or element. On electric cooktops, canners should not extend more than ½" (1.3 cm) beyond the surface cooking area or element.
To Deactivate the Energy Save Mode: Display When power is first supplied to the range, or if a power failure has occurred, 12:00 will appear on the display. See “Clock” in the “Settings” section to set time of day. When the oven is not in use, the display shows the time of day, unless the oven is in Energy Save mode. Cancel The Cancel pad stops any function except the Clock, Timer and Control Lock. Oven Lights While the oven doors are closed, press OVEN LIGHT to turn the lights on and off.
Adjusting End Tone On or Off The end tone is factory set for On but can be changed to Off. 1. Press SETTINGS four times until “END TONE” appears in the upper text area and “ON. Press (^) for OFF” scrolls twice from right to left in the lower text area. 2. Press the Temp/Time “up” arrow pad to turn the end tone off. “OFF. Press (^) for ON” will scroll twice from right to left in the lower text area. 3. “OFF Selected” will scroll twice in the lower text area. The End Tone has now been turned off.
To Adjust Oven Temperature Calibration: 1. Press SETTINGS 11 times until “TEMP CALIB” appears in the upper text area, and “UPPER CALIBRATE. Press (^) for Lower calibrate or push START” scrolls twice from right to left in the lower text area. 2. Press START to calibrate the upper oven. “UPPER calib selected” will scroll twice from right to left in the lower text area. “UPPER Calib” appears in the upper text area, and “Press (^) or ( ) for offset” will scroll twice from right to left in the lower text area.
Rack Positions - Upper Oven - Hidden Bake 2 1 Baking FOOD RACK POSITION All foods 1 Multiple Rack Cooking 2-rack: Use rack positions 2 and 4 when baking 2 racks of pizza. Stagger pizza so that the pizza on rack position 2 is toward the right side of the oven and the pizza on rack position 4 is toward the left side of the oven. Baking Layer Cakes on 2 Racks For best results when baking cakes on 2 racks, use rack positions 2 and 4. Place the cakes on the racks as shown.
Bakeware The bakeware material affects cooking results. Follow manufacturer’s recommendations and use the bakeware size recommended in the recipe. Use the following chart as a guide. BAKEWARE/ RESULTS RECOMMENDATIONS Light colored aluminum ■ Light golden crusts ■ ■ Use temperature and time recommended in recipe. Baking Before baking, position racks according to the “Positioning Racks and Bakeware” section. ■ If only one oven is to be used, that oven will preheat more quickly. ■ Allow at least ½" (1.
Broiling Broiling uses direct radiant heat to cook food. The lower the temperature, the slower the cooking. Thicker cuts and unevenly shaped pieces of meat, fish and poultry may cook better at lower broiling temperatures. ■ For best results, use a broiler pan and grid. They are designed to drain juices and help avoid spatter and smoke. If you would like to purchase a broiler pan, one may be ordered. See “Assistance or Service” section to order. To Broil Using Hi/Low Temperature Settings: 1.
■ Toasting - Upper Oven Only (on some models) For toasting bread and products that are toasted in a toaster or toaster oven. ■ Lower oven cannot be operated while upper oven is toasting. If the lower oven is operating when the Toast pad is pressed, a beep will sound. ■ Toasting is based on time, not temperature. ■ Frozen foods should not be toasted in the oven. ■ Toasting times will be shorter when the oven is hot or when repeated toasting functions are done.
3. Press the Temp/Time “up” or “down” arrow pads until the desired temperature is displayed. 4. Press START. “CONVECT BROIL” will appear in the lower oven text area, followed by “Preheating.” To Use: 1. Press the HOLD WARM keypad for desired oven. “KEEP WARM” will scroll in the upper or lower text area (depending on oven selection), and 170°F (77°C) will be displayed. “Set temp or” will scroll in the selected oven text area, followed by “Push START.
■ Cooktop elements, including the Warm Zone, can be enabled for use during Sabbath mode. Timed/Delay Cooking NOTE: The Warm Zone must be activated before entering Sabbath mode. Once in Sabbath Mode, the Warm Zone settings cannot be modified. ■ The oven light will not change and will remain on or off all the time, even if the Oven Light keypad is pressed or the oven doors are opened or closed. ■ For best results, cooking should be done on one rack in the upper oven and one rack in the lower oven.
RANGE CARE Self-Cleaning Cycle Do not touch the oven during the Self-Cleaning cycle. Keep children away from oven during Self-Cleaning cycle. Failure to follow these instructions can result in burns. IMPORTANT: The health of some birds is extremely sensitive to the fumes given off during the Self-Cleaning cycle. Exposure to the fumes may result in death to certain birds. Always move birds to another closed and well-ventilated room. Self-clean the oven before it becomes heavily soiled.
Before delay starting Self-Clean, make sure the oven door is completely closed or it will not lock and the cycle will not begin. 1. Press START TIME. “PRESS (^) FOR UPPER OVEN” will scroll in the upper text area, and “PRESS ( ) FOR LOWER OVEN” will scroll in the lower text area. ^ 2. Press the Temp/Time “up” or “down” arrow pads to select the desired oven. “--:--” will be displayed, and “Set starting time.
General Cleaning IMPORTANT: Before cleaning, make sure all controls are off and the oven and cooktop are cool. Always follow label instructions on cleaning products. Soap, water and a soft cloth or sponge are suggested first unless otherwise noted. EXTERIOR PORCELAIN ENAMEL SURFACES Food spills containing acids, such as vinegar and tomato, should be cleaned as soon as the entire range is cool. These spills may affect the finish.
OVEN DOOR EXTERIOR Cleaning Method: ■ Glass cleaner and paper towels or nonabrasive plastic scrubbing pad: Apply glass cleaner to soft cloth or sponge, not directly on panel. affresh™ Kitchen and Appliance Cleaner Part Number W10355010 (not included): ■ See “Assistance or Service” section to order. OVEN CAVITY Do not use oven cleaners. Food spills should be cleaned when oven cools. At high temperatures, foods react with porcelain and staining, etching, pitting or faint white spots can result.
TROUBLESHOOTING Try the solutions suggested here first in order to avoid the cost of an unnecessary service call. Nothing will operate ■ Has a household fuse blown, or has a circuit breaker tripped? Replace the fuse or reset the circuit breaker. If the problem continues, call an electrician. Cooktop will not operate ■ Is the control knob set correctly? Push in knob before turning to a setting. ■ On ceramic glass models, is the oven control lockout set? See “Control Lockout” section.
ASSISTANCE OR SERVICE Before calling for assistance or service, please check “Troubleshooting.” It may save you the cost of a service call. If you still need help, follow the instructions below. When calling, please know the purchase date and the complete model and serial number of your appliance. This information will help us to better respond to your request. If you need replacement parts If you need to order replacement parts, we recommend that you use only FSP® replacement parts.
WHIRLPOOL CORPORATION MAJOR APPLIANCE WARRANTY LIMITED WARRANTY For one year from the date of purchase, when this major appliance is operated and maintained according to instructions attached to or furnished with the product, Whirlpool Corporation or Whirlpool Canada LP (hereafter “Whirlpool”) will pay for Factory Specified Parts and repair labor to correct defects in materials or workmanship. Service must be provided by a Whirlpool designated service company.
SÉCURITÉ DE LA CUISINIÈRE Votre sécurité et celle des autres est très importante. Nous donnons de nombreux messages de sécurité importants dans ce manuel et sur votre appareil ménager. Assurez-vous de toujours lire tous les messages de sécurité et de vous y conformer. Voici le symbole d’alerte de sécurité. Ce symbole d’alerte de sécurité vous signale les dangers potentiels de décès et de blessures graves à vous et à d’autres.
IMPORTANTES INSTRUCTIONS DE SÉCURITÉ AVERTISSEMENT : Pour réduire le risque d’incendie, de choc électrique, de blessures ou de dommages lors de l’utilisation de la cuisinière, il convient d’observer certaines précautions élémentaires dont les suivantes : ■ AVERTISSEMENT : POUR MINIMISER LE RISQUE DE BASCULEMENT DE LA CUISINIÈRE, ELLE DOIT ÊTRE BIEN IMMOBILISÉE PAR DES DISPOSITIFS ANTIBASCULEMENT CORRECTEMENT INSTALLÉS.
IMPORTANTES INSTRUCTIONS DE SÉCURITÉ ■ ■ ■ ■ ■ ■ Pour les cuisinières avec programme d’autonettoyage – ■ Ne pas nettoyer le joint de la porte – Le joint de la porte est essentiel pour l’étanchéité. Veiller à ne pas frotter, endommager ou déplacer le joint.
Témoin lumineux de surface chaude Commandes de la table de cuisson AVERTISSEMENT Le témoin lumineux de surface chaude se trouve sur le panneau de commande. Le témoin de surface chaude reste allumé tant qu’une surface de cuisson est trop chaude pour être touchée, même après que la ou les surface(s) de cuisson sont éteintes. Élément à dimension double A B Risque d'incendie Fermer tous les réglages lorsque la cuisson est terminée. Le non-respect de cette instruction peut causer un décès ou un incendie.
La zone de l'élément de maintien au chaud ne rougeoie pas lorsque l'élément s'allume. Cependant, le témoin indiquant que l’élément est allumé s’allume lorsque l’élément de maintien au chaud est utilisé. Le témoin de surface chaude reste allumé tant que la surface de l'élément de maintien au chaud est trop chaude pour être touchée. ■ N'utiliser que les ustensiles de cuisson et plats recommandés pour le four et la table de cuisson.
Préparation de conserves à la maison Lors de la préparation de conserves pendant de longues périodes, alterner l’utilisation des surfaces de cuisson, des éléments ou des brûleurs de surface entre les quantités préparées. Cette alternance permet aux dernières surfaces utilisées de refroidir. ■ Centrer l’autoclave sur la grille ou la plus grande surface de cuisson ou sur le plus grand élément.
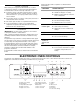
COMMANDES ÉLECTRONIQUES DU FOUR Ce manuel couvre différents modèles. La cuisinière que vous avez achetée peut comporter l'ensemble des articles énumérés ou seulement certains d'entre eux. Les emplacements et aspects des articles illustrés ici peuvent ne pas correspondre à ceux de votre modèle. B A P A. Commandes du four supérieur B. Afficheur du four C. Ajustement de température/durée D. Mise en marche du four supérieur E. Annulation du four supérieur O N L K D J F.
Pour désactiver le mode Energy Save : 1. Appuyer sur SETTINGS (réglages) pendant 3 secondes. “Écono éner désact” apparaît dans la zone de texte supérieure. 2. L'horloge réapparaît dans l'affichage; on peut alors faire fonctionner la cuisinière comme d'habitude. Fahrenheit et Celsius La température est préréglée à l'usine pour un affichage en degrés Fahrenheit, mais on peut le permuter en degrés Celsius. 1. Appuyer une fois sur SETTINGS (réglages).
3. “Appuyez CLOCK” apparaît dans la zone de texte supérieure et “ou START” défile de bas en haut dans la zone de texte inférieure. 4. Appuyer sur CLOCK (horloge) ou START (mise en marche). “Durée rég” défile de haut en bas dans la zone de texte supérieure pendant 5 secondes. Une fois qu'elle a disparu, la durée est réglée.
Verrouillage des commandes : Déverrouillage des commandes : 1. Appuyer sur la touche Oven Light (lampe du four) pendant 3 secondes. “COMMANDE VERR” défile dans la zone de texte supérieure. “COMMANDE VERR” défile pendant que le module de commande se verrouille, puis “VERROUILLE” s'affiche. “VERROUILLE” ainsi que l'heure restent allumés sur l'affichage. 1. Appuyer sur OVEN LIGHT (lampe du four) pendant 3 secondes.
Cuisson au four ALIMENT POSITION DE LA GRILLE Tous les aliments GGE388 GGE390 1 Cuisson au four Cuisson au four par convection Visible 2 et 4 Dissimulé 2 et 4 Cuisson au four Dissimulé 2 et 4 Cuisson au gril - Fours avec élément de cuisson au four visible ou non ALIMENT POSITION DE LA GRILLE Cuisson au gril 1 Positions de grille - Four inférieur - Élément de cuisson au four visible ou non GGE390 5 4 3 2 1 Cuisson traditionnelle USTENSILES DE CUISSON ALIMENT POSITION DE LA GRILLE Rôti
USTENSILES DE CUISSON AU FOUR/ RÉSULTATS RECOMMANDATIONS Aluminium foncé et autres ustensiles de cuisson au four avec fini foncé, terne et/ou antiadhésif ■ Croûtes brunes, croustillantes ■ Peut nécessiter de réduire légèrement les températures de cuisson. ■ Utiliser la durée de cuisson suggérée. ■ Pour les tartes, pains et mets en sauce, utiliser la température recommandée dans la recette. ■ Placer la grille au centre du four.
5. Une fois le programme de préchauffage terminé, insérer les aliments. “Placez la nourriture pour une cuisson sur une seule grille” ou “Placez la nourriture pour une cuisson sur plusieurs grilles” apparaît dans la zone de texte du four sélectionné. “Cuisson au four” défile dans la zone de texte du four sélectionné jusqu'à ce que l'on appuie sur le bouton CANCEL (annulation) correspondant au four sélectionné. 6. Placer les aliments dans le four lorsque le signal sonore de préchauffage retentit. 7.
TABLEAU DE CUISSON AU GRIL Il n'est pas nécessaire de préchauffer le four inférieur lors de la cuisson au gril. Le four supérieur doit être préchauffé pendant 5 minutes. Les durées de cuisson sont citées à titre indicatif seulement; on peut les régler en fonction des goûts personnels. Retourner la viande à mi-cuisson. Les positions recommandées de la grille sont indiquées de la base (1) jusqu’en haut (5). Pour le schéma, voir la section “Positionnement des grilles et ustensiles de cuisson au four”.
■ Choisir des tôles à biscuits sans bords et des plats de rôtissage à côtés plus bas pour permettre à l’air de circuler librement autour de l’aliment. ■ Vérifier la cuisson des aliments quelques minutes avant le temps de cuisson minimum, avec un cure-dents par exemple. ■ Utiliser un thermomètre à viande pour déterminer le degré de cuisson des viandes et de la volaille. Vérifier la température du porc et de la volaille à 2 ou 3 endroits différents, y compris la partie la plus épaisse.
La température peut être réglée entre 145°F (63°C) et 190°F (85°C). REMARQUE : La température peut être modifiée à tout moment en appuyant sur les touches à flèche “vers le haut” ou “vers le bas” de Temp/Time (température/durée) jusqu'à ce que la température souhaitée s'affiche, puis en appuyant sur START (mise en marche). Si l'on modifie la température une fois que les aliments ont été placés dans le four, la performance du four pourrait être affectée. Rôtissage par convection (sur certains modèles) 1.
■ Les éléments de table de cuisson, y compris la zone de réchauffage, peuvent être activés durant l'utilisation du mode Sabbat. REMARQUE : La zone de réchauffage doit être activée avant que l'utilisateur n'entre dans le mode Sabbat. Une fois au mode Sabbat, les réglages de la zone de réchauffage ne peuvent pas être modifiés.
Appuyer sur les touches à flèche “vers le haut” ou “vers le bas” de Temp/Time pour entrer une température autre que celle qui est affichée puis appuyer sur START. 6. Appuyer sur START (mise en marche). L’heure de mise en marche est calculée et affichée automatiquement. 2. Appuyer sur START TIME (heure de mise en marche). 3. Appuyer sur les touches à flèche “vers le haut” ou “vers le bas” de Temp/Time pour entrer la durée de mise en marche différée.
^ 3. Appuyer sur les touches à flèche “vers le haut” ou “vers le bas” de Temp/Time (température/durée) pour sélectionner le four désiré. “ÔTEZ GRILLES” défile dans la zone de texte du four sélectionné pendant 5 secondes, suivi de “SÉLECT. OPTION”. Dans la zone de texte du four inférieur, “APPUYEZ SUR la touche (^) ou ( )” défile de droite à gauche. ^ 4. Appuyer sur la touche à flèche “vers le haut” de Temp/Time (température/durée).
Nettoyage à la vapeur (sur certains modèles) La caractéristique SteamClean (nettoyage avec vapeur) est conçue pour un nettoyage léger du fond de la cavité du four pour les modèles dont l'élément de cuisson au four est dissimulé pour les deux fours. Laisser la cuisinière refroidir et atteindre la température ambiante avant d'utiliser la caractéristique de nettoyage à la vapeur.
VITROCÉRAMIQUE (sur certains modèles) Afin d'éviter d'endommager la table de cuisson, ne pas utiliser de laine d'acier, de nettoyants en poudre abrasifs, d'agent de blanchiment au chlore, de produit antirouille ou d’ammoniaque. Méthode de nettoyage : Toujours essuyer avec une éponge ou un linge propre mouillé et sécher à fond pour éviter les rayures et les taches.
Dépose : Lampe du four La lampe du four est une ampoule standard de 40 watts pour appareil ménager. Avant de procéder au remplacement, s'assurer que le four et la table de cuisson ont refroidi et que les boutons de commande sont éteints. 1. Ouvrir la porte du four complètement. 2. Abaisser le verrou de charnière vers soi de chaque côté. Remplacement : 1. Débrancher la cuisinière ou déconnecter la source de courant électrique. 2.
Les résultats de cuisson sur la table de cuisson ne sont pas les résultats prévus ■ Utilise-t-on un ustensile de cuisson approprié? Voir la section “Ustensiles de cuisson”. ■ Le bouton de commande est-il réglé au niveau approprié de chaleur? Voir la section “Commandes de température de la table de cuisson”. La cuisinière est-elle d’aplomb? Niveler la cuisinière. Voir les Instructions d’installation.
ASSISTANCE OU SERVICE Avant de faire un appel pour assistance ou service, consulter la section “Dépannage”. Ce guide peut vous faire économiser le coût d’une visite de service. Si vous avez encore besoin d’aide, suivre les instructions ci-dessous. Lors d’un appel, veuillez connaître la date d’achat, le numéro de modèle et le numéro de série au complet de l’appareil. Ces renseignements nous aideront à mieux répondre à votre demande.
ARTICLES EXCLUS DE LA GARANTIE La présente garantie limitée ne couvre pas : 1. Les visites de service pour rectifier l'installation du gros appareil ménager, montrer à l'utilisateur comment utiliser l'appareil, remplacer ou réparer des fusibles ou rectifier le câblage ou la plomberie du domicile. 2. Les visites de service pour réparer ou remplacer les ampoules électriques de l'appareil, les filtres à air ou les filtres à eau. Les pièces consomptibles ne sont pas couvertes par la garantie. 3.