_ TM SPEEDCOOK APPLIANCE For questions about features, operation/performance parts, accessories or service, call: 1-800-253-1301. or visit our website at... www.whirlpool.eom Table of Contents .......................................
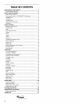
TABLEOF CONTENTS MICROWAVE OVEN SAFETY ........................................................ Electrical Requirements ............................................................... PARTS AND FEATURES ................................................................ 3 5 5 Oven Cavity Coating .................................................................... Microwave System - ACCUWAVE ®Technology ......................... Grill Element ...................................................................
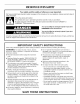
MICROWAVEOVENSAFETY Your safety and the safety of others are very important. We have provided many important safety messages in this manual and on your appliance. Always read and obey all safety messages. This symbol alerts you to potential hazards that can kill or hurt you and others. All follow the safety alert symbol and either the word "DANGER" or Thissafety is themessages safety alertwillsymbol. "WARNING.
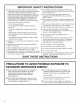
iMPORTANT SAFETY iNSTRUCTiONS [] Liquids, such as water, coffee, or tea are able to be overheated beyond the boiling point without appearing to be boiling. Visible bubbling or boiling when the container is removed from the microwave oven is not always present. THiS COULD RESULT IN VERY HOT LIQUIDS SUDDENLY BOiLiNG OVER WHEN THE CONTAINER IS DISTURBED OR A SPOON OR OTHER UTENSIL IS iNSERTED INTO THE LiQUiD. [] Do not clean with metal scouring pads.
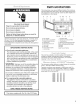
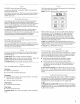
PARTSAND FEATURES This manual may cover several different models. The model you have purchased may have some or all of the features shown here. The appearance of your particular model may differ slightly from the illustrations in this manual. B ElectricalShock D C EF G H Hazard Plug into a grounded 3 prong outlet. Do not remove ground prong. Do not use an adapter. Do not use an extension cord. Failure to folow these instructions can resut in death, fire, or electrical shock. MK A.
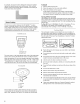
In contrast, microwave ovens utilizing this microwave system deliver the selected power level continuously. This constant stream of microwave power helps to minimize overcooking of foods and messy food spatters. To Install: 1. Remove tape from the hub. 2. Place the support on the oven cavity bottom. 3. Place the turntable on the support. Fit the raised, curved lines in the center of the turntable bottom between the three spokes of the hub.
TheSizzle Pan,withanonstick surface andadetachable handle, hasbeenspecially designed formicrowave use,andisidealfor pan-frying (pan-browning) foodsintheoven.TheSizzle Panis alsousedasadrippanforgrilling. Usethehandle tograspthepan.Placegripping endontheedge ofpan,squeeze handle andliftpan.See"Assistance orService" toorderreplacement parts. Thecircular grillrackisdesigned forgrillingintheoven.Place the grillracksecurely onSizzle Pan,theSizzle Panontheturntable, andposition foodongrillrack.
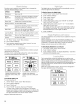
Touch "Doneness" if desired. (See "Doneness" Use" section. Display shows: Touch Screen Doneness The LCD touch screen is used to input commands. A light- to medium-pressure touch of the fingertip will activate the menu choice. However, sensitivity of the touch screen may vary, and using the tips or backs of fingernails may provide more accuracy when inputting commands. Press + button to change doneness level. LESS From the "Home" screen, touch "Cook.
TheSTART control willstartanyfunction. Ifcooking isinterrupted, touching theSTART control padwill resume thepresetcycle. Foraddedconvenience, the"Start"touchpadisalsoavailable on somedisplay screens, andprovides thesamefunction asthe START controlpad. Thenumerical pads1-5sharefunction withtheEasyMinute controls. Whenoneofthesecontrols istouched (whileno function isoperating), theovenwillbegincooking athighpower for1-5minutes, depending onwhichpadistouched.
Functions canbeselected, anddisplays canbechanged by usingthe"Hints&Settings" menu. The Night Light can be programmed when low light levels are detected. OPTION SETTING Child Lock Turn on or off. Display Brightness Set at full, or reduced or off after 2 minutes of inactivity. See "Display Brightness and Contrast" section. to automatically come on To Set the Sensor for Night Light: 1. On the "Home" screen, touch "More Choices." 2. 3. Touch "Hints & Settings." Touch "More Choices." 4.
To Activate Learning The oven must be off. Mode: 1. On the "Home" screen, touch "More Choices," 2. 3. Touch "Hints & Settings." Touch "More Choices," 4. 5. Touch "Learning Mode." Touch "On/Off" to set. 6. Touch "Finished," The Demo Mode demonstrates the features and capabilities the oven on the display screen. To Activate Repeat to deactivate Learning Mode, Demo of Mode: 1. On the "Home" screen, touch "More Choices," 2. 3. Touch "Hints & Settings." Touch "More Choices," 4.
Do Not Use Cookware and dinnerware must fit on the turntable. Always use oven mitts or pot holders when handling because any dish may become hot from heat transferred from the food. Do not use cookware and dinnerware with gold or silver trim. Use the following chart as a guide, then test before using. For Use with Grill Element MATERIAL RECOMMENDATIONS Aluminum Foil, Metal See "Aluminum Browning Dish Bottom must be at least 3/16"(5 mm) above the turntable. Follow manufacturer's recommendations.
__:_ To Use the Auto Cooking Functions: When using preset cooking powers and cook times for selected food types (Cereal, Eggs, Frozen Food, Vegetable, Grains, Meat, Poultry, and Fish), follow the "Cook" menus to select amounts and begin the auto function, See "Display/Touch Screen" section for sample programming. To Cook Manually: 1. Touch COOK TIME/POWER. 2. 3.
Popcorn is a sensor function. The sensor determines the appropriate popping time of commercially packaged microwavable popcorn. Times and cooking power have been preset for reheating specific foods, plus manual. FOOD TO BE REHEATED • Remove rectangular cooking rack before use. • Do not use regular paper bags or glassware. Dinner Plates: 1 plate* of food, 2-4 plates of food • Pop only 1 package of popcorn at a time. Beverage: 1 or 2 cups (250 or 500 mL) • Follow manufacturer's popcorn popper.
The auto defrost feature has 3 categories: Meat, Poultry and Fish. It should not be used for food left outside the freezer more than 20 minutes and frozen ready-made food. The oven can also be manually set to defrost. The oven has a baking function which uses the grill element in conjunction with the Sizzle Pan and microwaves. Times and cooking powers have been programmed for 5 baked goods settings. • Food should be 0°F (-18°C) or colder at defrosting for optimal results.
To Grill: Before using, remove rectangular cooking rack from oven. The Grill function uses 1,000-watt halogen and 500-watt quartz elements that heat quickly to grill a variety of foods. 1. Place circular grill rack securely on Sizzle Pan, and place both on the turntable. Then position food on rack. • 2. On "Home" screen, touch "Grill." 3. Select food item to be grilled or touch "Custom" (on "More Choices" screen) if grilling a food not on the menu. See "Custom Grill Chart.
To Use Simmer The Simmer function has programs for simmering rice and pasta. Use the Simmer Cook function for foods such as soups, casseroles, stews and other liquid food. Simmer is a sensor function. • Cover dish with its lid, not plastic wrap. • Do not remove lid or covering while container is in oven. The large amount of steam released will disrupt sensor settings. On "Home" screen, touch "More Choices." Touch "Simmer Cook." 3. Enter simmer time. See "Simmer Cook Chart" for instructions. 4.
Touch "Start" or START pad. If preheating is required for the food, "Preheating Pan" will appear in the display. When Sizzle Pan is preheated, 2 short tones will sound, and "Place food in pan." will appear in the display. Open door, place food in Sizzle Pan, close door and touch "Continue." The Sizzle Pan feature uses the pan to brown, crisp, and pan-fry foods in the oven. The Sizzle Pan reaches its optimal cooking temperature in approximately 3 minutes.
To Soften or Melt: 1. Place container of food on turntable. 2. On "Home" screen, touch "More Choices." 3. 4. On "More Choices" screen, touch "Soften & Melt." Select either "Soften" or "Melt." 5. Select food item to be softened or melted. 6. Enter amount. Food Poisoning Hazard Do not let food sit in oven more than one hour before or after cooking. Doneness may be adjusted at this time by touching "Doneness," and then touching "+" or "-." Preparation instructions by touching "Prepare." 7.
OVENCARE CONTROL IMPORTANT: Before cleaning, make sure all controls are off and the oven is cool. Always follow label instructions on cleaning products. Soap, water and a soft cloth or sponge are suggested first unless otherwise noted. GREASE FILTERS PANEL Do not use abrasive cleaners, steel-wool pads or gritty washcloths. Damage may occur. Unplug oven or disconnect activation. power to avoid touch screen Use gentle pressure when wiping the touch screen.
The grease filters should be removed and cleaned at least once a month. Do not operate the oven without the filters in place. The charcoal filters cannot be washed and should be replaced every 6 to 12 months. See "Assistance or Service" to reorder filters. See "General Cleaning" for cleaning instructions. To Remove: 1. 2= Remove each of the grease filters by pushing the back of the filter up, grasping the tab, and sliding the filter to the back. Pull tab down until the filter drops out.
TROUBLESHOOTING Try the solutions suggested here first in order to avoid the cost of an unnecessary service call. Turntable Nothing will operate • Has a household fuse blown or has the circuit breaker tripped? Replace the fuse or reset the circuit. • Is the appliance wired properly? See Installation Instructions provided with your oven. • rotates both directions This is normal and depends on motor rotation at the beginning of the cycle.
Quartzbulbdoesnotappearto beon • This is not unusual. See "Grill Element" section. Is the element still working properly? Place 2 slices of bread on the circular grill rack, place the rack on the turntable and close the door. Program the oven using manual or custom grill - without microwaves - for 4 minutes (see "Grill" section). The bread should toast dark brown. If the bread does not toast, call for service. See "Assistance or Service" section.
WHIRLPOOLCORPORATIONMAJORAPPLIANCEWARRANTY ONE YEAR LIMITED WARRANTY For one year from the date of purchase, when this major appliance is operated and maintained according to instructions attached to or furnished with the product, Whirlpool Corporation or Whirlpool Canada LP (hereafter "Whirlpool") will pay for FSP replacement parts and repair labor to correct defects in materials or workmanship. Service must be provided by a Whirlpool designated service company. ITEMS WHIRLPOOL WILL NOT PAY FOR 1.