
Manual
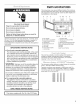

Touch Screen
The LCD touch screen is used to input commands. A light- to
medium-pressure touch of the fingertip will activate the menu
choice. However, sensitivity of the touch screen may vary, and
using the tips or backs of fingernails may provide more accuracy
when inputting commands.
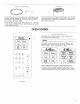
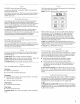
The following illustrates how the touch screen display screens
help the navigation through menus. This example shows the
display screens and selections when cooking chicken pieces.
1. From the "Home" screen, touch "Cook." Display shows:
Cook
Food
2,
3,
BACK MORE
CHOICES
k
Touch "More Choices." Display shows:
Cook
I Poultry II
Meat 1
Fish "_
ManualI
BACK
Touch "Poultry." Display shows:
Poultry
_ Breast _I Breast 1
Bonelss Bonelss
Poached PanBrown
l(c,,o,oolBone-In Tenders
BACK Ground
d
4,
Touch "Pieces, Bone-In." Use number pads to enter weight.
Display shows:
Pieces BoNE-,N
Cooks 0.5-2.0 Pounds.
l]_pounds
ENTER AMOUNT. PRESS
PREPARE, DONENESS, OR START.
BACK Start I
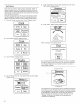
Touch "Doneness" if desired. (See "Doneness" in the "Oven
Use" section. Display shows:
Doneness
Press + button to
change doneness level.
LESS NORMAL MORE
Normal is lowest ( _
allowed for
lev_/is food.
L
BACK Start ]
6. Touch "Start." While cooking, display shows:
:37
,.._,bC°° kingrr.
tt
When cooking is over, display shows:
End
Let stand 3 minutes
covered.
Removefood or
press Warm Hold.
WarmHold ._
See "Learning Mode" section to see how to practice navigating
through the menus without turning on the microwave generator.
See "Display Brightness and Contrast" section to see how to
adjust display settings.
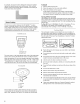
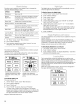
Sensing
,Reheating,,
,,-, tr
A. Progress bar
The progress bar is a visual picture of the estimated running time
of a cooking cycle. It will appear during sensor cooking functions.
The line appears below the word "Sensing," and shows progress
by the darkening of the line from the left. After the sensor is
finished sensing, the remaining cook time replaces the word
"Sensing" at the top of the display, but the progress bar
continues to be displayed.