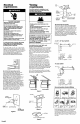
IMPORTANT: Read and save these instructions. IMPORTANT: Installer: Leave Installation Instructions with homeowner. Homeowner: Keep Installation Instructions forfuturereference. Save Installation Instructions forelectrical inspector'suse. Part No.
Before you start... Important: Observe all governing codes and ordinances. Proper installation is the installer's responsibility. A qualified technician should install this microwave oven hood. Make sure you have everything necessary for correct installation. It is the responsibility of the installer to comply with the installation clearances specified either on the mounting bracket or in the Installation Instructions. Electrical ground is required. See "Electrical requirements," Panel B.
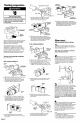
Venting requirements roof requirements Ductwork needed for Installation is not included. Wall and roof caps used must have back-draft damper. diameter _ I o°""""[-........ .un00u I , '" elbow "** 3-I/4" to round duct transition Figure If codes permit and a separate grounding wire is used, it is recommended that a qualified electrician determine that the grounding path is adequate.
Venting preparation blower u0lt exhaustports Usesidecuttersor tinsnips. blower unit mounting screws blower blower plate knockouts "A" Electrical Shock Hazard Do not pull or stretch blower wiring. Reinsed wires into clips before reinstalling blower unit into microwave oven hood. Failure to do so could result in death or serious injury. Replace screws into cabinet. Use side cutters or tin snips to cut and remove knockouts marked "A _ from blower plate. Discard knockouts.
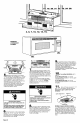
U ii 1. nli, 18. 19. 20. 21.22. 23. 24. 26. • 8.11. 17. 4. 6. 7. 10. 12. 14. 15. Numbers correspond to steps. • 25. 25. °I° o [] Determine o []i ___,_____1 e_. _ _L _ _'"'_ _ _ _ F [] Locate the wall stud closest to the [] Measure the bottom of the upper cabinet frame. Trim the edges "A', "B" and "C" on the upper cabinet template so that the template will fit on the bottom of the upper cabinet, if upper cabinet has a recessed frame, trim template so that it fits inside the recessed area.
1 2 J Roof venting: Do Not install ductwork 161 at this time. Go to Step 14. Wall venting: Install ductwork through the vent opening in the wall. Complete the venting system through the wall according to the method needed. See "Venting requirements" and "Venting preparation," Panels B and C. Use caulking to seal exterior wall opening around exhaust cap. 3. Slide 1 washer onto lock pin and set inside upper cabinet, Injury Hazard Two people are required to lift this microwave oven hood.
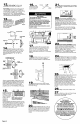
If microwave oven does not operate... • Check that the circuit breaker is not tripped or the house fuse blown. ° Check that the power supply cord is plugged into the wall receptacle. • See Use and Care Guide for troubleshooting checklist. Accessory Accessory kits kit no. 4378403 - Almond 4158439 - White 4158311 - Black Filler panel kits are available from your dealer to use when installing this microwave oven in a 36""- or 42""-wide opening, The filler panels come in pairs and each panel is 3" wide.