
Installation guide


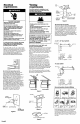


Venting preparation bloweru0lt
exhaustports
Usesidecuttersortinsnips.
Electrical Shock Hazard
Do not pull or stretch blower wiring.
Reinsed wires into clips before reinstalling
blower unit into microwave oven hood.
Failure to do so could result in death or
serious injury.
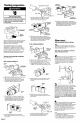
Replace screws
into cabinet.
Remove
plate.
Remove three screws that attach mounting
plate to microwave oven hood cabinet.
Remove mounting plate and set aside,
Replace screws into cabinet.
This microwave oven hood is shipped
assembled for ventless (recirculating)
installation. Adjustments must be made to
vent the hood through the wall or through
the roof. Follow the instructions for
preparing your microwave oven hood for
the type of venting method you need,
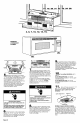
blower plate
knockouts "A"
Use side cutters or tin snips to cut and
remove knockouts marked "A _ from
blower plate. Discard knockouts.
blower unit
exhaust ports
blower
blower unit
mounting
screws
blower plate
mounting screws
g. Reattach blower plate to cabinet so
exhaust ports and blower plate openings
are aligned. Attach with the two blower
unit mounting screws and then the two
blower plate mounting screws,
blower unit
mounting
:rews
Roof-venting installation:
blower
unit
blower unit
mounting
screws
blower
blower plate
mounting screws
g. Reattach blower plate to cabinet, so
exhaust ports and blower plate openings
are aligned. Attach with the two blower
unit mounting screws and then the two
blower plate mounting screws.
Now start...
With microwave hood in kitchen.
==Put on safety glasses and gloves.
Remove shipping materials and parts from
inside microwave oven.
Slide range onto cardboard or hardboard
before moving across floor.
Ventless (recirculating) installation:
Go to "Now start,.."
Wall-venting installation:
blower
unit
blower unit
mounting screws
blower
blower
plate screws
a. Remove two blower unit mounting screws.
b. Remove two blower plate screws.
Remove the blower plate from cabinet,
c, Carefully pull the blower unit out of the
cabinet. Remove wires from clips,
r
d. Rotate blower unit end over end. Then
rotate blower unit 1/2 turn (180 °) so that
the exhaust ports face the rear of the
cabinet. Replace wires into clips at the
upper left-hand corner of blower unit.
exhaust
pods
e, Place blower unit back into cabinet.
Check that exhaust ports face the rear of
the cabinet.
Panel C
blower
plate_.
blower
plate screws
a. Remove two blower unit mounting screws.
b. Remove two blower plate screws.
Remove the blower plate from cabinet.
c, Carefully pull the blower unit out of the
cabinet. Do Not remove wires from clips.
blower
unit
d. Rotate blower unit 1/4 turn (90 °) so that
the exhaust ports face the top of the
cabinet,
exhaust
ports
e. Place blower unit back into cabinet.
Check that exhaust ports face the top of
the cabinet.
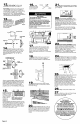
knockouts "B"
Useside
cuttersor tin
snips.
blower plate
Use side cutters or tin snips to cut and
remove knockouts marked "B" from
blower plate, Discard knockouts.
,, Disconnect and move freestanding
range out of the cabinet opening to
provide easier access to the upper cabinet
and back wall. Put a thick, protective
covering over cooktop, set-in range or
countertop to protect from damage
and diff.
3= Using a plumb line and measuring
tape, determine and clearly mark a vertical
centerline on the wall in the area the
microwave oven hood isto be installed.
Find and mark the location of all wall
stud(s) on the wall; then measure and mark
their location on the wall template, if there
are no wall studs in the area the microwave
oven hood is to be installed, consult a local
buildinginspector.Do Not offempt to install
microwave oven hood ifa wallstud cannot
be found.
Center wall template in opening by
lining up the plumb line on wall with
centerline on wall template. Make sure the
minimum width is 30 inches and that the
top of the wall template is located a
minimum of 30 inches above the cooking
surface. Securely tape or tack the wall
template to the wall.
Note:
° If cabinets ore not plumb, adjust the wall
template to the cabinets.
• If front edge of cabinet is lower than
back edge, adjust the wall template so
that it is level with the cabinet front.