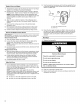
THANK YOU for purchasing this high-quality product. If you should experience a problem not covered in TROUBLESHOOTING, please visit our website at www.whirlpool.com for additional information. If you still need assistance, call us at 1-800-253-1301. In Canada, visit our website at www.whidpool.ca or call us at 1-800-807-6777. You will need your model and serial number, located on the inside wall of the refrigerator compartment.
IMPORTANT WARNING: SAFETY INSTRUCTIONS To reduce the risk of fire, electric shock, or injury when using your refrigerator, follow these basic precautions: • Plug into a grounded • Use nonflammable 3 prong outlet. • Do not use an adapter. • Do not use an extension cord. • Disconnect cleaner. • Keep flammable materials and vapors, such as gasoline, away from refrigerator. • Do not remove ground prong. • Use two or more people to move and install refrigerator.
Electrical Shock Hazard Explosion Hazard Keep flammable materials and vapors, such as gasoline, away from refrigerator. Failure to do so can result in death, explosion, or fire. To ensure proper ventilation for your refrigerator, allow for a 1/2" (1.25 cm) space at the top and behind the refrigerator. If your refrigerator has an ice maker, allow extra space at the back for the water line connections. When installing your refrigerator next to a fixed wall, leave a 33/4"(9.
. Gather therequired toolsandpartsbefore starting installation. Readandfollowtheinstructions provided withanytoolslisted here. TOOLS NEEDED: • Flat-blade screwdriver • ¼" Nut driver • 7/le" and 1/2"Open-end or two adjustable wrenches • ¼" Drill bit • Cordless drill 5. Determine the length of copper tubing you need. Measure from the connection on the rear of the refrigerator to the water pipe. Add 7 ft (2.1 m) to allow for cleaning. Use 1/4"(6.35 mm) O.D. (outside diameter) copper tubing.
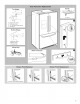
. Attach thecopper tubingtotherefrigerator witha"P"clamp. Slidetheplastic waterlineintotheretainer. All graphics referenced in the following instructions later in this section after "Final Steps." are included Remove and Replace Handles To Remove Handles: 1. Grasp the lower part of the handle firmly, slide the handle up and pull the handle straight out from the door. See Plastic Handle graphics 1 and 2. To Replace Handles: 1.
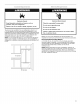
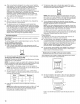
2. Replace Doors and Hinges 1= Assemble the parts for the top hinges as shown in Top Hinge graphic. Do not tighten the screws completely. 2. Replace the parts for the bottom hinge as shown in Bottom Hinge graphic. Tighten screws. Replace the refrigerator door. NOTE: Provide additional support for the refrigerator door while the hinges are being moved. Do not depend on the door gasket magnets to hold the door in place while you are working.
Fagade A. Screw \\ \\ \\\\ Bottom Hinges \\ A B C \\ \\ \\ k\\\ A. Hinge Pin Cover B, Bottom Hinge C. Hinge Screws \\ \\\ Wiring Plug Water Connection A, Loosen 4 Door Bracket Screws
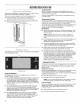
REFRIGERATOR USE There are two refrigerator compartment doors. The doors can be opened and closed either separately or together. There is a vertically-hinged seal on the left refrigerator door. • When the left side door is opened, the hinged seal automatically folds inward so that it is out of the way. • When both doors are closed, the hinged seal automatically forms a seal between the two doors. Cooling On/Off To turn cooling off, press and hold the TEMP button on the dispenser panel for 3 seconds.
NOTE: To view Celsius temperatures, press UNITS. To return the display setting to Fahrenheit press UNITS again. CONDITION: TEMPERATURE ADJUSTMENT: REFRIGERATOR too cold REFRIGERATOR Setting 1° higher REFRIGERATOR too warm REFRIGERATOR Setting 1° lower FREEZER too cold FREEZER too warm/too • Additional Settings Time and Date • FREEZER Setting 1° higher little ice If you need to keep the doors open and wish to silence the alarm for longer than 5 minutes, press RESET on the display screen.
Afterconnecting therefrigerator toawatersource, flushthe watersystem. Useasturdycontainer todepress andholdthe waterdispenser padfor5seconds, thenrelease itfor 5seconds. Repeat untilwaterbegins toflow.Oncewater begins toflow,continue depressing andreleasing the dispenser pad(5seconds on,5seconds off)foranadditional 5minutes. Thiswillflushairfromthefilterandwater dispensing system. Additional flushing mayberequired in somehouseholds. Asairiscleared fromthesystem, water mayspurtoutofthedispenser.
NOTE: When using the dispenser with the faucet rotated, do not use the water dispenser pad. Only use the water dispenser button to dispense. Dispensing by pressing the container against the water dispenser pad may result in unintentional spilling. 3. The tray can be pulled out a bit in order to better support large containers. It is designed to catch small spills and allow for easy cleaning. There is no drain in the tray.
Removing and Replacing Ice Storage Bin To Remove the Ice Storage Bin: NOTE: It is not necessary to turn off the ice maker when removing the storage bin. 1. Pull the handle to unlock the ice storage bin. 2. Hold both sides of the ice storage bin, tilt the bin forward and lift slightly to remove. To Replace the Ice Storage Bin: IMPORTANT: The ice storage bin must be locked in place for proper ice dispensing. 1. 2. Replace the ice storage bin on the door.
1. 2. 3. Unplug refrigerator or disconnect power. Hand wash, rinse, and dry removable parts and interior surfaces thoroughly. Use a clean sponge or soft cloth and a mild detergent in warm water. Wash stainless steel and painted metal exteriors with a clean sponge or soft cloth and a mild detergent in warm water.
The doors will not close completely • Door blocked open? Move food packages away from door. • Bin or shelf in the way? Push bin or shelf back into the correct position. The ice maker is not producing ice or not enough ice • Refrigerator connected to a water supply and the supply shutoff valve turned on? Connect refrigerator to water supply and turn water shutoff valve fully open. • Kink in the water source line? A kink in the line can reduce water flow. Straighten the water source line.
The water and ice dispenser will not operate properly WATERFILTERCERTIFICATIONS Refrigerator connected to a water supply and the supply shutoff valve turned on? Connect refrigerator to water supply and turn water shutoff valve fully open. State of California Department Kink in the water source line? Straighten the water source line. Water of Public Health Treatment New installation? Flush and fill the water system. See "Water and Ice Dispenser.
PRODUCTDATASHEETS Interior Water Filtration System Model UKF8001AXX-750 Capacity 750 Gallons (2839 Liters) reduction of Chlorine Taste and Odor, Particulate Class I*; and against NSF/ANSI 53 forand the certified reduction byofNSF Lead, Mercury, Atrazine, Benzene, p-Dichlorobenzene, I Standard System tested International against NSF/ANSI Standard 42 for the Carbofuran, Toxaphene, Cysts, Turb d ty, Asbestos, Tetrach oroethy one and L ndane.
Interior Water Filtration System Model UKF8001AXX-200 Capacity 200 Gallons (757 Liters) Chlorine Taste and Odor, Particulate Class I*; and against NSF/ANSI Standard 53 for the reduction of Lead, Mercury, tested Atrazine, p-Dichlorobenzene, Toxaphene, Cysts, Asbestos,of System and Benzene, certified by NSF International Carbofuran, against NSF/ANSI Standard 42 Turbidity, for the reduction O-Dichlorobenzene, Ethylbenzene, Chlorobenzene, Endrin, Tetrachloroethylene and Lindane.
WHIRLPOOL CORPORATIONMAJORAPPLIANCEWARRANTY LIM ITED WARRANTY For one year from the date of purchase, when this major appliance is operated and maintained according to instructions attached to or furnished with the product, Whirlpool Corporation or Whirlpool Canada LP (hereafter "Whirlpool") will pay for Factory Specified Parts and repair labor to correct defects in materials or workmanship that existed when this major appliance was purchased.
NousvousREMERCIONS d'avoiracheteceproduitdehautequalite. Sivousrencontrez unprobleme nonmentionne dansla sectionDI_PANNAGE, veuillez visiternotresiteWebwww.whirlpool.com pourdesinformations supplementaires. Sivousavez toujoursbesoind'assistance, veuillez noustel6phoner au1-800-253-1301. AuCanada, visiteznotresiteWebwww.whirlpool.ca outel6phonez-nous au1-800-807-6777. Vousaurezbesoindevosnum@os de modeleet des@iesituessurlaparoiinterneducompartiment derefrig@ation.
Mise au rebut de votre vieux r frig rateur Avant de jeter votre vieux r_frig_rateur • Enlever les portes. • ou cong_lateur : Laisser les tablettes en place de sorte que les enfants ne puissent pas y pen6trer facilement. Risque de suffoquer Enlever les portes de votre vieux r_frig_rateur. Le non=respect de cette instruction peut causer un d_c_s ou des I_sions c_r_brales. IMPORTANT : L'emprisonnement et I'etouffement des enfants ne sont pas un probleme du passe.
REMARQUE : II est recommande de ne pas installer le refrigerateur pres d'un four, d'un radiateur ou de toute autre source de chaleur. Ne pas installer le refrigerateur dans un endroit oQ la temperature baissera au-dessous de 55°F (13°C). / Rassembler les outils et pieces necessaires avant de commencer I'installation. Lire et suivre les instructions fournies avec les outils indiques ici.
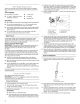
Lire toutes les instructions avant de commencer. IMPORTANT : Si on doit utiliser le refrig6rateur avant qu'il soit raccorde & la canalisation d'eau, placer la commande de la machine & gla£;ons a la position OFF (arr_t). Raccordement au r_frig_rateur 1. Retirer le capuchon de plastique de la connexion d'alimentation en eau. Placer I'ecrou en laiton et le manchon compression sur I'extremit6 du tube de cuivre. Voir I'illustration. 2.
Achever I'installation Enl_vement des portes et des charni_res IMPORTANT : • Retirer les aliments et tout balconnet ou compartiment utilitaire des portes. • Laisser les portes du refrig6rateur fermees jusqu'& ce vous soyez pr_t ales soulever de la caisse. REMARQUE : Prevoir un support additionnel des portes pendant la reinstallation des charnieres. La force d'attraction des aimants des portes ne suffit pas & les maintenir en place.
2, R_installation des portes et des charnibres 1. Assembler les pieces des charnieres superieures. Voir I'illustration de la charniere superieure. Ne pas completement serrer les vis. 2, Replacer les pieces de la charniere inferieure. Voir I'illustration de la charniere inferieure. Serrer les vis. Replacer la porte du refrigerateur. REMARQUE • Prevoir un support additionnel des portes pendant la reinstallation des charnieres.
Charni_res sup_rieures Panneau de fagade ................... A. Vis A, Vis du cache de la charniere B, Cache de la charniere superieure C. Vis de charniere a t_te hexagonale de 5/18" D. Chamiere superieure \\\ \\ Charni_res inf_rieures \\ A B C \\ \\\\ \\ \\ A, Couvercle de I'axe de la chamiere B, Charniere infedeure C. Vis de charniere \\\ \\ Fiche de branchement Raccordement d'eau A, Desserrer les 4 vis (bride de porte) 25
# # UTILISATION DU REFRIGERATEUR (__i_ _ _:_ _S __t ¸_s II y a deux portes pour le compartiment de refrig6ration. Les portes peuvent etre ouvertes et fermees separement ou ensemble. II y a sur la porte de gauche du refrigerateur un joint & charniere verticale. Pour faire passer le texte de I'ecran d'affichage de I'espagnol au fran£_ais, appuyer sur le bouton HOME (accueil) du tableau de distribution. Sur I'ecran d'affichage, appuyer sur OPCIONES, puis PRE.FERENCIAS, et enfin IDIOMA.
Appuyer sur la fleche vers le bas pour abaisser le point de reglage. • Appuyer sur MAXIMIS pour augmenter la taille du compte & rebours sur I'ecran d'affichage. Lorsque le compte rebours atteint zero, I'affichage retourne a I'ecran precedent. Appuyer sur la fleche vers le haut pour augmenter le point de reglage. REMARQUE • Pour voir les temperatures Celsius, appuyer sur UNIT¢:S. Pour ramener le reglage de I'affic.hage en degres Fahrenheit, appuyer de nouveau sur UNITES.
Entretien de I'_cran tactile Le distributeur d'eau IMPORTANT : Ne pas utiliser d'objets pointus Iorsque I'on utilise I'ecran tactile. Cela pourrait endommager I'ecran. IMPORTANT : Puiser une quantite suffisante d'eau chaque semaine pour maintenir un approvisionnement frais. Pour des renseignements "Nettoyage". L'unite d'affichage par defaut pour la distribution d'eau est en onces. Les unites peuvent _tre changees en tasses ou en litres.
Pour selectionner un nouveau volume ou selectionner & nouveau le m_me volume, il est necessaire auparavant d'achever la distribution du volume selectionn6, ou bien de desactiver la fonction Measured Fill pour la reactiver ensuite. Volumes pr_r_gl_s Le distributeur peut contenir jusqu'& trois volumes d'eau prer6gl6s pour une distribution facile dans des contenants traditionnels. Pour sauvegarder les pr6reglages, appuyer sur EAU, puis sur PREREGLAGE.
La lampe du distributeur Lorsqu'on utilise le distributeur, la lampe s'allume automatiquement. Si I'on souhaite que la lumiere soit constamment allumee, appuyer sur ECLAIRAGE sur I'ecran d'affichage pour permuter entre les reglages MARCHE et ARRI_T. Uecran d'affichage indique le mode selectionn& MARCHE • La lumiere du distributeur reste activee avec une luminosite constante. ARRI_T • La lumiere du distributeur reste eteinte, sauf Iors de la distribution d'eau ou de glace.
Apres avoir change le filtre & eau, regler de nouveau le temoin lumineux de I'etat du filtre & eau. Sur I'ecran d'affichage, appuyer sur OPTIONS, puis FILTRE A EAU, puis RI21NITIALISATION, et enfin OUI. Le temoin lumineux passe de REMPLACER (rouge) NORMAL (vert) Iorsque le systeme est reinitialis& Le filtre & eau se situe dans le coin superieur droit du compartiment de refrigeration.
# DEPANNAGE Essayer d'abord les solutions sugg_r_es ici ou visiter notre site Internet et la FAQ (foire aux questions) pour _viter le co_t d'un appel de service. Aux I_.-U., www.whirlpool.com Au Canada, www.whirlpool.
• Les commandes sont-elles correctes pour les conditions existantes? Ajuster les commandes un cran plus froid. Verifier la temperature au bout de 24 heures. Voir "Utilisation de la(des) commande(s)".
L'eau du distributeur est tilde REMARQUE : L'eau du distributeur est seulement refrig6r6e • N'a-t-on pas r_cemment distribu_ de I'eau? Le premier verre d'eau peut ne pas _tre froid. Jeter le premier verre d'eau. • Le r_frig_rateur est-il branch_ a I'arriv_e d'eau froide? S'assurer que le refrig6rateur est branche a I'arrivee d'eau froide. Voir "Specifications de I'alimentation en eau". a 50°F (10°C).
Syst me ModUle de filtration d'eau int rieur UKF8001AXX-200/Capacite : 200 gallons (757 litres) et de I'odeur du chlore, et particules (classe I*)); et en vertu de la norme NSF/ANSI 53 (reduction de plomb, mercure, benzene, p-dichlorobenzene, carbofuran, kystes, turbidite, Systeme teste et atrazine, certifie par NSF International en vertu de la norme toxaphene, NSF/ANSI 42 (reduction du goQt amiante, O-dichlorobenzene, ethylbenzene, chlorobenzene, endrine, tetrachloro6thylene, et lindane).
# GARANTIE DE GROSAPPAREILMENAGER WHIRLPOOL CORPORATION GARANTIE LIMITI_E Pendant un an & compter de la date d'achat, Iorsque ce gros appareil menager est utilise et entretenu conformement aux instructions jointes & ou fournies avec le produit, Whirlpool Corporation ou Whirlpool Canada LP (ci-apres designees "Whirlpool") paiera pour les pieces specifiees par I'usine et la main-d'oeuvre pour corriger les vices de materiaux ou de fabrication qui existaient dej& Iorsque ce gros appareil menager a ete achete