Use And Care A Note to You .................................................. 2 Oven Safety ..................................................... 3 Parts and Features 5 Using Your Oven Positioning ......................................... ............................................ 6 racks and pans ........................... Bakeware 6 ......................................... 6 foil ...................................... 7 The electronic oven control ...........................
A Note to You The Whirlpool Brand is committed to designing quality products that consistently perform for you to make your life easier. To ensure that you enjoy years of trouble-free operation, we developed this Use and Care Guide. It is full of valuable information about how to operate and maintain your appliance properly. Please read it carefully. Also, please complete and mail the Product Registration notify you about any new information on your appliance.
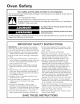
Your safety and the safety of others is very important. We have provided many important safety messages in this manual and on your appliance. Always read and obey all safety messages. This is the safety alert symbol. This symbol alerts you to hazards that can kill or hurt you and others. All safety messages will be preceded by the safety alert symbol and the word "DANGER" or "WARNING." These words mean: You will be killed or seriously injured if you don't follow instructions.
The California Safe Drinking Water and Toxic Enforcement Act requires the Governor of California to publish a list of substances known to the State of California to cause cancer, birth defects, or other reproductive harm, and requires businesses to warn of potential exposure to such substances. WARNING: This product contains a chemical known to the State of California to cause cancer, birth defects, or other reproductive harm.
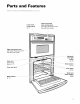
Parts and Features Upper microwave oven control panel (see Upper Microwave Oven Use and Care Guide) Lower oven control panel (p. 7) _ i!i! Upper microwave oven ..................... (see Upper Microwave Oven ........................................ Use and Care Guide) Oven vent (above oven door) (p. 17) Automatic oven light switch (p. 24) Broil element (p. 12) Oven lock latch Oven lights (p. 24) Bake element (p.
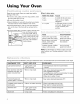
Using Your Oven iii'''I:I:_ O,_i!!!!iiii_ iiiii:il iili0 _iiii:i1_i:_ iiilii _iiiiiii '_ii__ii_ii_i''¸ii!i!_iii ,0iiiii_,_ii,il :_Ji!i_i_ _i!i:_ _ili11_ ,,_ii:iiiii iiiii:::::ii_J,i_!!!iii_J _ii_li '_iii _i!i!i;ii;_ Place the oven racks where you need them before turning on the oven. Where to place pans: WHEN YOU HAVE PLACE 1 pan In center of the oven rack. • Be sure the rack(s) is level.
ilii,J _!!!ii_ iii,i _ii_i_ili_ !!!ii:il ,iii!i_!!_:_i_i_ iiii_:iii _i_ii:i i_iii_i_i_ iiii_ii_i_i _i_i_f_ _iiiJ_ _i_ii_i'i_iii_1_ii_ iii!_':'_ o_iiiiiii • Do not line the oven bottom with any type of foil, liners, or cookware, Permanent damage will occur to the oven bottom finish, • Do not cover the entire rack with aluminum foil. Doing so will reduce air circulation and overall oven performance. Temperature pad (pp. 10, 11, 13, 15, 16) Oven setting pads (BAKE pp. 10, 11, 14, 16; CUSTOM BROIL pp.
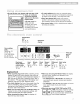
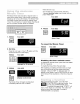
Command pads The command pads tell the oven what to do and in what order. Some command pads have an Indicator Light. The Indicator Light comes on when you press the command pad. The ON Indicator Light comes on when you press START/ENTER for an oven function. Using the control lock The control lock prevents unwanted use of the oven by disabling most of the control panel command pads (except CLOCK, TIMER SET, TIMER OFF, and LIGHT). 1.
When the time is up: ilii,ii_:_!!!i:;i_ iii_ii _i_i_i_ii 'ii_ _iiiiiiiii i11 ili'__iiii_ _:_i_!_i!_ _iii_!ii!i_ ,_C_1:;_i_i_i:_ ''_,O _i_iiiii_ iiii_C_ iii'!iJli iiilii _ii_i_i iii_ i_i,:i_l::,_ili!i_ iiil_iiiiiii ;i;_ ii_,_ilili_ _iiii _'_ You will hear four 1-second tones, then four 1-second reminder tones every minute until you press TIMER OFF. The Minute Timer does not start or stop the oven. It works like a kitchen timer. It can be set in hours and minutes up to 12 hours 59 minutes.
OFF/CANCEL will cancel any function except for the Clock and Timer Set functions. When you press OFF/CANCEL, the display will show the time of day or, if Minute Timer is also being used, the time remaining. To cancel the Minute Timer, see "Using the electronic Minute Timer" earlier in this section. NOTE: You may hear a fan blowing in the oven even after you press OFF/CANCEL This is the cooling fan. It will turn off when the oven cools to a certain temperature. 4. When roasting or cooking put food in oven.
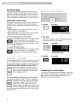
Asthecountdown ends,thesettemperature replaces"PrE"on thedisplay.Youwill alsoheara 1=second tone. YOU SEE (display shows set temperature after preheat) NOTES: ® You can change the temperature setting any time after pressing START/ENTER. ® The display will show "door" and the heating elements will not heat if the door is open when you try to bake/roast. 6. When baking, put food oven is preheated.
3. Enter the adjustment, PRESS ii!!i!!iiii_!ii;ii,,,@i;iiiiiiiiiiiiiii_ili;i;i;ii!!!iiiiiii YOU SEE (time of day) How to determine adjustment NOTES: the amount of recommends it. needed The chart below tells you how much to adjust the offset temperature to get the desired cooking results. You can determine cooking results by the amount of browning, moistness, and rising times for baked foods. 1. Place the rack where you need it.
5. PRESS YOU SEE Lower temperature settings Hetthe broiH heating eHement cycHe and show cooking resuHts. The Hower the temperature, the shower the cooking. NOTE: Fish and chicken are some foods that may cook better if you use Hower broiHing temperatures. Broiling You can change the temperature setting any time before or after pressing START/ENTER. To change the setting, see "To custom broil at a lower temperature" below.
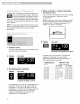
APPROXIMATE MEAT RACK POSITION TIME (MINUTES) SIDE 1 SIDE 2 14-15 15-16 18-19 7-8 8-9 9-10 Steak, 1" thick medium rare medium well done 4 Ground Meat Patties, ¾" thick, ¼ Ib well done 4 13-14 7-8 Pork Chops, 1" thick 4 20-22 10-11 Ham Slice, 4" thick, precooked 4 8-10 4-5 Frankfurters 4 5-7 3-4 Lamb Chops, 1" thick 4 14-17 8-9 3 4 17-20 11-16 17-20 11-16 8-10 16-18 4-5 8-9 Chicken bone-in pieces boneless breasts Fish 4 fillets ¼-4" thick steaks _-1" thick NOTE: Times are
NOTES: 3. Set the temperature PRESS (optional). YOU SEE (example shows Bake at 375°F) Do this step if you want to set a temperature other than 350°E Press • to raise the temperature or • to lower the temperature in 5°F amounts. Use these pads until the temperature you want shows on the small display. 4. PRESS • You can change the temperature or time settings any time after pressing START/ENTER by repeating Steps 3 or 5. You do not have to press START/ENTER.
To delay start and stop automatically: 6. PRESS YOU SEE 1. Place the oven rack(s) where you need them and put your food in the oven. To place your racks correctly, see "Positioning racks and pans" in "Using the oven" earlier in this section. 2. PRESS 7. Set the start YOU SEE time. Press the "up" (A) or "down" (V) pad(s) until the correct time shows on the display. The following example shows a chosen start time of 2 o'clock.
10. When baking/roasting is done: YOU SEE Oven vent The oven will turn off by itself and beep 4 times. You will also hear four 1-second tones every minute until you press OFF/CANCEL. NOTE: To remove the end-of-cycle tones, press and hold COOK TIME for 5 seconds. To bring back the tones, repeat this step. You will see "OFF" when the tones are turned off and "On" when they are turned on. Refer to "Using the Electronic Minute Timer," Step 3, to remove the reminder tones. 11. PRESS ....
f°Cleanin Burn Hazard Do not touch the oven during the Self-Cleaning cycle. Keep children away from oven during Self-Cleaning cycle. Do not use commercial oven cleaners in your oven. Failure to follow these instructions can result in burns, or illness from inhaling dangerous fumes. ii!!i!!!ill; iliiiii iiiiiO ¸'iiii ii:iiil; !!ifO i ;iii i il ;iii Before you start the Self-Cleaning sure cycle, make you: NOTE: DO NOT dean, move, or bend the gasket. You may get poor cHeaning, baking and roasting.
_iiii:!i_i _i,ii;!_ li,11 i: iiii_i_iiigii_ _iili_I:;!iiiiigi_ _i:i_i_ ,_i:i;: ,_Ci_, _iii_i_ !: _mii_ '_'_,O:_ !!_!:!ii_:_ 4. After the Self-Cleaning NOTE: Make sure the clock is set to the correct time of day. (See "Setting the clock" in the "Using Your Range" section.) cycle ends: YOU SEE To start cleaning immediately: 1. PRESS YOU SEE LOCKED goes off and the door unlocks. 5.
3. PRESS YOU SEE 7. After the Self-Cleaning cycle ends: YOU SEE 4. Set the start time. PRESS LOCKED goes off and the door unlocks. YOU SEE NOTE: The stop time will be the start time plus the cleaning time. [..I1o,.1 A A [x7 II l (example for 2:30 start time) Press the "up" (A) or "down" (V) pad(s) until the desired start time shows on the display. The oven will automatically come up with the stop time by adding the set cleaning time to the set start time. 5. PRESS 8.
iiil'_O "_,i_,_i_J _'_;iiiiiiiii_ _/iiii_ ,;i,i,:;_,li_;i_" ,_iii_ iii,ii _i_!_ '_i_i_'_i_ O _i!! '_''ii!,,_iiiill _i_!iiii; The Self-Cleaning cycle uses very high heat to burn away soil and grease. During the cycle, the oven gets much hotter than it does for normal baking or broiling. This high heat breaks up the soil or grease and burns it away. Your oven is automatically Cleaning cycle. preset for a 3_-hour Self- The graph below shows you what happens in a 3_hour Self-Cleaning cycle.
Caring for Your Oven Explosion Hazard Do not store flammable materials such as gasoline near this appliance. Doing so can result in death, explosion, or fire. < ii!i! iiiiiii iiiiii iiiiilii !!iiii iii!liiil;i;ii iii! ' 'lI Before cleaning, always make sure all controls are off and the oven is cool. Refer to instructions on all cleaning products before using them to clean your oven.
To replace: ii!i:iii!i!i!i!ill _ii!!ii_i_ __iiii_iii_i_lii_ _iiiiiiil;_, '_iJiiiiii _i_ !_i_i_ !iiiiiiii_iiiiiii_ !i_ii_i_ ,_iiiii_;_ ,_iiiiiiiii_ _'_i_J _iii:;!_ _iiiiii_ii _iiiii:i:iiiil _iiiiiiiii:_ ,_iiiiiilt_, _i_i_i .... 1. Fit hinge arms into slots in frame. For normal use of your oven, you do not need to remove the door. However, you can remove the oven door by following the instructions in this section. in at lower corner to ensure arms are fully engaged. Push that hinge The oven door is heavy.
!iiiii!iii!ii! The oven lights will come on when you open the oven door. 3. Remove the light bulb from its socket. Replace the bulb with a 40-watt appliance bulb. To turn the lights on or off when oven door is closed: 4. Replace the bulb clockwise. the cover by turning it • Press the oven LIGHT pad. B To replace 1. Disconnect an oven light: power. 2. Remove the glass bulb cover in the back of the oven by turning it counterclockwise. 5. Reconnect power.
Troubleshooting Most cooking problems are caused by little things you can find and fix without tools of any kind. Check the lists below and on the next page before calling for assistance or service. If you still need help, see "Requesting Assistance or Service" on page 27. PROBLEM CAUSE Nothing works • The oven is not plugged into a properly grounded live outlet with the proper voltage. (See Installation Instructions.) • You have blown a household fuse or tripped a circuit breaker.
iiiiiiiiiiii_ ii_!i;_ ii_:i_ii_ ¸¸iii _:iiii!iii_ !!i_i9 iiti'iiii_iii_ _iii:_:_ _iii!!!i; _ii!iii _i!:!iii !i!i!i_! _lliiiii_ _!!:;i; PROBLEM CAUSE The display is showing "PF" • There has been a power failure. Press OFF/CANCEL to clear the display, then reset the clock. (See page 8.) "F" followed by a number shows on the display • Press OFF/CANCEL to clear the display. If an "F" code appears again, call for service. (See "If You Need Assistance or Service" on page 27.
Requesting Assistance To avoid unnecessary service calls, please check the "Troubleshooting" the cost of a service call. If you still need help, follow the instructions Call the Whirlpool Consumer Assistance Our consultants are available to assist you. Center calling: toll free at 1-800-253-1301. When Please know the purchase date, and the complete model and serial number of your appliance (see the "A Note to You" section). This information will help Whirlpool better respond to your request.
® ui n m arra LENGTH OF WARRANTY WHIRLPOOL FULL ONE-YEAR WARRANTY FROM DATE OF PURCHASE FSP '_'replacement parts and repair labor to correct defects in materials or workmanship. Service must be provided by a Whirlpool designated service company. LiMiTED FOUR-YEAR WARRANTY SECOND- THROUGH FIFTH-YEAR FROM DATE OF PURCHASE FSP replacement magnetron tube on microwave ovens if defective in materials or workmanship. WHIRLPOOL CORPORATION CORPORATION WiLL PAY FOR WiLL NOT PAY FOR A.