ELECTRIC COMBINATION LOWER OVEN In the U.S.A., for questions about features, operation, performance, parts, accessories or service, call: 1-800-253-1301. or visit our website at... www.whirlpool.com Table of Contents MODELS 8300610 ............................................
TABLEOF CONTENTS OVEN SAFETY ............................................................................ 3 PARTS AND FEATURES ............................................................ 5 ELECTRONIC OVEN CONTROL ................................................ Display .......................................................................................... Start/Enter .................................................................................... Off/Cancel ......................................
OVENSAFETY Your safety and the safety of others are very important. We have provided many important safety messages in this manual and on your appliance. Always read and obey all safety messages. This symbol alerts you to potential hazards that can kill or hurt you and others. All follow the safety alert symbol and either the word "DANGER" or Thissafety is themessages safety alertwillsymbol. "WARNING." These words mean: You can be killed or seriously injured if you don't immediately follow instructions.
mMPORTANT SAFETY mNSTRUCTmONS For self-cleaning ovens: • Clean Only Parts Listed in Manual. • Do Not Clean Door Gasket - The door gasket is essential for a good seal. Care should be taken not to rub, damage, or move the gasket. • Do Not Use Oven Cleaners - No commercial oven cleaner or oven liner protective coating of any kind should be used in or around any part of the oven. • Before Self-Cleaning the Oven - Remove broiler pan and other utensils.
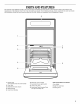
PARTSANDFEATURES This manual covers different models. The oven you have purchased may have some or all of the items listed, The locations and appearances of the features shown here may not match your model, On I-enabled products, please consult the Use and Care Guide and Installation Guide that have been provided with the Web Tablet and Integrated Home Management System, L 2 3 lilt 1. Upper Oven (see separate Use and Care Guide) 2. Oven Vent 3. Broil Element (not shown) 4. Bake Element 5.
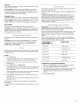
ELECTRONICOVENCONTROL 1 2 -ii 4 LOWER OVE. MICROWAVE OVEN (ADD I l _QUANTITY TIME START! V TIME I cooK _ ii TIME <. 6 o J .... I i i i 7 8 g i 10 11 12 1. Oven Setting Pads 5. Microwave Oven Controls 9. 2. 3. Temperature Pad Timer Set and Off 6. Electronic Clock Control Pad 10. Light Pad 11. Off/Cancel Pad Clock Pad 4. Electronic Display 7. 8. Hour Pad Minute Pad 12. Start/Enter Pad When power is first supplied to the appliance, "PF" will appear on the display.
All Tones All of the above tones are preset on, all except the end-of-cycle tones can be turned off. To Turn Off/On: Press and hold STOP TIME for 5 seconds. A tone will sound and "oFF" or "Snd OFF" (depending on your model) will appear on the display. Repeat to change back to "on" or "Snd On" (depending on your model). Reminder Tones Reminder tones are four 1-second tones which indicate that the set time has expired for a timer or a timed oven control function.
BAKEWARE BEFOREUSING To cook food evenly, hot air must be able to circulate. Allow 2 in. (5 cm) of space around bakeware and oven walls. Use the following chart as a guide. Odors are normal when the range is new. This happens the first time the oven is used. NUMBEROF PAN(S) POSITION ON RACK IMPORTANT: The health of some birds is extremely sensitive to the fumes given off. Exposure to the fumes may result in death to certain birds. Always move birds to another closed and well ventilated room.
Onmodels without atemperature probe, alwaysrelyonameat thermometer todetermine doneness ofmeatandpoultry. The internal temperature, notappearance, iswhatcounts. Ameat thermometer isnotsupplied withthisappliance. • Insertthethermometer intothecenterofthethickest portion ofthemeatorinnerthighorbreastofpoultry. Thetip ofthe thermometer shouldnottouchfat,boneorgristle. • Afterreading thethermometer once,pushitintothemeat 1/2 in.(1.25cm)moreandreadagain.Ifthetemperature drops,cookthemeatorpoultry longer.
BROILING Broiling usesdirectradiantheattocookfood.Changing the temperature whenCustom Broiling allowsmoreprecise control whencooking. Thelowerthetemperature, theslower the cooking. Thicker cutsandunevenly shaped pieces ofmeat, fish andpoultry maycookbetteratlowerbroiling temperatures. • Useonlythebroiler panandgridprovided withtherange. Itis designed todrainjuicesandhelpprevent spatterandsmoke. • Forproperdraining, donotcoverthegridwithfoil.The bottomofthepanmaybelinedwithaluminum foilforeasier cleaning.
To Set a DELAY START TIME: 1. Press BAKE. Press TEMP "up" or "down" arrow pad to set a temperature other than 350°F (175°C) in 5° amounts. The bake range can be set between 170°F and 500°F (75°C and 260°C). Food Poisoning Hazard Do not let food sit in oven more than one hour before or after cooking. 2. Press DELAY START TIME. 3. Press HR and MIN "up" or "down" arrow pad until the desired time of day to start appears on the display. Press START/ENTER. 4. The temperature can be changed after this step.
How the Cycle Works IMPORTANT: The heating and cooling of porcelain on steel in the oven may result in discoloring, loss of gloss, hairline cracks and popping sounds. OVENCARE The Self-Cleaning cycle uses very high temperatures, to a powdery ash. burning soil The oven is preset for a 3 hour 30 minute clean cycle, but the time can be changed. Suggested clean times are 2 hours 30 minutes for light soil and between 3 hours 30 minutes to 4 hours 30 minutes for average to heavy soil.
BROILER PAN AND GRID IMPORTANT: Before cleaning, make sure all controls are off and the oven is cool. Always follow label instructions on cleaning products. Soap, water and a soft cloth or sponge are suggested first unless otherwise noted. Do not clean in the Self-Cleaning • • Rub in direction of grain to avoid damaging. • Oven cleaner: Follow product label instructions. or Service" section to order.
For normal range use, it is not suggested to remove the oven door. However, if necessary, follow these instructions. The oven door is heavy. TROUBLESHOOTING Try the solutions suggested here first in order to avoid the cost of an unnecessary service call. To Remove: 1. Open oven door all the way. 2. Flip up the hinge latch on each side. Nothing will operate • Has a household fuse been blown or has the circuit breaker been tripped? Replace the fuse or reset the circuit.
Oven cooking results not what expected • Is the appliance level? Level the appliance. See the Installation Instructions. • Is the proper temperature set? Double-check the recipe in a reliable cookbook. • Is the proper oven temperature calibration set? See "Oven Temperature Control" section. • Was the oven preheated? See "Baking and Roasting" section. • Is the proper bakeware being used? See "Bakeware" section. • Are the racks positioned properly? See "Positioning Racks and Bakeware" section.
WHIRLPOOL ®COOKTOP,BULT-IN OVENANDRANGEWARRANTY FULL ONE-YEAR WARRANTY For one year from the date of purchase, when this appliance is operated and maintained according to instructions attached to or furnished with the product, Whirlpool Corporation will pay for FSP ® replacement parts and repair labor to correct defects in materials or workmanship. Service must be provided by a Whirlpool Corporation designated service company.